EducationSoftwareStrategy.com
StrategyCommunity

Knowledge Base

Product

Community

Knowledge Base

TopicsBrowse ArticlesDeveloper Zone

Product

Download SoftwareProduct DocumentationSecurity Hub

Education

Tutorial VideosSolution GalleryEducation courses

Community

GuidelinesGrandmastersEvents
x_social-icon_white.svglinkedin_social-icon_white.svg
Strategy logoCommunity

© Strategy Inc. All Rights Reserved.

LegalTerms of UsePrivacy Policy
  1. Home
  2. Topics

Account Management for MSTR on AWS


Community Admin

• Strategy


The Account Management page allows users to configure, manage, and share their AWS accounts from the Provisioning Console. These accounts can be used to provision environments using Strategy on AWS. AWS accounts that you have configured or that have been shared with you will be listed on the page. The accounts that are listed will be separated by region. Under each account, you will see a list of users who have access to the account. Environments that you have access to and that are using the AWS account will also be listed. This guide will give an overview of the various features of the Account Management page. It covers the following topics:
 

  • Configuring a New Account
  • Sharing an Account
  • Removing Other Users From an Account
  • Removing Yourself From an Account
  • Updating MicroStrategy on AWS Resources
  • Creating a New Environment Using an AWS Account
  • User Privileges

Configuring a New Account

If you do not have any AWS accounts configured, a message will show asking you to configure one. Below is a step-by-step guide to configure your AWS account for use with Strategy on AWS.
Prerequisites: Have an AWS account and login to it.
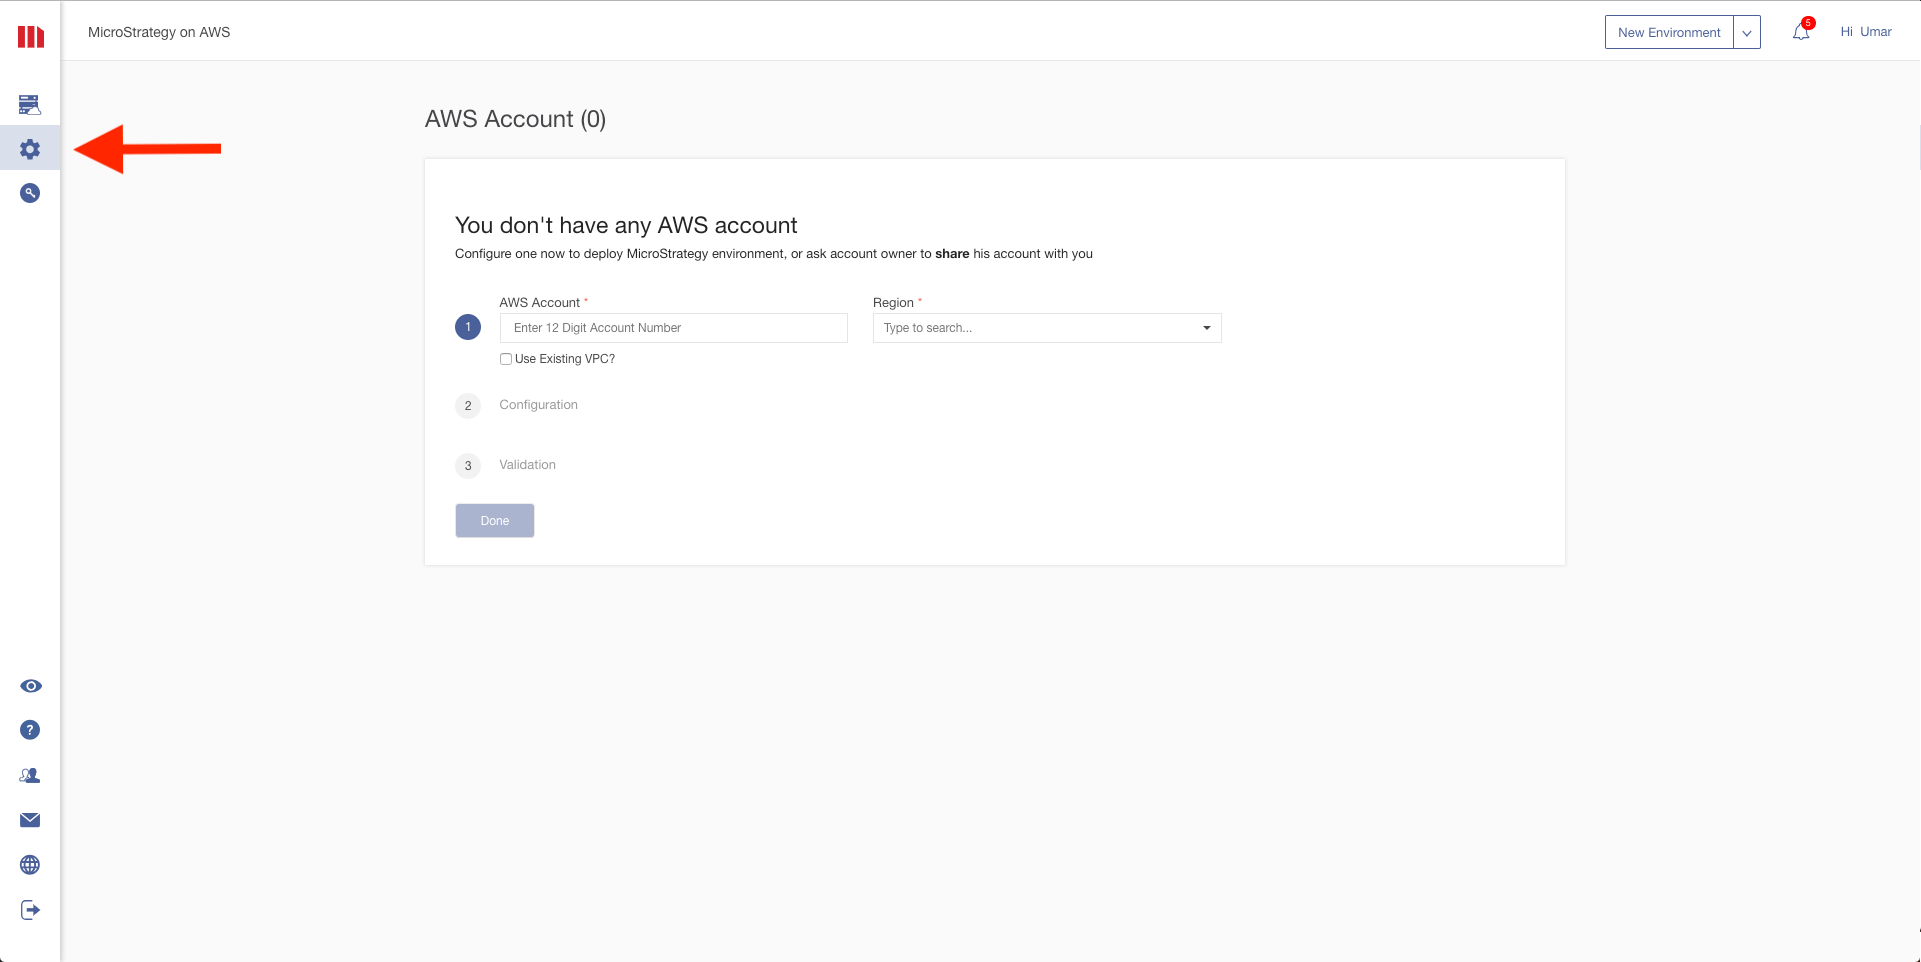
 

  • Click the Account Management button on the Menu Bar on the left. You will be take to a screen to configure your AWS Account.
ka04W000001486wQAA_0EM44000000QgOI.png
  • Enter your 12 digit AWS Account Number and select the region in which you would like to configure your account.
ka04W000001486wQAA_0EM44000000QgON.png
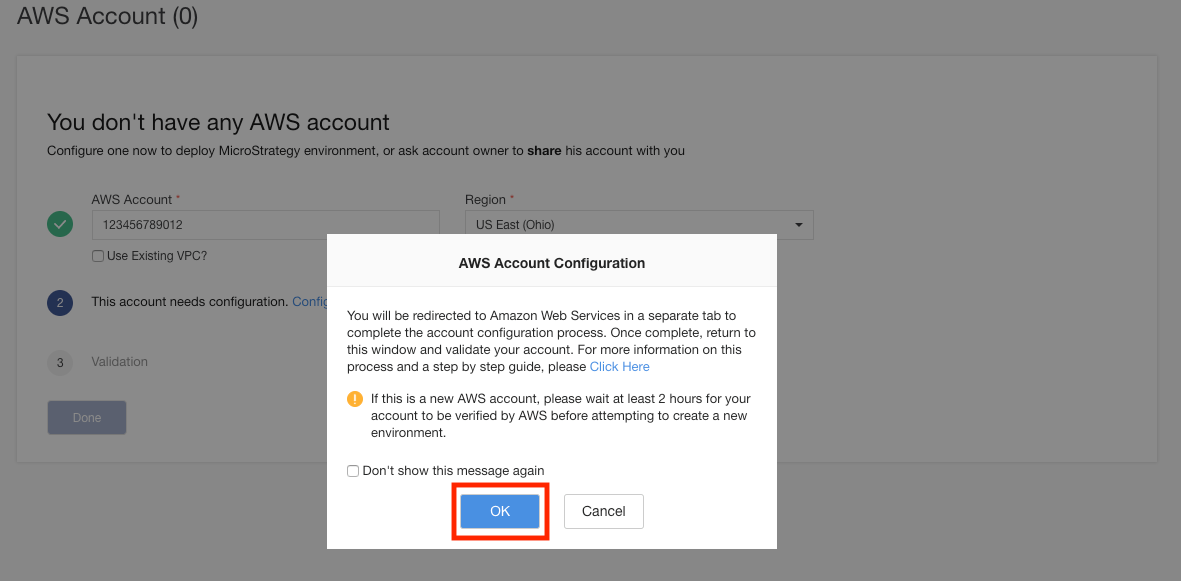
  • Next, a message will show indicating that the account needs configuration. Click the Configure link and then click OK on the subsequent popup.
ka04W000001486wQAA_0EM44000000QgOc.png
  • You will be taken to your AWS Account in a new browser window. Click Next through each screen until you get to the Review screen. At the bottom of the Review screen, select the checkbox that says "I acknowledge that AWS CloudFormation might create IAM resources with custom names." Review all the details and then click Create. AWS will begin configuring your account for use with Strategy on AWS.
ka04W000001486wQAA_0EM44000000QgOh.png
ka04W000001486wQAA_0EM44000000QgOm.png
ka04W000001486wQAA_0EM44000000QgOr.png
ka04W000001486wQAA_0EM44000000QgOw.png
  • After AWS has finished configuring the account, go back to the Provisioning Console and you will say the Configuration step has completed. The final step is to validate the configuration. Click the blue Validate link the begin validation. In the event that validation fails, you can click the blue Validate Again link to try validation again.
ka04W000001486wQAA_0EM44000000QgP1.png
ka04W000001486wQAA_0EM44000000QgP6.png
  • After validation completes, you will get a notification indicating that the account has been validated in the selected region. Click the the Done button to finish configuration.
ka04W000001486wQAA_0EM44000000QgPB.png
ka04W000001486wQAA_0EM44000000QgPG.png
  • Your AWS account has been configured! You will now see it in the Account Management page and can share it with other users.
ka04W000001486wQAA_0EM44000000QgPL.png
  • To configure additional AWS accounts, you can click the Configure New button at the top of the Account Management page and repeat steps 1-6.
ka04W000001486wQAA_0EM44000000QgPQ.png


Sharing an Account

The new Account Management now allows users to share their AWS account with others. Sharing the account allows others to use your account to provision environments with Strategy on AWS. When sharing the account, you have the option of adding an Administrator or Collaborator. An Administrator will have the ability to add and remove users from the account. A collaborator will only be able to use the account to provision environments. Take a look at the following step by step guide for an overview of account sharing:

  • To share an account, click the blue share account button next to the account.
ka04W000001486wQAA_0EM44000000QgPV.png
  • Type in the email address of the user you would like to invite and choose whether the user should be a Collaborator or Administrator, then click the Send Invitation button.
ka04W000001486wQAA_0EM44000000QgPW.png
  • While waiting for the user to respond to the invitation, the email will show as pending. You can remind the user of the invitation by clicking the Send a Reminder button.
ka04W000001486wQAA_0EM44000000QgPa.png
  • The invited user will get a notification when logged in to the Provisioning Console indicating that you would like to share an account with them. The user must click Accept to be added to the account.
ka04W000001486wQAA_0EM44000000QgPf.png
  • After accepting the invite, the invited user will see the environment on the Account Management page. If added as an Administrator, the user will see the share button and be able to invite others using the same process. If added as a Collaborator, the user will only be able to use account to provision new environments, as seen below:


Removing Other Users From an Account

Administrators are able to remove other Administrators and Collaborators from an account using the same screen that is used to add new users to an account. 

  • As an Administrator of an environment, click the blue share button next to the environment.
ka04W000001486wQAA_0EM44000000QgQ4.png
  • Hover the cursor over the user you would like to remove and click the blue "Remove" link that appears.
ka04W000001486wQAA_0EM44000000QgQ9.png
  • In the confirmation dialog that appears, click the blue Remove button to remove access for the specified user. After doing so, the user will disappear from the list and will no longer be able to use this account to provision environments.
ka04W000001486wQAA_0EM44000000QgQE.png


Removing Yourself From an Account

Administrators can also remove themselves from an account as long as they are not the last Administrator left. Collaborators can only remove themselves from an account. The guide below shows how a user can remove himself from an account:

  • Click the three dots next to the account you would like to remove yourself from.
ka04W000001486wQAA_0EM44000000QgQJ.png
  • Click the Remove Account button to remove yourself from the account. After doing so, the account will disappear from the Account Management page after refreshing and you will no longer be able to use this account to provision environments. Note: If you are the only Administrator on the account, you will be unable to click the Remove Account button.
ka04W000001486wQAA_0EM44000000QgQO.png


Updating Strategy on AWS Resources

Occasionally an update might be required for the Strategy on AWS resources on your AWS Account. If an account you have access to needs an update, you will see a message indicating so next to the account. Use the following guide to complete the update:

  • Click the yellow message that indicates your AWS account needs to be updated.
ka04W000001486wQAA_0EM44000000QgQT.png
  • In the following dialog window, click the blue Update Now button to begin the update.
ka04W000001486wQAA_0EM44000000QgQY.png
  • The window will indicate that the update is in progress. You will also receive a notification. Please wait for the update to complete.
ka04W000001486wQAA_0EM44000000QgQd.png
ka04W000001486wQAA_0EM44000000QgQi.png
  • After a few minutes, the update should complete and a confirmation window will show. You will receive another notification indicating the account and region that was updated. Click the Done button to close the window. The Strategy on AWS resources on your AWS account are now updated.
ka04W000001486wQAA_0EM44000000QgQn.png
ka04W000001486wQAA_0EM44000000QgQs.png


Creating a New Environment Using an AWS Account

All accounts that you see on the Account Management page can be used to provision environments. You can start creating a new environment from the Account Management and the AWS account and region will be pre-filled on the create environment screen.

  • If you are a Collaborator on the account, click the blue Create New Environment button. If you are an Administrator on the account, click the three dots and then click the Create New Environment button. 

    Collaborator:
     
ka04W000001486wQAA_0EM44000000QgQx.png
  • Administrator:
ka04W000001486wQAA_0EM44000000QgQZ.png
  • Select the type of environment you would like to create.
ka04W000001486wQAA_0EM44000000QgR2.png
  • Fill out the rest of the environment details and click Create Environment at the bottom. The AWS account number and region have are pre-filled for you.
ka04W000001486wQAA_0EM44000000QgR7.png
  • After the environment has finished provisioning, you will see it included under the corresponding account. Clicking on the name will take you to the environment.
ka04W000001486wQAA_0EM44000000QgRC.png
  • After clicking on the environment name from the Account Management page, you will be taken to the environment on the Environments page. If the environment is provisioned, it will automatically expand the environment details.
ka04W000001486wQAA_0EM44000000QgRH.png

Comment

0 comments

Details

Knowledge Article

Published:

August 24, 2018

Last Updated:

September 25, 2018