This section will go into detail about how to configure encrypted Client/Server Communication for non-Kerberos HiveServer2 Connections. In production systems, one should use a CA-signed SSL certificate instead of a self-signed certificate. For self-signed certificates, perform the following steps on the HiveServer2:
Note that a server secures communication using a certificate that's saved in a keystore. The client trusts that certificate using what is saved in the client's truststore. Keystore is the SSL server, truststore is the SSL client. In this case, this will be Hiveserver 2 (server / keystore) and ODBC connection(client / truststore).
Once above keys are generated, perform the following steps on HiveServer side.
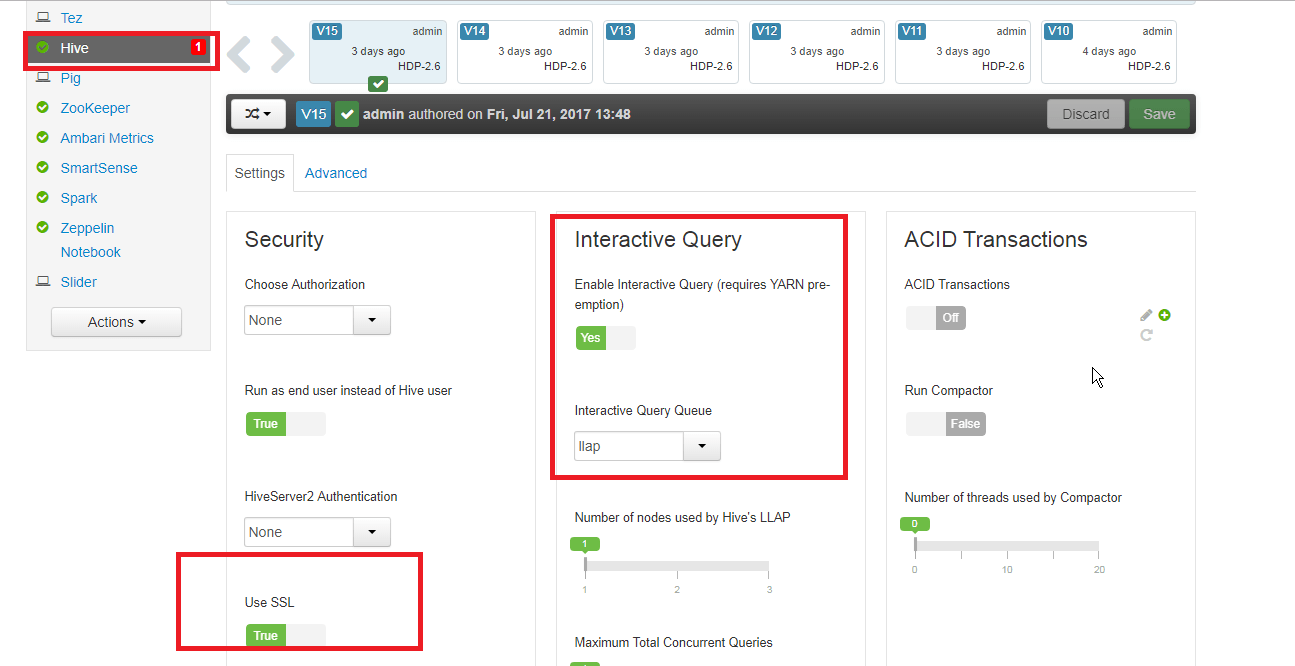
These are the 3 settings that need to be enabled on hive-site.xml:
hive.server2.use.SSL=true
hive.server2.keystore.path=/etc/security/serverKeys/hbase.jks
hive.server2.keystore.password=xxxxxxxx
To do the above, perform the following steps:
Mark “Use SSL” to be TRUE
You can also use Interactive Query or LLAP as the processing engine, although this isn’t required for SSL to work. In our setup, we have enabled LLAP/Interactive Query.
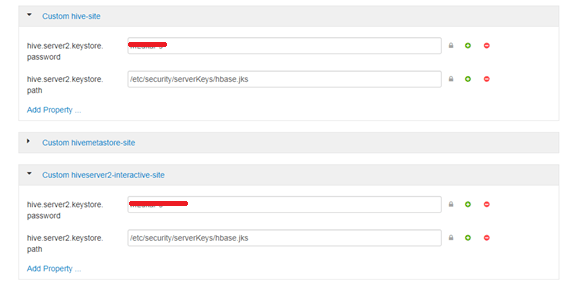
hive.server2.keystore.path=/etc/security/serverKeys/hbase.jks
hive.server2.keystore.password=xxxxxxxx
You can add them under hiveserver2-interactive-site.xml as well if your Interactive Server is enabled as part of the previous step:
beeline --verbose -u "jdbc:hive2://<hostname>:10501/default;ssl=true;sslTrustStore=/etc/security/serverKeys/hbase.jks;trustStorePassword=*******;transportMode=http;httpPath=cliservice"
Note that in Strategy Internal testing, we haven’t been able to make beeline work because of existing JIRAs restricting the capability of beeline; and unavailability of certain parameters that are part of the ODBC connection.
1. Create a new DSN using 64-bit ODBC administrator.
2. Pick Strategy Hive ODBC driver
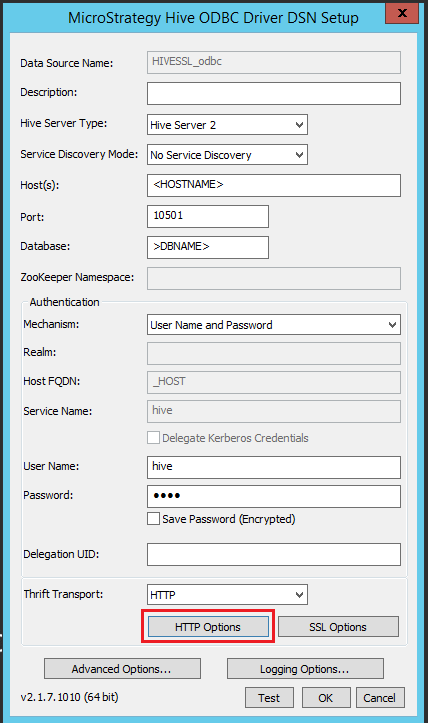
3. Click on HTTP options and add “cliservice” as the HTTP path.

4. Click on SSL options and enabled following parameters for basic self-signed SSL connection(1 way):

5. Once the above is done, click on “Test connect” on your DSN and it should pass.
You need to generate the client side certificate and private key to perform 2-way SSL. For that, refer to the vendor’s documentation and/or OpenSSL documentation. Following steps give a general guideline about how to do it using OpenSSL on the HiveServer2 machine:
shell> rm -rf newcerts
shell> mkdir newcerts && cd newcerts
# Create CA certificate
shell> openssl genrsa 2048 > ca-key.pem
shell> openssl req -new -x509 -nodes -days 3600 \
-key ca-key.pem -out ca.pem
# Create server certificate, remove passphrase, and sign it
# server-cert.pem = public key, server-key.pem = private key
shell> openssl req -newkey rsa:2048 -days 3600 \
-nodes -keyout server-key.pem -out server-req.pem
shell> openssl rsa -in server-key.pem -out server-key.pem
shell> openssl x509 -req -in server-req.pem -days 3600 \
-CA ca.pem -CAkey ca-key.pem -set_serial 01 -out server-cert.pem
# Create client certificate, remove passphrase, and sign it
# client-cert.pem = public key, client-key.pem = private key
shell> openssl req -newkey rsa:2048 -days 3600 \
-nodes -keyout client-key.pem -out client-req.pem
shell> openssl rsa -in client-key.pem -out client-key.pem
shell> openssl x509 -req -in client-req.pem -days 3600 \
-CA ca.pem -CAkey ca-key.pem -set_serial 01 -out client-cert.pem
Test the setup from ODBC Administrator:
1. Create a new DSN using 64-bit ODBC administrator.
2. Pick Strategy Hive ODBC driver, and add the following parameters as shown in the screenshots below, in addition to the regular parameters that were added as part of basic SSL
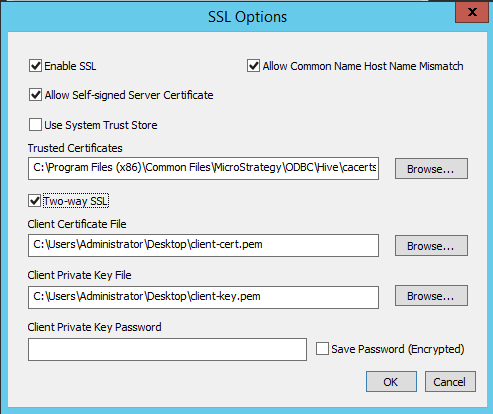
Once the above is done, click on “Test connect” on your DSN and it should pass.
Create a DSN-less connection using the Strategy Web interface, by clicking on Add External data->Hadoop->Pick your Hive Distribution. Following screenshot shows Hortonworks Hive distribution.

Connection String:
DRIVER={Strategy Hive ODBC Driver};HOST=ec2-34-206-11-242.compute-1.amazonaws.com;PORT=10501;SCHEMA=wh2;HiveServerType=2;GetTablesWithQuery=1;UseNativeQuery=1;AuthMech=3;UID=hive;PWD=hive;ThriftTransport=2;HTTPPath=cliservice;SSL=1;UseSystemTrustStore=0;CAIssuedCertNamesMismatch=1;AllowSelfSignedServerCert=1;TwoWaySSL=0
Doing the above steps will enable you to use Data Import to publish cubes.
