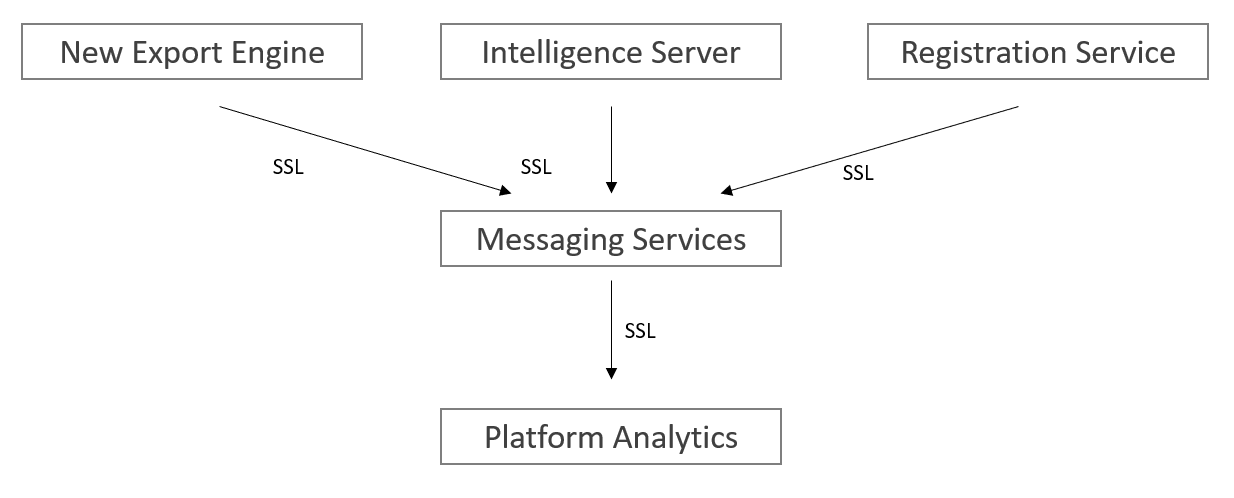
This article provides step-by-step instructions for setting up the certificates, keys, and other configurations to protect the data in transit for Platform Analytics. To ensure the security of data transfer among the Strategy Services (Messaging services, Intelligence server, Platform Analytics, New Export Engine, and Registration service), we strongly suggest you follow the instructions in this article and enable the security functions. In the Strategy 2021 Update 1 release, we have certified one way SSL between all clients and Messaging Services. Refer to the Kafka documentation to get more details about encryption and authentication of Apache Kafka using SSL.
Apache Kafka allows clients to connect over SSL. By default, SSL is disabled but can be turned on as needed.
For this article, we will create our own certificate authority (CA). When setting up a production environment, please use the certificates that are signed by a corporate CA that is trusted throughout the company. The steps below are for getting certificates from a self-signed CA. Please refer to KB484969 for more methods of generating CA certificates for development or testing usage.
The first step for deploying one or more brokers with the SSL support is to generate the key and the certificate for each machine in the cluster. You can use Java's keytool utility to accomplish this task. We will generate the key into a temporary keystore initially so that we can export and sign it later with CA.
keytool -keystore server.keystore.jks -alias {hostname} -validity {validity} -genkey -keyalg RSA -ext SAN=DNS:{FQDN},IP:{IP}
keystore: the keystore file that stores the certificate. The keystore file contains the private key of the certificate; therefore, it needs to be kept safely.
validity: the valid time of the certificate in days.
hostname: the hostname for the Kafka broker.
FQDN: the fully qualified domain name for the Kafka broker (for example, a device with the hostname
myhostin the parent domain
example.comhas the fully qualified domain name of
myhost.example.com).
IP: the IP for the Kafka broker.
For example:
>keytool -keystore server.keystore.jks -alias JQIU-CLUSTER1 -validity 1000 -keyalg RSA -genkey -ext SAN=DNS:JQIU-CLUSTER1.labs.Strategy.com,IP:10.27.18.233
Enter keystore password:
Re-enter new password:
What is your first and last name?
  [Unknown]:  jqiu
What is the name of your organizational unit?
  [Unknown]:  SR
What is the name of your organization?
  [Unknown]:  MSTR
What is the name of your City or Locality?
  [Unknown]:  HZ
What is the name of your State or Province?
  [Unknown]:  ZJ
What is the two-letter country code for this unit?
  [Unknown]:  CN
Is CN=jqiu, OU=SR, O=MSTR, L=HZ, ST=ZJ, C=CN correct?
  [no]:  yes
server.keystore.jks
keytoolis not recognized as an internal or external command, operable program, or batch file, add the JDK or JRE bin path to environment variable
PATCH, and rerun the command.
From Kafka version 2.0.0 and onwards, host name verification of servers is enabled by default for client connections, as well as inter-broker connections, to prevent man-in-the-middle attacks. Server host name verification may be disabled by setting
ssl.endpoint.identification.algorithmto an empty string in
server.properties.
If host name verification is enabled, clients will verify the server's fully qualified domain name (FQDN) against one of the following two fields:
Both fields are valid. However, RFC-2818 recommends the use of SAN. SAN is also more flexible, allowing for multiple DNS entries to be declared. Another advantage is that the CN can be set to a more meaningful value for authorization purposes. To add a SAN field, append the argument
-ext SAN=DNS:{FQDN} to the keytool command:
keytool -keystore server.keystore.jks -alias {hostname} -validity {validity} -genkey -keyalg RSA -ext SAN=DNS:{FQDN},IP:{IP}
keytool -list -v -keystore server.keystore.jks
After the first step, each machine in the cluster has a public-private key pair, and a certificate to identify the machine. The certificate, however, is unsigned, which means that an attacker can create such a certificate to pretend to be any machine.
Therefore, it is important to prevent forged certificates by signing them for each machine in the cluster. A certificate authority (CA) is responsible for signing certificates. CA works likes a government that issues passports—the government stamps (signs) each passport so that the passport becomes difficult to forge. Other governments verify the stamps to ensure the passport is authentic. Similarly, the CA signs the certificates, and the cryptography guarantees that a signed certificate is computationally difficult to forge. Thus, as long as the CA is a genuine and trusted authority, the clients have high assurance that they are connecting to the authentic machines.
Due to a bug in OpenSSL, the x509 module will not copy requested extension fields from CSRs into the final certificate. Since we want the SAN extension to be present in our certificate to enable hostname verification, we'll use the CA module instead. This requires some additional configuration to be in place before we generate our CA keypair:
C:\Program Files (x86)\Common Files\Strategy\Apache\Apache24\conf\openssl.cnfand modify a copy with the following changes:
copy_extensions = copy
string_mask=utf8onlyto
string_mask = pkix
index.txt.
serialand add
01into it. You can run command
echo 01 > serialto create this file. Ensure there are no quotes around
01.
[CA_default]in
openss.cnf, where:
certs= [certs folder path]
database= [index.txt file path]
new_certs_dir= [newcerts folder path]
serial= [serial file path]
certificate= [CA certificate file path]
private_key= [CA private key file path]
After completing these steps, you are now ready to generate your CA that will be used to sign certificates later.
openssl req -new -x509 -keyout ca-key -out ca-cert -days 1000 -config "openssl.cnf"
>openssl req -new -x509 -keyout ca-key -out ca-cert -days 1000 -config "openssl.cnf"
Generating a RSA private key
.............................................................................+++++
..............................................+++++
writing new private key to 'ca-key'
Enter PEM pass phrase:
Verifying - Enter PEM pass phrase:
-----
You are about to be asked to enter information that will be incorporated
into your certificate request.
What you are about to enter is what is called a Distinguished Name or a DN.
There are quite a few fields but you can leave some blank
For some fields there will be a default value,
If you enter '.', the field will be left blank.
-----
Country Name (2 letter code) [AU]:CN
State or Province Name (full name) [Some-State]:ZJ
Locality Name (eg, city) []:HZ
Organization Name (eg, company) [Internet Widgits Pty Ltd]:MSTR
Organizational Unit Name (eg, section) []:SR
Common Name (e.g. server FQDN or YOUR name) []:jqiu
Email Address []:email@Strategy.com
ca-key
ce-cert
The generated CA is simply a public-private key pair and certificate, and is intended to sign other certificates. The next step is to add the generated CA to the **client's truststore** so that the clients can trust this CA:
keytool -keystore client.truststore.jks -alias CARoot -import -file ca-cert.
>keytool -keystore client.truststore.jks -alias CARoot -import -file ca-cert
Enter keystore password:
Re-enter new password:
Owner: EMAILADDRESS=email@Strategy.com, CN=jqiu, OU=SR, O=MSTR, L=HZ, ST=ZJ, C=CN
Issuer: EMAILADDRESS=email@Strategy.com, CN=jqiu, OU=SR, O=MSTR, L=HZ, ST=ZJ, C=CN
Serial number: 59ae4ec7e279e572314d63c163e2a438d517f79d
Valid from: Wed Jan 27 08:48:06 GMT 2021 until: Tue Oct 24 09:48:06 BST 2023
Certificate fingerprints:
         SHA1: 92:2D:E0:65:FC:D9:FF:40:44:13:2B:AD:26:E2:4B:0C:84:86:4B:83
         SHA256: 9E:CE:1F:61:C4:43:C5:06:5C:F0:C8:02:2B:FC:ED:25:7B:99:01:24:CF:
DC:58:FF:57:58:DE:2B:38:A9:29:2D
Signature algorithm name: SHA256withRSA
Subject Public Key Algorithm: 2048-bit RSA key
Version: 3

Extensions:

#1: ObjectId: 2.5.29.35 Criticality=false
AuthorityKeyIdentifier [
KeyIdentifier [
0000: B5 3A 6E A8 D7 81 12 93   43 0F 93 EA F2 86 B8 ED  .:n.....C.......
0010: 1B 60 DA EA                                        .`..
]
]

#2: ObjectId: 2.5.29.19 Criticality=true
BasicConstraints:[
  CA:true
  PathLen:2147483647
]

#3: ObjectId: 2.5.29.14 Criticality=false
SubjectKeyIdentifier [
KeyIdentifier [
0000: B5 3A 6E A8 D7 81 12 93   43 0F 93 EA F2 86 B8 ED  .:n.....C.......
0010: 1B 60 DA EA                                        .`..
]
]

Trust this certificate? [no]:  yes
Certificate was added to keystore
ssl.client.authto be "requested" or "required" on the Kafka brokers config, then you must provide a truststore for the Kafka brokers as well and it should have all the CA certificates that clients' keys were signed by. The command is
keytool -keystore server.truststore.jks -alias CARoot -import -file ca-cert.
>keytool -keystore client.truststore.jks -alias CARoot -import -file ca-cert
Enter keystore password:
Re-enter new password:
Owner: EMAILADDRESS=email@Strategy.com, CN=jqiu, OU=SR, O=MSTR, L=HZ, ST=ZJ, C=CN
Issuer: EMAILADDRESS=email@Strategy.com, CN=jqiu, OU=SR, O=MSTR, L=HZ, ST=ZJ, C=CN
Serial number: 59ae4ec7e279e572314d63c163e2a438d517f79d
Valid from: Wed Jan 27 08:48:06 GMT 2021 until: Tue Oct 24 09:48:06 BST 2023
Certificate fingerprints:
         SHA1: 92:2D:E0:65:FC:D9:FF:40:44:13:2B:AD:26:E2:4B:0C:84:86:4B:83
         SHA256: 9E:CE:1F:61:C4:43:C5:06:5C:F0:C8:02:2B:FC:ED:25:7B:99:01:24:CF:
DC:58:FF:57:58:DE:2B:38:A9:29:2D
Signature algorithm name: SHA256withRSA
Subject Public Key Algorithm: 2048-bit RSA key
Version: 3

Extensions:

#1: ObjectId: 2.5.29.35 Criticality=false
AuthorityKeyIdentifier [
KeyIdentifier [
0000: B5 3A 6E A8 D7 81 12 93   43 0F 93 EA F2 86 B8 ED  .:n.....C.......
0010: 1B 60 DA EA                                        .`..
]
]

#2: ObjectId: 2.5.29.19 Criticality=true
BasicConstraints:[
  CA:true
  PathLen:2147483647
]

#3: ObjectId: 2.5.29.14 Criticality=false
SubjectKeyIdentifier [
KeyIdentifier [
0000: B5 3A 6E A8 D7 81 12 93   43 0F 93 EA F2 86 B8 ED  .:n.....C.......
0010: 1B 60 DA EA                                        .`..
]
]

Trust this certificate? [no]:  yes
Certificate was added to keystore
client.truststore.jks
server.truststore.jks
In contrast to the keystore in step 1 that stores each machine's own identity, the truststore of a client stores all the certificates that the client should trust. Importing a certificate into one's truststore also means trusting all certificates that are signed by that certificate. As the analogy above, trusting the government (CA) also means trusting all passports (certificates) that it has issued. This attribute is called the chain of trust, and it is particularly useful when deploying SSL on a large Kafka cluster. You can sign all certificates in the cluster with a single CA, and have all machines share the same truststore that trusts the CA. That way all machines can authenticate all other machines.
The next step is to sign all certificates generated by step 1 with the CA generated in step 2. First, you need to export the certificate from the keystore:
keytool -keystore server.keystore.jks -alias {hostname} -certreq -file cert-file -ext SAN=DNS:{FQDN},IP:{IP}
cert-file
Then sign it with the CA:
openssl ca -config "openssl.cnf" -in cert-file -out CASignedCert.crt
openssl x509 -in CASignedCert.crt -out CASignedCert.pem
keytool -keystore server.keystore.jks -alias CARoot -import -file ca-cert
keytool -keystore server.keystore.jks -alias {hostname} -import -file CASignedCert.pem
keystore: the location of the keystore
ca-cert: the certificate of the CA
ca-key: the private key of the CA
ca-password: the passphrase of the CA
cert-file: the exported, unsigned certificate of the server
cert-signed: the signed certificate of the server
Here is an example of a bash script with all the above steps. Note that one of the commands assumes a password of
test1234, so either use that password or edit the command before running it.
#!/bin/bash
#Step 1
keytool -keystore server.keystore.jks -alias {hostname} -validity {validity} -genkey -keyalg RSA -ext SAN=DNS:{FQDN},IP:{IP}
#Step 2
openssl req -new -x509 -keyout ca-key -out ca-cert -days 1000 -config "openssl.cnf"
keytool -keystore server.truststore.jks -alias CARoot -import -file ca-cert
keytool -keystore client.truststore.jks -alias CARoot -import -file ca-cert
#Step 3
keytool -keystore server.keystore.jks -alias {hostname} -certreq -file cert-file -ext SAN=DNS:{FQDN},IP:{IP}
openssl ca -config "openssl.cnf" -in cert-file -out CASignedCert.crt
openssl x509 -in CASignedCert.crt -out CASignedCert.pem
keytool -keystore server.keystore.jks -alias CARoot -import -file ca-cert
keytool -keystore server.keystore.jks -alias {hostname} -import -file CASignedCert.pem
The
listenersvalue needs to be modified to include the local machine’s FQDN, and to change
PLAINTEXTto
SSL.
listeners=PLAINTEXT://:9092
listeners=SSL://<fqdn of machine>:9092
.propertiesfile:
inter.broker.listener.name=SSL
ssl.keystore.location=/<path to>/server.keystore.jks
ssl.keystore.password=<keystore password>
ssl.key.password=<ssl key password> (may be different from keystore password depending on config)
ssl.truststore.location=/<path to>/server.truststore.jks
ssl.truststore.password=<truststore password>
ssl.client.auth=required
kafka-console-consumer, an additional file needs to be created to store SSL properties. Create a file named
client.properties(doesn’t matter where, you can put this in the Kafka or PA config folders) with the following contents:
security.protocol: SSL
ssl.truststore.location: /<path to>/client.truststore.jks
ssl.truststore.password: <truststore password>
kafka-topics) that take the
--bootstrap-serverparameter, add the following parameter to the command line:
--consumer.config /<path to>/client.properties
kafka-topicsutility only, the parameter has a different name:
--command-config /<path to>/client.properties
./kafka-console-consumer.sh --bootstrap-server Linux.labs.Strategy.com:9093 --topic Mstr.PlatformAnalytics.IsReportStats --consumer.config client.properties --from-beginning
For one-way TLS authentication, we do not need to create an extra client private certificate and key for the Intelligence Server.
The Intelligence Server reads security configurations from a JSON file. For SSL one-way TLS authentication, we need these configurations:
security.protocol: Protocol used to communicate with brokers.
plaintext,
ssl,
sasl_plaintext,
sasl_ssl.
ssl.ca.location: File or directory path to CA certificate(s) for verifying the broker's key. For Windows environment, please use double backslashes in the file directory, like
C:\\Program Files (x86)\\Common Files\\Strategy\\ca-cert
ssl.endpoint.identification.algorithm: Endpoint identification algorithm to validate broker hostname using broker certificate.
Here’s an example of the JSON file:
{
	"security.protocol": "ssl",
	"ssl.ca.location": "/ca/location/ca-cert",
	"ssl.endpoint.identification.algorithm": "https"
}
The Intelligence Server will load the file location from the register path
[HKEY_LOCAL_MACHINE\SOFTWARE\Strategy\DSS Server], with key name:
KafkaProducerSecurityConfig. You should set the key value to the JSON file location.
Other common settings (like Kafka server IP/port, max messages batched) are still available in Command Manager. For example:
ALTER SERVER CONFIGURATION ENABLEMESSAGINGSERVICES TRUE CONFIGUREMESSAGINGSERVICES "bootstrap.servers:localhost:9092/batch.num.messages:5000/queue.buffering.max.ms:2000";
The New Export Engine loads the configuration from the application.properties file. Add the following configurations to
application.propertiesand restart the New Export Engine services.
## Kafka security protocol. Default: PLAINTEXT
 security.protocol=

 ## To support ssl communication in kafka. Default: Empty value
 ssl.keystore.location=
 ssl.keystore.password=
 ssl.key.password=
 ssl.truststore.location=
 ssl.truststore.password=

 ##Validate server hostname using server certificate, Default: https
 ssl.endpoint.identification.algorithm=

 ## To support SASL_SSL, set the mechanism. Default: Empty value
 sasl.mechanism=
 sasl.username=
 sasl.password=

 ## Configuration for SASL, Default: org.apache.kafka.common.security.plain.PlainLoginModule required username=sasl.username  password=sasl.password ;
 # sasl.jaas.config=
application.properties:
security.protocol = PLAINTEXT
security.protocol = SSL
ssl.truststore.location=/var/private/ssl/client.keystore.jks(Example)
ssl.truststore.password=test1234(Example)
ssl.endpoint.identification.algorithm=none
security.protocol = SSL
ssl.keystore.location=/var/private/ssl/client.keystore.jks(Example)
ssl.keystore.password=test1234(Example)
ssl.key.password=test1234(Example)
ssl.truststore.location=/var/private/ssl/client.truststore.jks(Example)
ssl.truststore.password=test1234(Example)
ssl.endpoint.identification.algorithm=none
security.protocol = SASL_SSL
ssl.truststore.location=/var/private/ssl/client.keystore.jks(Example)
ssl.truststore.password=test1234(Example)
sasl.mechanism=PLAIN
sasl.username=mstrc(Example)
sasl.password=mstr123(Example)
Several changes need to be made to the
kafkaConsumerPropertiessection. The
bootstrap.serversvalue needs to be modified to match the
listenersvalue from the Kafka
server.propertiesfile:
bootstrap.servers: "<fqdn of kafka machine>:9092"
    security.protocol: SSL
    ssl.truststore.location: "/<path to>/client.truststore.jks"
    ssl.truststore.password: "EWY1MetXPbtedQfF909Mas8DFsUTyYZhD,ejPeWMP116Ni3cK8"
ssl.truststore.passwordis obtained by running the
platform-analytics-encryptorscript and entering the password for the truststore file, like when encrypting the warehouse password.
kafkaProducerPropertiesmust be added, with the same parameters as above added to it.
PAConsumerConfig.yaml:
---
paParentConfig:
  consumerGroupSuffix: null
  overrideKafkaOffsets: true
  kafkaTopicNumberOfReplicas: 1
  kafkaTopicsDoNotCreateList: []
  zooKeeperConnection: "127.0.0.1:2181"
  ignoreUsherTopics: false
  kafkaConsumerProperties:
    bootstrap.servers: "tec-l-013000.labs.Strategy.com:9092"
    security.protocol: SSL
    ssl.truststore.location: "/opt/MicroStrategy/PlatformAnalytics/conf/client.truststore.jks"
    ssl.truststore.password: "EWY1MetXPbtedQfF909Mas8DFsUTyYZhD,ejPeWMP116Ni3cK8"
  kafkaProducerProperties:
    security.protocol: SSL
    ssl.truststore.location: "/opt/MicroStrategy/PlatformAnalytics/conf/client.truststore.jks"
    ssl.truststore.password: "EWY1MetXPbtedQfF909Mas8DFsUTyYZhD,ejPeWMP116Ni3cK8"
paEtlConfig:
...
    ssl.keystore.location: "/<path to>/client.keystore.jks"
    ssl.keystore.password: "EWY1MetXPbtedQfF909Mas8DFsUTyYZhD,ejPeWMP116Ni3cK8"
    ssl.key.password: "EWY1MetXPbtedQfF909Mas8DFsUTyYZhD,ejPeWMP116Ni3cK8"
If SSL is enabled, we will use
application.propertiesfor Kafka producer configuration.
envinfo-collector.jar.
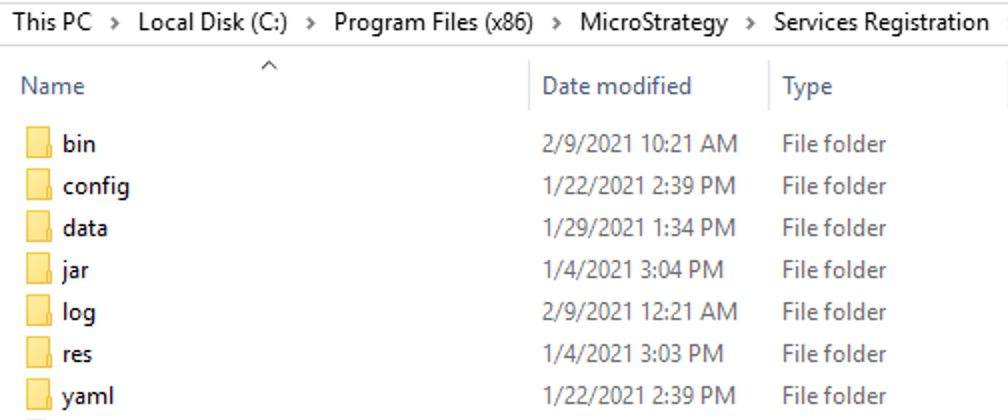
C:\Program Files (x86)\Strategy\Services Registration\jar\
[MSTR Home]/install/ServicesRegistration/jar/
Examples of
application.properties:
security.protocol=SSL

ssl.endpoint.identification.algorithm=
ssl.enabled.protocols=TLSv1.3
ssl.protocol=TLSv1.3

ssl.truststore.location=/opt/MicroStrategy/ServicesRegistration/jar/cert/client_localhost_client.truststore.jks
ssl.truststore.password=abcdefgh
application.propertiesfrom under the same directory of
envinfo-collector.jar, if it exists.
Apache-Kafka.jsonfor Telemetry service in Service Registration should also be updated with the host and port matchingthe local Kafka server settings to make Workstation Topology shows the correct service status. Please follow the steps below:
config,
jar,
yamland other folders.
C:\Program Files (x86)\Strategy\Services Registration
[MSTR Home]/install/ServicesRegistration
yamlfolder and duplicate
installation_list.yamland
mstr_services_config.yamlto a backup folder before you make the following change.
installation_list.yamland locate service
Apache-Kafka. Update port with the SSL port used by the Kafka server and then save the change. For example, if 9093 is used as SSL port, change "
Port": 9092to
"Port": 9093.
mstr_services_config.yamland locate service
Apache-Kafka. Update HostName/IP and port number in tcp command with the FQDN/IP used in Kafka server certificate SAN. For example, if only IP and FQDN are added into certificate SAN and 9093 is used as SSL port, change
"tcp": "localhost:9092"to
"tcp": "[IP address or FQDN]:9093".
/ServicesRegistration/jar.Run the following command to parse
Apache-Kafkaservice configuration:
<mstr_java_binary> -jar svcsreg-admin.jar parse Apache-Kafka
C:\Program Files (x86)\Common Files\Strategy\JRE\Win64\bin\java.exe
[MSTR Home]/install/_jre/bin/java
/ServicesRegistration/config/Apache-Kafka.jsonwill be updated with the new port and tcp command.