EducationSoftwareStrategy.com
StrategyCommunity

Knowledge Base

Product

Community

Knowledge Base

TopicsBrowse ArticlesDeveloper Zone

Product

Download SoftwareProduct DocumentationSecurity Hub

Education

Tutorial VideosSolution GalleryEducation courses

Community

GuidelinesGrandmastersEvents
x_social-icon_white.svglinkedin_social-icon_white.svg
Strategy logoCommunity

© Strategy Inc. All Rights Reserved.

LegalTerms of UsePrivacy Policy
  1. Home
  2. Topics

KB486204: How to replace Cloud Object Connector certificates in Windows


Gustavo Sulbaran

Product Specialist • MicroStrategy


This article provides steps for replacing the out-of-the-box Cloud Object Connector certificates with user provided certificates when using a Windows OS.

For security purposes, two-way SSL communication is established between the Cloud Object Connector component and Strategy Intelligence server. After installation, the keys are generated and configured ready-to-use in your environment.
However, these keys are not signed by the certificate authority and thus, some vulnerability scanning tools may flag these out-of-the-box (OOTB) keys as vulnerable. In those cases, refer to the following steps to replace the OOTB certificate with a user provided certificate.
 
1) Validate the customer provided private key and certificate file:
 

  • Let the provided private key file be named user_key.pem

Make sure the key file has the "PRIVATE_KEY" string:
 

> type user-key.pem | findstr "PRIVATE KEY"

-----BEGIN PRIVATE KEY-----

-----END PRIVATE KEY-----

  • Let the provided certificate key file be named user_cert.pem

Make sure the key file has the "CERTIFICATE" string:
 

>type user-cert.pem | findstr "CERTIFICATE"

-----BEGIN CERTIFICATE-----

-----END CERTIFICATE-----

2) Rename the private key and certificate file to match the expected file names:
 

ren user_key.pem server-key.pem

ren user_cert.pem server-cert.pem

copy server-key.pem client-key.pem

copy server-cert.pem client-cert.pem

3) Generate the KCS12 keystore:
 

openssl pkcs12 -export -name server-cert -in server-cert.pem -inkey server-key.pem -passout pass:secret -out server-keystore.p12

4) Generate the KCS12 truststore:
keytool -import -noprompt -alias client-cert -file client-cert.pem -keystore server-truststore.p12 -storetype PKCS12 -storepass secret

5) The certificate's distinguished name's common name (CN) field should match the hostname of the host running the Intelligence server and the Cloud Connector.
For example, if the name of the host running intelligence-server and cloud-connector has a hostname of env-285104laiouse1.customer.cloud.Strategy.com, the certificate's CN must be equal to env-285104laiouse1.customer.cloud.Strategy.com.
Check if this is true with the following command:
 

keytool -list -v -keystore server-keystore.p12 | findstr Owner 

 
Owner: CN=env-285104laiouse1.customer.cloud.Strategy.com, OU=Unknown, O=Unknown, L=Unknown, ST=Unknown, C=Unknown

6) Make a backup of the original certificate files into the "ootb_certificates" folder (the folder name is arbitrary):
 

cd <MSTR_Install_path>\CloudObjectConnector\key

 
mkdir ootb_certificates

copy client-cert.pem ootb_certificates

copy client-key.pem ootb_certificates

copy client-keystore.p12 ootb_certificates

copy client-truststore.p12 ootb_certificates

copy server-cert.pem  ootb_certificates

copy server-key.pem ootb_certificates

copy server-keystore.p12 ootb_certificates

copy server-truststore.p12  ootb_certificates

the <MSTR Install path> is the mstr path of installation.
7) Copy the files created in steps [1,2,3,4] into the folder, " <MSTR Install path>\MicroStrategy\CloudObjectConnector\key ":
 

copy server-key.pem <MSTR_Install_path>\CloudObjectConnector\key

copy server-cert.pem <MSTR_Install_path>\CloudObjectConnector\key

copy client-key.pem <MSTR_Install_path>\CloudObjectConnector\key

copy client-cert.pem <MSTR_Install_path>\CloudObjectConnector\key

copy server-keystore.p12 <MSTR_Install_path>\CloudObjectConnector\key

copy server-truststore.p12 <MSTR_Install_path>\CloudObjectConnector\key

the <MSTR Install path> is the mstr path of installation.
8) Replace the keystore/truststore password and alias from the file located at: <MSTR_Install_path>/CloudObjectConnector/config/application.yml
 
the <MSTR Install path> is the mstr path of installation.
 

key-alias: server-cert

key-store-password: secret

    ....

trust-store-password: secret  
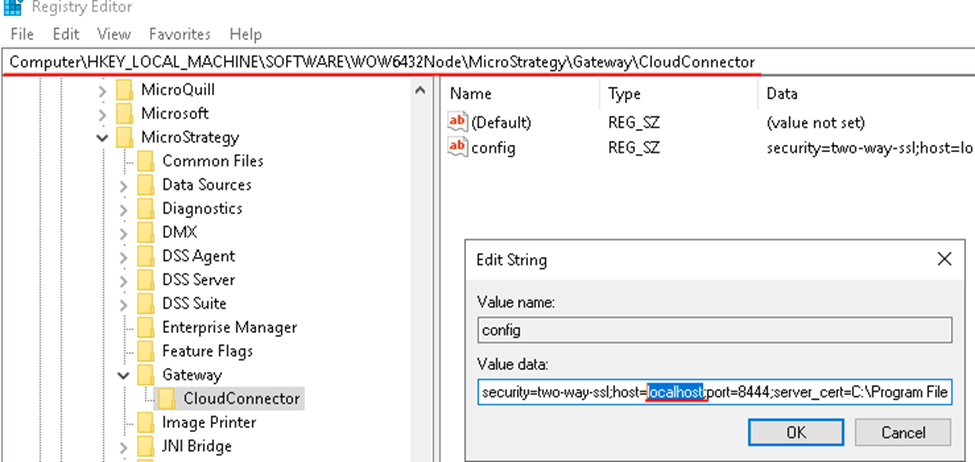
9) Update cloud-connector's hostname in the registry from windows

ka0PW0000000AQnYAM_0EMPW000002UuGX.jpeg


change host="localhost"; to host="env-285104laiouse1.customer.cloud.Strategy.com";

the content of host in the text above is for explanation purposes and must be filled with the equivalent that applies to your situation.
Registry Modification WARNING: Modifying registry values incorrectly may cause serious, system-wide problems that may require the re-installation of Microsoft Windows. Any editing of the registry is done at the user's own risk. Since these are user-initiated changes, they are not covered by any Strategy warranty. If using Microsoft Windows, the user should backup the registry and/ or update an Emergency Repair Disk prior to alterations.


Comment

0 comments

Details

Knowledge Article

Published:

December 14, 2023

Last Updated:

December 15, 2023