EducationSoftwareStrategy.com
StrategyCommunity

Knowledge Base

Product

Community

Knowledge Base

TopicsBrowse ArticlesDeveloper Zone

Product

Download SoftwareProduct DocumentationSecurity Hub

Education

Tutorial VideosSolution GalleryEducation courses

Community

GuidelinesGrandmastersEvents
x_social-icon_white.svglinkedin_social-icon_white.svg
Strategy logoCommunity

© Strategy Inc. All Rights Reserved.

LegalTerms of UsePrivacy Policy
  1. Home
  2. Topics

KB483518: How to set up Kerberos for use with SAP HANA and MicroStrategy


Community Admin

• Strategy


This article provides steps to configure Kerberos with SAP HANA.

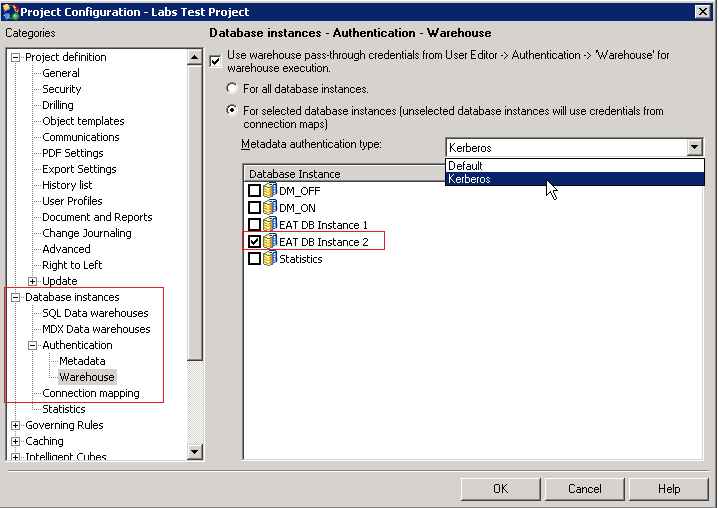
Strategy supports Single Sign-On (SSO) access to SAP HANA (using Kerberos) when the Strategy Intelligence Server resides on a Windows operating system or a Linux system. 

Configure Kerberos


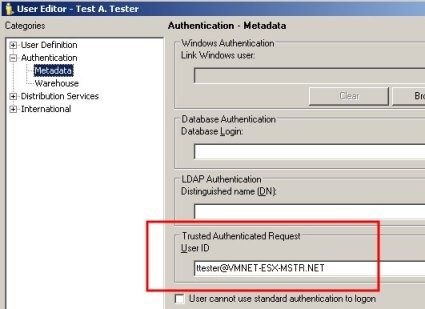
To set up Kerberos (Integrated) authentication for the Strategy Intelligence server, you must configure users in a Microsoft Windows Active Directory environment with Kerberos (Integrated) authentication to authenticate against the Intelligence server.

  1. Configure a user account.
    While configuring, uncheck the Account is sensitive and cannot be delegated checkbox. You must uncheck this because all Active Directory domain user accounts will access the Intelligence server must be defined to be delegated. 
  2. Ensure the Intelligence server machine is trusted for delegation.
    Depending on whether the Intelligence server is run as a service or as an application, perform the appropriate steps below.

Running the Intelligence Server as an Application


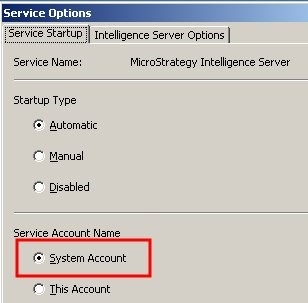
If the Strategy Intelligence Server is run as an application under a user account, the user must be created in the domain with the Account that is trusted for delegation authentication option.

  • The user account under which the Intelligence server is run should have the Service Principal name MSTRSVRSvc/MachineName:Port.
    The Service principal name can be added using the setspn.exe utility.

    For example:
    >setspn.exe -L mstrsvr_acct Registered ServicePrincipalNames for CN=Strategy Server Account,CN=Users,DC=vmnet-esx-mstr,DC=net:

    >setspn.exe -A MSTRSVRSvc/KRB901W2K3-32:34952 mstrsvr_acct Registering ServicePrincipalNames for CN=Strategy Server Account,CN=Users,DC=vmnet-esx-mstr,DC=net MSTRSVRSvc/KRB901W2K3-32:34952 Updated object

    >setspn.exe -L mstrsvr_acct Registered ServicePrincipalNames for CN=Strategy Server Account,CN=Users,DC=vmnet-esx-mstr,DC=net: MSTRSVRSvc/KRB901W2K3-32:34952

  • For the user account under which the Intelligence server is run as a service, select Trust this user for delegation to any service (Kerberos only).
ka04W000001IwyyQAC_0EM2R000000lUHW.jpeg
  • Run the Intelligence server using the MSTRSvr.exe file located in Program Files\Strategy\Intelligence Server.

Running the Intelligence Server as a Service


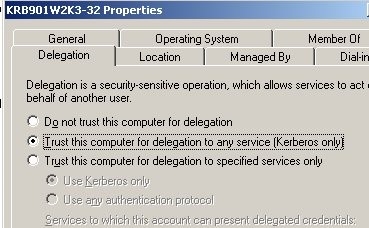
If the Strategy Intelligence server is run as a service, the host machine must be configured to be trusted for delegation. This can be configured in the domain controller by selecting the Trust computer for delegation authentication option for the Strategy Intelligence server host machine.

  • Run the Intelligence server under the Local System account on the Microsoft Windows machine.
ka04W000001IwyyQAC_0EM2R000000lUHl.jpeg
  • On the Domain Controller the Service Principal name MSTRSVRSvc/MachineName:Port should be added to the computer account as shown below:
    >setspn.exe -L KRB901W2K3-32 Registered ServicePrincipalNames for CN=KRB901W2K3-32,CN=Computers,DC=vmnet-esx-mstr,DC=net:

    >setspn.exe -A MSTRSVRSvc/KRB901W2K3-32:34952 KRB901W2K3-32 Registering ServicePrincipalNames for CN=KRB901W2K3-32,CN=Computers,DC=vmnet-esx-mstr,DC=net MSTRSVRSvc/KRB901W2K3-32:34952 Updated object

    >setspn.exe -L KRB901W2K3-32 Registered ServicePrincipalNames for CN=KRB901W2K3-32,CN=Computers,DC=vmnet-esx-mstr,DC=net: MSTRSVRSvc/KRB901W2K3-32:34952

  • Enable Trust this computer for delegation to any service (Kerberos only) on the computer account.
ka04W000001IwyyQAC_0EM2R000000lUI0.jpeg

Running the Strategy Intelligence Server on Linux

  • Ensure the Kerberos libraries are installed. In most cases, the libraries are pre-installed by the operating system.
  • Create a separate directory inside the Strategy home directory.
    #> cd Strategy

    #> mkdir krb5

    #> cd krb5

  • Create a krb5.conf file and populate the file with the following content:
    [libdefaults]	default_realm = EXAMPLE.COM	forwardable = true	noaddresses = true

    [realms]	EXAMPLE.COM =	{ kdc = kdc.example.com	admin_server = kdc.example.com	}

    [domain_realm]	.example.com = EXAMPLE.COM	example.com = EXAMPLE.COM

     
    Replace the following values:
     
    -Replace
    EXAMPLE.COM
    with the Kerberos realm.
    -Replace
    kdc.example.com
    in the [realms] section with the hostnames of the KDC and Admin server for the Kerberos realm.
    -Replace
    example.com
    and
    .example.com
    with the domain names that correspond to the Kerberos realm.
     
    Note: Although this example is provided for reference, the correct values for these parameters (within an environment) are environmentally dependent. Therefore, Strategy Support is unable to assist with the setup of the krb5.conf file.
     
  • Authenitcate into the Kerberos environment using the
     kinit<prinicpal>
    command.
  • Run the
    klist
    command to verify that a ticket was created for the krbtgt service. This is the ticket that entitles the user to get other tickets in the realm after authenticating. 
    #> kinit linuxiserver	Password for linuxiserver@EXAMPLE.COM	#> klist	Ticket cache: FILE:/tmp/krb5cc_1000

  • Verify that it is possible to manually obtain a ticket for the Intelligence Server SPN. Run the kvno command to obtain a ticket. After, run the klist command to verify that a ticket was created. The ticket should match the SPN that was configured for the I-server service on the Active Directory. Make note of the key version number returned (kvno = 2) and the ticket cache location (/tmp/krb5cc_1000).
    #> kvno MSTRSVRSvc/<hostname-fqdn>
    :34952@EXAMPLE.COM	MSTRSVRSvc/<hostname-fqdn>
    :34952@EXAMPLE.COM: kvno = 2	#> klist	Ticket cache: FILE:/tmp/krb5cc_1000 

     
    Use the following syntax for the
    addent 
    command:
     
    addent -password -p -k -e

     
    There should be two files, MSTRSVRSvc.keytab and krb5.conf, in your /MicroStrategy/krb5 directory.
  • Copy the third file, which is the ticket cache file, by entering the following command:
    #> cp /tmp/krb5cc_1000 /MicroStrategy/krb

  • Create the environment variables to point to these files. Got o your profile home directory and open the ./bashrc file using the following command:
    #> sudo vi ./bashrc

  • Enter the following lines in the file and save.
    export KRB5_CONFIG=/MicroStrategy/krb5/krb5.conf	export KRB5_KTNAME=/MicroStrategy/krb5/MSTRSVRSvc.keytab	export KRB5CCNAME=/MicroStrategy/krb5/krb5cc_1000

  • After the user accounts are configured and the server is running, a user object must be created for the user using Integrated Authentication to log into Strategy. The Integrated Authentication ID must be added for the user.
ka04W000001IwyyQAC_0EM2R000000lUJm.jpeg
  • By default, users logged into Strategy inherit permissions from the 3rd Party Users group. If the users are not in the Strategy metadata, the session is temporary, as shown below.
ka04W000001IwyyQAC_0EM2R000000lUJw.jpeg
  • Users should ensure that the Project source used for logging in through Strategy Desktop has the exact server name (lower case) as the one used for the service principal name.
  • Log into the client machine using the Kerberos user defined in SAP HANA.
  • Ensure the database login in the Database Instance is using Windows authentication.
ka04W000001IwyyQAC_0EM2R000000lUK1.jpeg
  • To use database passthrough, make sure to select the Warehouse Authentication type to Kerberos in the Project Configuration.
ka04W000001IwyyQAC_0EM2R000000lUK6.jpeg

Comment

0 comments

Details

Knowledge Article

Published:

July 29, 2019

Last Updated:

September 22, 2022