EducationSoftwareStrategy.com
StrategyCommunity

Knowledge Base

Product

Community

Knowledge Base

TopicsBrowse ArticlesDeveloper Zone

Product

Download SoftwareProduct DocumentationSecurity Hub

Education

Tutorial VideosSolution GalleryEducation courses

Community

GuidelinesGrandmastersEvents
x_social-icon_white.svglinkedin_social-icon_white.svg
Strategy logoCommunity

© Strategy Inc. All Rights Reserved.

LegalTerms of UsePrivacy Policy
  1. Home
  2. Topics

KB17457: How to hide an attribute and its elements in a report grid in MicroStrategy Developer 9.4.x - 10.x


Stefan Zepeda

Salesforce Solutions Architect • Strategy


This technical note explains how to hide certain attributes and attribute elements for presentation purposes in a report grid, in MicroStrategy Developer 9.4.x - 10.x.

SYMPTOM:
When working with a report grid in the Report Editor, it may be possible that a user would like to hide certain attributes and attribute elements for presentation purposes.
ACTION:
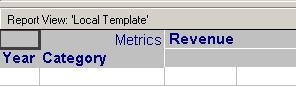
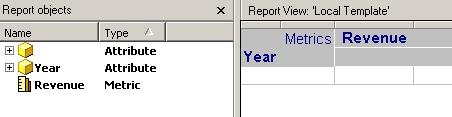
The following steps describe how to hide an attribute and its elements using a simple report in Strategy Tutorial as an example. The report contains Year, Category, and Revenue in the report grid, as illustrated below:
 

ka02R000000kaRBQAY_0EM440000002ExT.jpeg
  • Assuming that the user would like to hide the Category attribute and its elements, navigate to the Grid menu at the top of the Report Editor window and select 'Options'.
  • Click on the Columns and Rows tab and click on the 'Fixed' radio button in the Columns section.
  • From the drop down menu, select 'Category,DESC', and set the associated pixels to 0. Click OK.
ka02R000000kaRBQAY_0EM440000002ExB.jpeg
  • Notice that the header of the report changes to no longer display the Category attribute, but it maintains space allocation for the attribute name.
ka02R000000kaRBQAY_0EM440000002Ex9.jpeg
  • In order to clean up the spacing in the header, navigate to the Data menu at the top of the screen and select 'Report Data Options'.
  • From the Report Data Options menu, select Display > Alias.
  • Under the Object Alias Settings, input a space ' ' for the Category attribute Alias. Click OK.
ka02R000000kaRBQAY_0EM440000002ExH.jpeg
  • Notice that the header of the report changes to no longer display the spacing allocation for the Category attribute header. Also, having the alias for Category set to a blank causes the name in the Report Objects window to be a blank, as expected.
ka02R000000kaRBQAY_0EM440000002ExQ.jpeg
  • Run the report and notice how the data returned for the Revenue metric is still correct at the Category level, but the Category attribute name and its elements are hidden.
ka02R000000kaRBQAY_0EM440000002ExR.jpeg
  • The row height can further be adjusted to a more presentable level by going to Grid > Options and selecting the Columns and Rows tab.
ka02R000000kaRBQAY_0EM440000002ExA.jpeg
  • Select the 'Fixed Row Height' radio button from the Rows section and set the pixels to an applicable number. Click OK.
  • Notice how the report now shows correct data at the Category level without showing the Category attribute, any of its elements, and any unnecessary spacing.


ka02R000000kaRBQAY_0EM440000002ExS.jpeg

Comment

0 comments

Details

Knowledge Article

Published:

April 24, 2017

Last Updated:

April 24, 2017