EducationSoftwareStrategy.com
StrategyCommunity

Knowledge Base

Product

Community

Knowledge Base

TopicsBrowse ArticlesDeveloper Zone

Product

Download SoftwareProduct DocumentationSecurity Hub

Education

Tutorial VideosSolution GalleryEducation courses

Community

GuidelinesGrandmastersEvents
x_social-icon_white.svglinkedin_social-icon_white.svg
Strategy logoCommunity

© Strategy Inc. All Rights Reserved.

LegalTerms of UsePrivacy Policy
  1. Home
  2. Topics

KB204736: How to Set the Send Option to “Link to history list in email” as the Default and Remove other Options when Creating Email Subscriptions from the Subscriptions Page Using MicroStrategy Web SDK


Community Admin

• Strategy


How to Set the Send Option to “Link to history list in email” as the Default and Remove other Options when Creating Email Subscriptions from the Subscriptions Page Using MicroStrategy Web SDK

There are two parts to this customization.

Part 1: Set the Link to history list in email Send Option as the Default Selection

Before Customization:
Data in email is selected by default for the Send: value, as shown below.
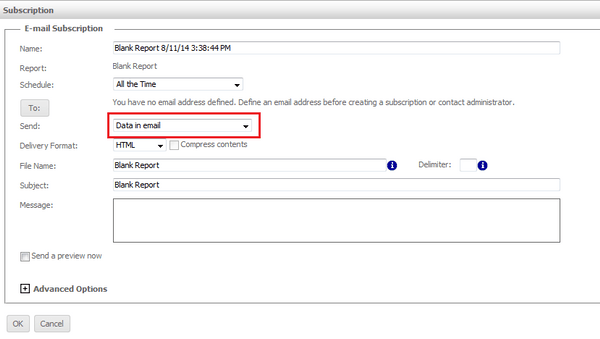
ka04W00000148YCQAY_0EM440000002GTB.jpeg

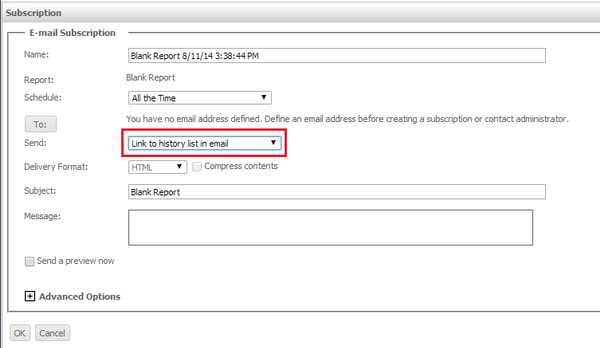
After Customization:

ka04W00000148YCQAY_0EM440000002GTM.jpeg
  1. Open the Web Customization Editor.
  2. Create a new plug-in and give it a meaningful name. For step-by-step instructions on creating a new plug-in, please navigate to Home > Web SDK > Customizing Strategy Web > Web Customization Editor > Features and Customizable.
  3. Inside the Application Settings view, click Strategy Web Configuration to expand the hierarchical tree. The expanded list comprises the different settings that can be modified to perform customizations.
  4. Navigate to Strategy Web Configuration > Pages.
  5. Right click ncEditSubs (Edit Narrowcast Email Subscriptions) and choose Create New Add-on.
  6. Click the Browse button next to the Source folder field and choose the src folder under the Strategy project, and click OK.
  7. Enter the following information for the rest of the text fields:
    Package: Any package the developer wants to use
    Name: Any name for the class
    Add-on Description: This addon will set the Link to history list in email as the default option.
  8. Select the Add custom logic before fetching data from Intelligence Server (preCollectData) checkbox.
  9. Click Next.
  10. Click Finish. The Java class opens in the editor.
  11. Make sure to include the following required import statements:
    
    import com.Strategy.web.app.addons.AbstractAppAddOn;
    import com.Strategy.web.app.beans.PageComponent;
    import com.Strategy.web.beans.SubscriptionBean;
    import com.Strategy.web.beans.WebBeanException;
    import com.Strategy.web.objects.WebSubscription;
    import com.Strategy.web.objects.WebSubscriptionDeliveryModeEmailProperties;

  12. Modify the preCollectData method to include the following code:
    
    //This will set the Send Option to "Link to history list email" as the default selection
    
    SubscriptionBean sb = (SubscriptionBean) page.getChildByClass(SubscriptionBean.class); 
            if(sb==null)return; 
    
            WebSubscription ws; 
            try { 
                    ws = sb.getSubscription(); 
                    WebSubscriptionDeliveryModeEmailProperties prop = (WebSubscriptionDeliveryModeEmailProperties) ws.getDeliveryMode();
            setIncludeLink(true);
                    prop.setSendToInbox(true);
                    prop.setIncludeData(false);
            } catch (WebBeanException e) {
                    e.printStackTrace();
            }
    return;

  13. Save your changes.
  14. Navigate to Strategy Web Configuration > Pages.
  15. Double-click ncEditSubs (Edit Narrowcast Email Subscriptions) to open the Properties Page Editor.
  16. Select the Add-on Properties tab at the bottom of the editor. Make sure the custom add-on has been added to the add-ons list.
  17. Restart the Web server to take advantage of the new changes.

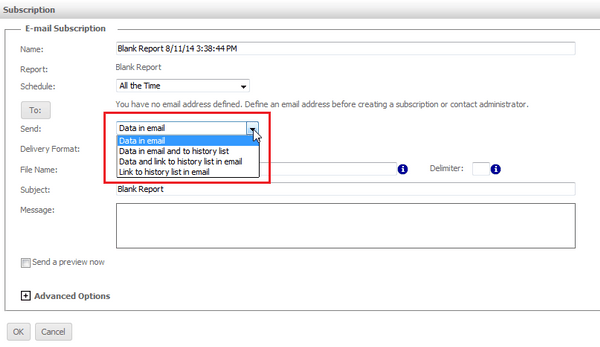
Part 2: Remove Other Send Options from the Drop-Down

Before Customization:

ka04W00000148YCQAY_0EM440000002GTD.jpeg

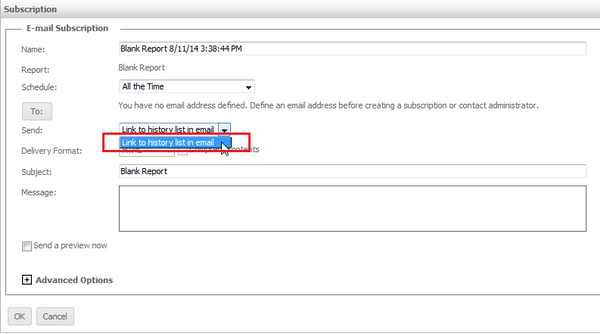
After Customization:

ka04W00000148YCQAY_0EM440000002GTG.jpeg
  1. Open the Web Customization Editor.
  2. Developers can use the same plugin created in Part 1 of this customization.
  3. Inside the Application Settings view, click Strategy Web Configuration to expand the hierarchical tree. The expanded list comprises the different settings that can be modified to perform customizations.
  4. Right-mouse Styles and choose Create Transform to launch the Transform Creation wizard.
  5. Click the Browse button next to the Source folder field and choose the src folder under the Strategy project, and click OK.
  6. Enter the following information for the rest of the text fields:
    Package: Any package the client wants to use
    Name: Any name for the class
    Transform description: This transform removes options from the Send drop-down.
    Superclass: com.Strategy.web.app.transforms.SubscriptionEditTransform
  7. Click Next.
  8. Select the renderSchedulePane (MarkupOutput out) checkbox and click Next.
  9. Click Finish. Your custom class opens in the editor.
  10. Make sure to include the following required import statements:
    
    import com.Strategy.web.app.transforms.SubscriptionEditTransform;
    import com.Strategy.web.beans.MarkupOutput;
    import com.Strategy.web.beans.WebBeanFactory;

  11. Add the following code to the renderSchedulePane method:
    
        	MarkupOutput newOutput = WebBeanFactory.getInstance().newMarkupOutput();
    /** Rendering the out of the box markup for this Schedule Pane
           * as the remaining code will be editing the MarkupOutput object
           * and not recreating the object.  The markup will be placed in a
           * method Markup object so the user will not see the original Schedule Pane
           */
    
    
    super.renderSchedulePane(newOutput);
         
         
          /** The following code was meant for version 9.4.1
           * If for future versions, this code no longer works, uncomment the line below,
           * this will output the Markupoutput to the console to see what "options" are created
           * for the "Send:" drop down values.  Copy and paste the new option values in string replace
           * statements below.
           */
          //System.out.println("Original Output = " + newOutput.getCopyAsString());
         
         
          // Creating a String version of the markup in order to manipulate the object
          String newOutputString = newOutput.getCopyAsString();
         
          // Removing the Data in Email option
          newOutputString = newOutputString.replace("<option value=\"0,0,1\">Data in email</option>", "");
         
          // Removing the Data in email and to history list
          newOutputString = newOutputString.replace("<option value=\"0,1,1\">Data in email and to history list</option>", "");
         
          // Removing the Data and link to history list in email
          newOutputString = newOutputString.replace("<option value=\"1,1,1\">Data and link to history list in email</option>", "");
         
          // Rendering the new MarkupOutput object to be displayed to the end user
          // out is the MarkupOutput parameter provided by the render method that this class extends
          out.append(newOutputString);
    
          return ;

    Based on the default method statements, arg0 is used instead of out, which results in a compilation error in part 2. If you decide to use the above code, you must modify the renderSchedulePane method as shown below.
    
        public void renderSchedulePane(com.Strategy.web.beans.MarkupOutput out) {
            MarkupOutput newOutput = WebBeanFactory.getInstance().newMarkupOutput();

  12. Save your changes.
  13. Navigate to Strategy Web Configuration >
  14. Double-click NCEditSubscriptionStyle.
  15. Click the Change button for Transform: SubscriptionEditTransform. Change it to the new transform you previously created.
  16. Save your changes.
  17. Restart the Web server to apply the changes.

The example provided in this document is provided “as-is” to the user and assumes that the user:

  • Can program, compile (e.g. javac, jikes, etc.), and execute Java programs
  • Can configure environment variables (e.g. JAR files, property files, etc.)
  • Have all the necessary tools to create Java applications (JDK, IDE, etc.)
  • Has access to the Strategy SDK documentation.
  • Has read the customization warning at the bottom of this document

Prerequisites

For the sample to work, the Strategy Web JAR files must be accessible by the Java Runtime Environment. The Strategy Web JAR files can be found under:

  • Strategy Web Universal (JSP): {web_root}/WEB-INF/lib directory.
  • Strategy Web (.NET): Program Files\Common Files\Strategy directory.

More elaborate programs require additional library files, which is out of the scope of this document.

Additional Information

The Strategy SDK allows you to customize the standard Strategy Web interface, and extend and integrate the Strategy business intelligence functionality into other applications. However, before changing the way Strategy Web products look or behave, it is helpful to understand how the application is built. For more information regarding the Strategy Web architecture or the process of customizing Strategy Web, please refer to Strategy Developer Zone (https://community.strategy.com/topic/0TO44000000FliLGAS/sdk).
To access the Strategy Developer Zone, you must have access to the Strategy Knowledge Base, you must have purchased the Strategy SDK, and you must be current on your Strategy maintenance agreement. If you are a US-based business and believe that you satisfy all three of these conditions but you do not have access to the Strategy Developer Zone, please contact Strategy Technical Support at support@microstrategy.com or at (703) 848-8700. If you are an international business, please contact Strategy Technical Support at the appropriate email address or phone number found at https://www.microstrategy.com/en/support/contact-support.

Customization Warning

This customization is provided as a convenience to Strategy users and is only directly applicable to the version stated. While this code may apply to other releases directly, Strategy Technical Support makes no guarantees that the code provided will apply to any future or previous builds. In the event of a code change in future builds, Strategy Technical Support makes no guarantee that an updated version of this particular customization will be provided. In the event of a code change in future builds, Strategy may not be able to provide additional code on this matter even though this customization is provided at this time for this specific build. For enhancements to this customization or to incorporate similar functionality into other versions, contact your Account Executive to inquire about Strategy Consulting assistance.


Comment

0 comments

Details

Knowledge Article

Published:

June 8, 2017

Last Updated:

March 17, 2020