EducationSoftwareStrategy.com
StrategyCommunity

Knowledge Base

Product

Community

Knowledge Base

TopicsBrowse ArticlesDeveloper Zone

Product

Download SoftwareProduct DocumentationSecurity Hub

Education

Tutorial VideosSolution GalleryEducation courses

Community

GuidelinesGrandmastersEvents
x_social-icon_white.svglinkedin_social-icon_white.svg
Strategy logoCommunity

© Strategy Inc. All Rights Reserved.

LegalTerms of UsePrivacy Policy
  1. Home
  2. Topics

KB20800: How to determine tables created from datamart reports with Enterprise Manager 9.4.x-10.x


Community Admin

• Strategy


This document describes how to trace datamart tables and users who created them using an example on MicroStrategy Tutorial

Usually, Enterprise Manager is able to collect Statistics on jobs executed on the monitored projects and tables hits.
 
However tracing datamart tables and users who created them is not a trivial task. This document describes how to implement this solution using an example on Strategy Tutorial:
 
ACTION:
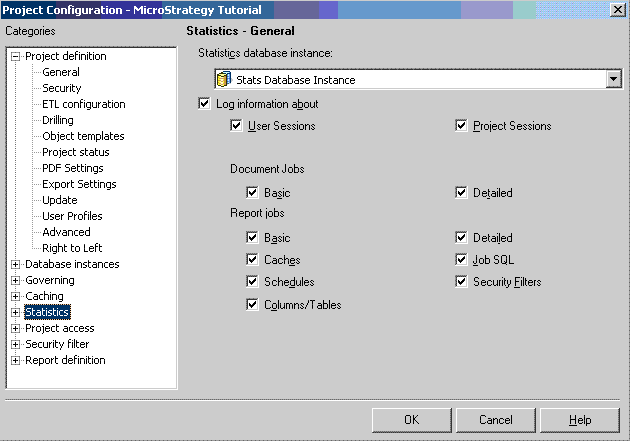
 

  • In order to be able to collect information regarding datamart reports the following Statistics within the Project configuration need to be enabled:
    • Report Jobs
    • Basic
    • Job SQL
ka04W000000OhkfQAC_0EM440000002EX0.gif
  • Once collected, a Dataload should be executed to get the latest update from the Enterprise Manager side in order to update the warehouse of the enterprise manager project itself.
     
  • On the Enterprise Manager project create a new attribute that would show the user the name of the tables created by datamart reports.
     
  • To accomplish this duplicate a pre-existing attribute: ‘Report Job SQL Pass’ (Located in the Report Job folder). Name the new attribute “TABLES CREATED”.
     
ka04W000000OhkfQAC_0EM440000002EWf.gif
  • Create a new report, drag and drop the following attributes to the Report Objects window:
    • Report Job
    • Datamart indicator
    • Tables Created
       
  • This report will show Regular reports and datamart reports.
     
  • Create a new filter on "Datamart indicator" attribute, qualify on "elements and operator in list" using the DATAMART REPORT attribute previously created, and apply this filter to the report.
     
  • At this point the report will show all datamart reports and the SQL that is being executed against the WH.
     
  • Add ‘Report Job SQL Pass Type’ into the local filter of the report (Qualify on Elements in list: CLEANUP TEMP RESOURCES).
     
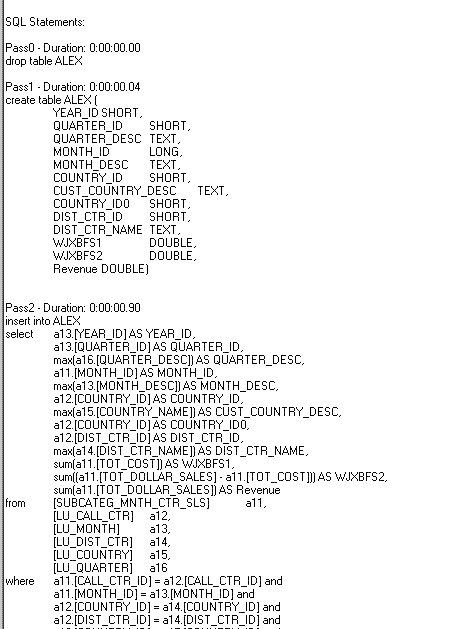
  • This is necessary because at the beginning of the SQL that is executed for a datamart report the table that is going to be created are purged, as shown in the following example:
     
ka04W000000OhkfQAC_0EM440000002EWx.gif
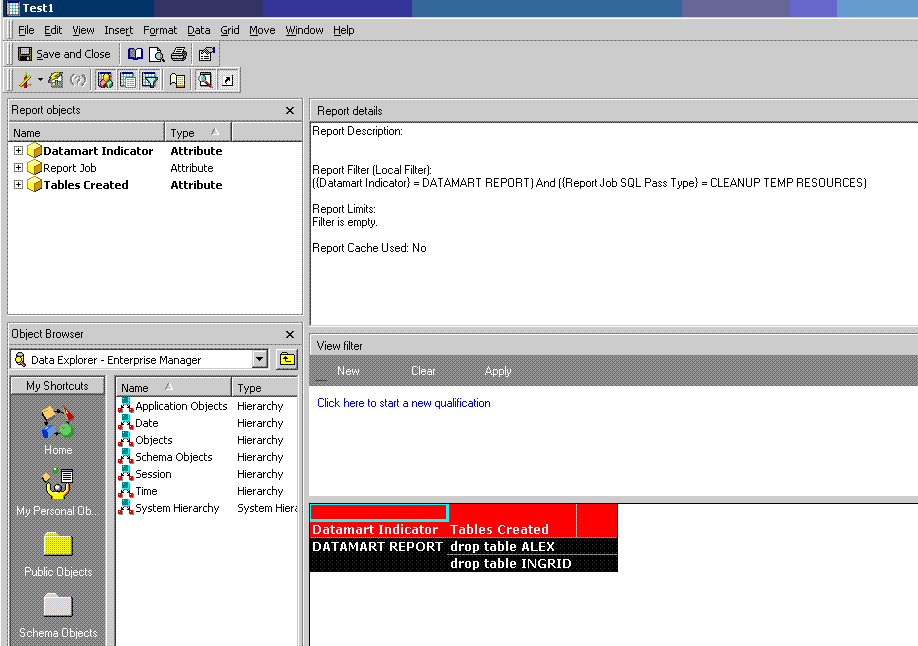
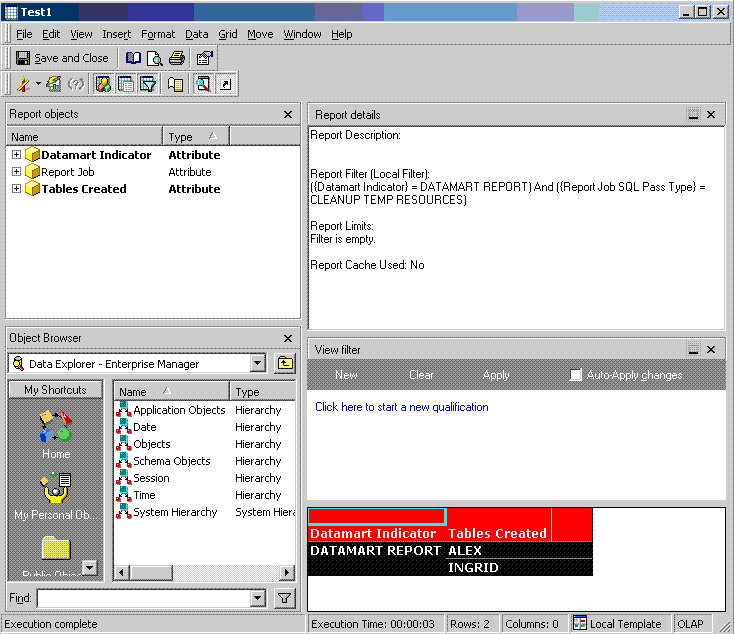
  • To test the report two example Datamart tables has previously been created ( ALEX and INGRID ) as example and the dataload being executed. When the Enterprise Manager report is executed at this stage, the result will appear as in the following picture:
     
ka04W000000OhkfQAC_0EM440000002EWy.gif
  • In order to eliminate the “drop table” tags from the reports:
     
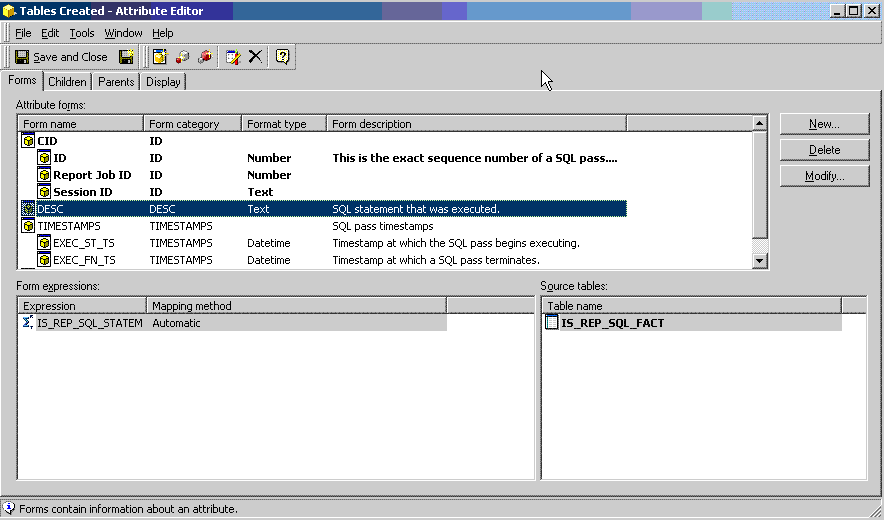
  • On the report editor, edit the TABLES CREATED attribute.
     
  • Click on DESC and Modify.
     
ka04W000000OhkfQAC_0EM440000002EWg.gif
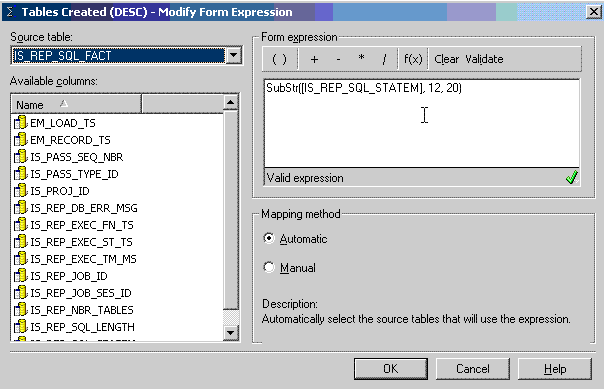
  • Click on Modify again:
     
ka04W000000OhkfQAC_0EM440000002EWg.gif
  • In order to eliminate the “drop table” string the form definition needs to be passed to the warehouse using a function that cuts the first 10 characters. This function might change in dependence of the database type in place. On the following example SubStr(Argument, Position, Length) has been used. This will retrieve the substring starting at the 12th character and will retrieve 20 characters starting from there.
     
ka04W000000OhkfQAC_0EM440000002EWz.gif
  • Click Ok and save and close the Attribute. Save and close the report.
     
  • Update Schema
     
  • Finally, executing the report, it shows the required list of tables created from datamart report as desired.
     
ka04W000000OhkfQAC_0EM440000002EWh.gif

Comment

0 comments

Details

Knowledge Article

Published:

April 17, 2017

Last Updated:

April 17, 2017