EducationSoftwareStrategy.com
StrategyCommunity

Knowledge Base

Product

Community

Knowledge Base

TopicsBrowse ArticlesDeveloper Zone

Product

Download SoftwareProduct DocumentationSecurity Hub

Education

Tutorial VideosSolution GalleryEducation courses

Community

GuidelinesGrandmastersEvents
x_social-icon_white.svglinkedin_social-icon_white.svg
Strategy logoCommunity

© Strategy Inc. All Rights Reserved.

LegalTerms of UsePrivacy Policy
  1. Home
  2. Topics

KB229004: How to use Kerberos authentication with MicroStrategy 9.4.1 or 10.x for Vertica 7.0 and newer


Community Admin

• Strategy


This document provides steps to setup single sign-on access to Vertica (using Kerberos) when MicroStrategy Intelligence Server 9.4.1 or 10.x resides on a Windows operating system.

This document provides steps to setup single sign-on access to Vertica (using Kerberos) when Strategy Intelligence Server 9.4.1 or 10.x resides on a Windows operating system.
 
Create user on Active Directory and assign the SPN

  1. Follow instructions in the following tech note to setup Active Directory users
    • KB19580 - How to setup Kerberos (Integrated) authentication for the Strategy Intelligence Server 9.x on Microsoft Windows operating systems.
    • The SPN should be set similarly to this format: KerberosServiceName/KerberosHostname@KerberosRealm (ex. vertica/ts-vertica89.labs.Strategy.com)
    • Set both users to “Trust this user for delegation to any service (Kerberos Only)”.
    • Check “Do not require Kerberos preauthentication” for both users as well.
  2. Create the keytab on the domain controller (Active Directory)
     
    
    ktpass -princ <SPN> -mapuser <AD User> -mapop set -pass <pw> -crypto rc4-hmac-nt -ptype KRB5_NT_SRV_HST -out <c:\path\file>
    
    IE:
    
    ktpass -princ host/tsvertica71.labs.Strategy.com@LABS.Strategy.COM -mapuser verticakerb -mapop set -pass <pw> -crypto rc4-hmac-nt -ptype KRB5_NT_SRV_HST -out c:\vertica.keytab 

Setup Single Sign-On (SSO) with Vertica

  1. Make sure that Kerberos libraries are installed on the Vertica server, including the Kerberos client libraries
    • See the Minimum requirements
  2. Copy the keytab file generated in step #2 of the first section into the Vertica server
  3. Set the Kerberos parameters via SQL. There are 4 total:
    
    KerberosHostname:
    
    SELECT set_config_parameter('KerberosHostname', '<host_name>');
    
    Example:
    
    SELECT set_config_parameter('KerberosHostname', 'ts-vertica89.labs.Strategy.com');
    
    KerberosKeytabFile:
    
    SELECT set_config_parameter('KerberosKeytabFile', '/<location>/<keytab_file>');
    
    Example:
    
    SELECT set_config_parameter('KerberosKeytabFile', '/vertica/db_1/v_node0001_catalog/vertica.keytab');
    
    
    KeberosRealm:
    
    SELECT set_config_parameter('KeberosRealm', '<KerberosRealm>');
    
    Example:
    
    SELECT set_config_parameter('KeberosRealm', 'LABS.Strategy.COM');
    
    
    KeberosServiceName:
    
    SELECT set_config_parameter('KeberosServiceName', '<kerberos_service_name>');
    
    Example:
    
    SELECT set_config_parameter('KeberosServiceName', 'vertica');

  4. Create the authentication method for Kerberos.
     
    
    CREATE AUTHENTICATION <auth_name> METHOD 'gss' HOST '0.0.0.0/0';

    <auth_name> can be anything, the 'gss' METHOD defines this authentication setup as Kerberos
     
  5. Enable the previously created Kerberos authentication method
    
    ALTER AUTHENTICATION <auth_name> ENABLE;

  6. Create the database users and grant the authentication methods.
    • Make sure the database user has the same name defined in the Active Directory
      
      CREATE USER <AD_user> identified by '<password>';

      
      GRANT AUTHENTICATION <auth_name> to <AD_user>;

 
Confirm that SSO is working

  1. Via the command line, running the following VSQL command will utilize Kerberos. 
    
    vsql -k <KeberosServiceName>  -K <KerberosHostname> -h <db_host> -U <AD_user>
    
    Example:
    vsql -k vertica -K ts-vertica71.labs.Strategy.com -h ts-vertica71.labs.Strategy.com -U verticakerb

     
  2. If VSQL is unavailable, testing the DSN with 'Windows Authentication' enabled should be successful.
  3. At this point, trying to authenticate as a standard user that has not been granted any sort of authentication method will fail. Since Kerberos is enabled, the default method of authenticating via password is no longer in place. To allow Kerberos users and standard users to connect, the following needs to be done.
    • Create authentication method for password:
      
      CREATE AUTHENTICATION <auth_name> METHOD 'password' HOST '0.0.0.0/0';

    • Grant users access to this authentication method:
      
      GRANT AUTHENTICATION <auth_name> to <db_user>;
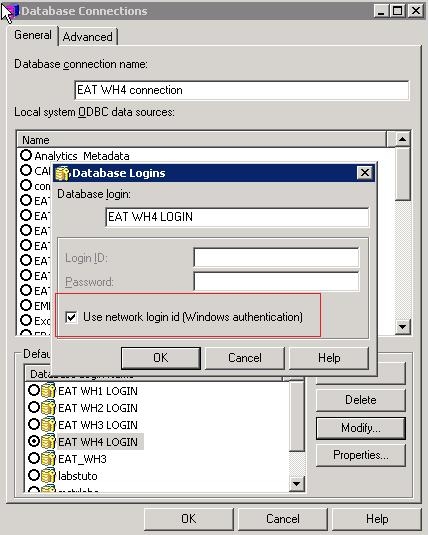
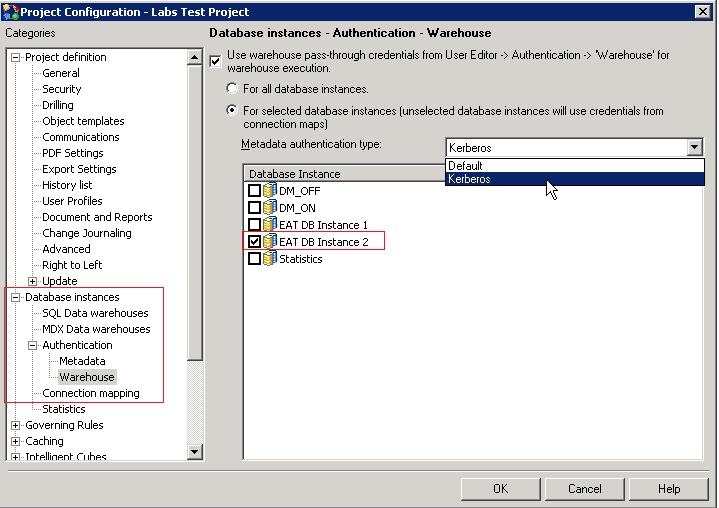
 
Setting up Strategy

  • Update the database object in the Strategy metadata
    • From a Strategy Developer installation, find the DATABASE.PDS file (found under the <install drive>\Program Files(x86)\Common Files\Strategy folder). Create a backup of this file before making any changes.
    • Edit this file and under the required DBMS type (for example: <DSSOBJECT TYPE="DBMS" NAME="HP Vertica 7.x" ID="@dbms199">), under <PROPERTYSET NAME="System SQL Templates">, the following text needs to be added. Save and close the file after making the required changes.
      
      <PROPERTY NAME="SupportsKerberos" VALUE="1"/>

  • Update the database object in the Strategy metadata using the steps from the following Strategy Knowledge Base document:
    • KB5779: How to update the database type in Strategy 9.x?
  • Ensure the database login in the Database Instance is using Windows authentication as shown below:

ka04W000000Oh3sQAC_0EM440000002JBB.jpeg
  • To use database pass-through, make sure to select the Metadata authentication type to Kerberos from the Project Configuration editor as shown below; Select the database instance that is connecting to Vertica and is configured to use Windows authentication.

ka04W000000Oh3sQAC_0EM440000002JBD.jpeg

Comment

0 comments

Details

Knowledge Article

Published:

June 5, 2017

Last Updated:

June 5, 2017