EducationSoftwareStrategy.com
StrategyCommunity

Knowledge Base

Product

Community

Knowledge Base

TopicsBrowse ArticlesDeveloper Zone

Product

Download SoftwareProduct DocumentationSecurity Hub

Education

Tutorial VideosSolution GalleryEducation courses

Community

GuidelinesGrandmastersEvents
x_social-icon_white.svglinkedin_social-icon_white.svg
Strategy logoCommunity

© Strategy Inc. All Rights Reserved.

LegalTerms of UsePrivacy Policy
  1. Home
  2. Topics

KB236549: How to Render the User History List on the Desktop Page with MicroStrategy Web SDK 9.4.1


Community Admin

• Strategy


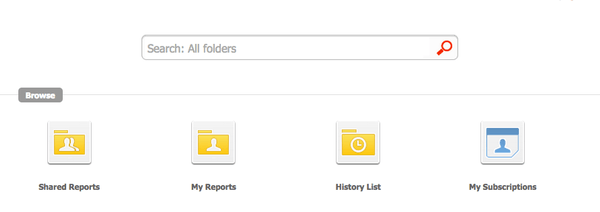
The customization described in this Technical Note renders the user history list above the default desktop section shown in the project home page in MicroStrategy Web.

The customization described in this Technical Note renders the user history list above the default desktop section shown in the project home page in Strategy Web:.
Before customization:
ka04W000001MKotQAG_0EM440000002GNA.jpeg

 
After customization:

ka04W000001MKotQAG_0EM440000002GNE.jpeg

 
Using the Web Customization Editor to create this customization:
Strategy SDK provides a Web Customization Editor that can be used to create a customization plug-in. The following steps guide users in creating the plug-in for adding the user history list to the Desktop page:

  • Launch the Web Customization Editor
  • Create a new plug-in and give it a meaningful name. (For step by step instructions on creating a new plug-in, please navigate toHome > Web SDK > Customizing Strategy Web > Web Customization Editor > Features and Customizable Settings)
  • Select the "Application Settings" tab and expand "Strategy Web Configuration" to view the hiearchical tree.
  • Navigate to Pages, and expand the "desktop(Desktop)" page.
  • Right-click on the "Beans" folder and select "New Bean":
ka04W000001MKotQAG_0EM440000002GND.jpeg
  • Enter "Inbox" for the name, "InboxBean" for the System Bean, and "Request" as the Persist Mode:
ka04W000001MKotQAG_0EM440000002GNC.jpeg
  • Click "next" until the finish screen is reached. Once finished, the bean should show under desktop(Desktop) -> Beans.
  • Double-click on the Inbox bean to open its properties on this page.
  • Scroll down and select the "Request Properties" tab.
  • Click on "Add" to add the "inboxFlags" property to the request properties:
  • Set the value to "2". This matches the value of this property on the out-of-the-box history list page.
ka04W000001MKotQAG_0EM440000002GN6.jpeg
  • Select the "Bean Styles" tab.
  • Click on "Add" to add the "HistoryListStyle" to this bean:
ka04W000001MKotQAG_0EM440000002GNB.jpeg

 
Now that the bean used by the history list is added to the page, we need to add a custom tag to the page template to instruct Web to display the history list using the bean:
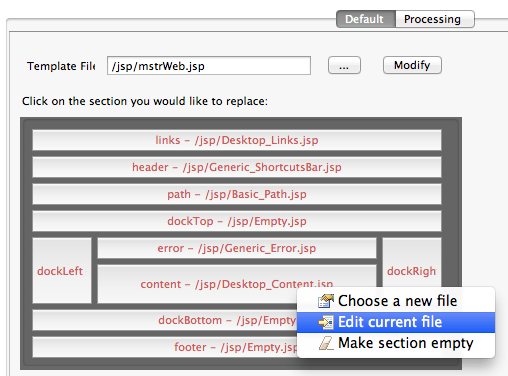
  • Double-click on the desktop(Desktop) page to open it.
  • Select the "Template Properties" tab.
  • Right-click on the "Content" section and select "Edit current file" to open Desktop_Content in the editor:
ka04W000001MKotQAG_0EM440000002GN5.jpeg
  • Look for:
    
    <!-- User Manager Sample link goes here -->
    

  • Under this line, add:
    
    <web:displayBean bean="Inbox" styleName="HistoryListStyle" />

     
    Note: the value of the "bean" property needs to match the name given when adding this bean to the desktop(Desktop) page. This value is case-sensitive.

ka04W000001MKotQAG_0EM440000002GN7.jpeg
  • Save all changes and restart Strategy Web. If necessary, clear browser and Web server caches for the changes to be registered.

The example provided in this document is provided “as-is” and user has read the following customization warning:
ADDITIONAL INFORMATION:
The Strategy SDK allows you to customize several Strategy products and extend and integrate the Strategy business intelligence functionality into other applications. However, before changing the way Strategy products look or behave, it is helpful to understand how the application is built. For more information regarding the Strategy products or the process of customizing Strategy products, please refer to Strategy Developer Zone (https://developer.Strategy.com).
To access the Strategy Developer Zone, you must have access to the Strategy Knowledge Base, you must have purchased the Strategy SDK, and you must be current on your Strategy maintenance agreement. If you are a US-based business and believe that you satisfy all three of these conditions but you do not have access to the Strategy Developer Zone, please contact Strategy Technical Support at support@Strategy.com or at (703) 848-8700. If you are an international business, please contact Strategy Technical Support at the appropriate email address or phone number found at https://www.Strategy.com/us/services/support/contact.
CUSTOMIZATION WARNING:
This customization is provided as a convenience to Strategy users and is only directly applicable to the version stated. While this code may apply to other releases directly, Strategy Technical Support makes no guarantees that the code provided will apply to any future or previous builds. In the event of a code change in future builds, Strategy Technical Support makes no guarantee that an updated version of this particular customization will be provided. In the event of a code change in future builds, Strategy may not be able to provide additional code on this matter even though this customization is provided at this time for this specific build. For enhancements to this customization or to incorporate similar functionality into other versions, contact your Account Executive to inquire about Strategy Consulting assistance.


Comment

0 comments

Details

Knowledge Article

Published:

April 7, 2017

Last Updated:

April 7, 2017