Before Customization:
By default, "Send Now" is not one of the options in the list of schedules in the E-mail Subscription page:
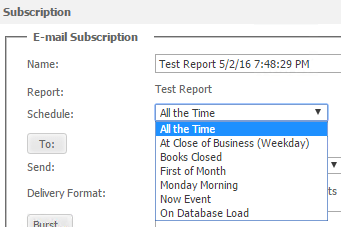
After Customization:
Using the Strategy SDK, additional schedules can be added:

Package: ##Any package the client wants to use##
Name: ##Any name for the class##
Transform description: This transform will add the "Send Now" option to the Schedule dropdown.
Superclass: com.Strategy.web.app.transforms.SubscriptionEditTransform
 // Creating a Markupout object
MarkupOutput newOutput = WebBeanFactory.getInstance().newMarkupOutput();

/** Rendering the out of the box markup for this Schedule Pane
* as the remaining code will be editing the MarkupOutput object
* and not recreating the object. The markup will be placed in a
* method Markup object so the user will not see the original Schedule Pane
*/
super.renderSchedulePane(newOutput);

// Creating a String version of the markup in order to manipulate the object
String newOutputString = newOutput.getCopyAsString();

// Appending send now schedule to the list of schedules
// The replace method is used to manipulate the list by replacing the markup
// that defines the "On Database Load" with two new markup lines with a break line between them '\n'
// The second line is the "Send Now".
newOutputString = newOutputString.replace("<OPTION VALUE=\"DE2B9DE549E75B363F3F6A95F2B0A3E6\" SendNow=\"false\" >On Database Load</OPTION>", "<OPTION VALUE=\"DE2B9DE549E75B363F3F6A95F2B0A3E6\" SendNow=\"false\" >On Database Load</OPTION>\n<OPTION VALUE=\"\" SendNow=\"true\" >Send Now</OPTION>");

// Append the new modified output the Markupoutput
out.append(newOutputString);

return ;The example provided in this document is provided “as-is” and user has read the following customization warning:
ADDITIONAL INFORMATION:
The Strategy SDK allows you to customize several Strategy products and extend and integrate the Strategy business intelligence functionality into other applications. However, before changing the way Strategy products look or behave, it is helpful to understand how the application is built. For more information regarding the Strategy products or the process of customizing Strategy products, please refer to Strategy Developer Zone (https://developer.microstrategy.com).
To access the Strategy Developer Zone, you must have access to the Strategy Knowledge Base, you must have purchased the Strategy SDK, and you must be current on your Strategy maintenance agreement. If you are a US-based business and believe that you satisfy all three of these conditions but you do not have access to the Strategy Developer Zone, please contact Strategy Technical Support at support@microstrategy.com or at (703) 848-8700. If you are an international business, please contact Strategy Technical Support at the appropriate email address or phone number found at https://www.microstrategy.com/us/services/support/contact.
CUSTOMIZATION WARNING:
This customization is provided as a convenience to Strategy users and is only directly applicable to the version stated. While this code may apply to other releases directly, Strategy Technical Support makes no guarantees that the code provided will apply to any future or previous builds. In the event of a code change in future builds, Strategy Technical Support makes no guarantee that an updated version of this particular customization will be provided. In the event of a code change in future builds, Strategy may not be able to provide additional code on this matter even though this customization is provided at this time for this specific build. For enhancements to this customization or to incorporate similar functionality into other versions, contact your Account Executive to inquire about Strategy Consulting assistance.
