Usher Professional Mobile App uses the schema objects and Intelligent cube from the Usher Analytics Project. The steps to create the project can be found at http://www2.microstrategy.com/producthelp/Usher/latest/Content/USHER/configuring-usher-analytics-usher-professional_12189832.htm
1. Navigate to the Usher Installation conf folder typically the one below:
cd /opt/mstr/Usher/UsherMobile/conf
2. In the conf folder, execute the package import script using the command below:
./usherpro.sh
3. Press "Enter" and provide the following information for all the prompts:
Note: If different, ensure to provide the project source name, project login and password that was created during initial MD/PS setup.
4. After inputting all the information, you should get a message whether you would like to restart the Intelligence Server, 'Yes' or 'No'.
5. Type 'Y' and press 'Enter'. The Intelligence Server will be restarted, and the package should be successfully imported.
Note: Since the Usher Professional package does not contain configuration and schema objects. Therefore, it is not mandatory to restart the Intelligence Server.
1. Once the machine is deployed and the installation is successful, launch Object Manager
Start > Strategy Products > Object Manager
2. Choose the target project source (Eg: Strategy Secure Enterprise) and provide the login information (Eg: administrator/<blank>)
3. Choose the target project (Eg: Usher Analytics Self Service)
4. Import the package from the following location (or wherever the build was installed) into the desired project
C:\Usher\UsherMobile\conf\UsherPro_10.4.0.mmp
5. Once the package is successfully imported, launch Developer and try to execute the subset reports from the following location:
Shared Reports > 6. Usher Pro Reporting > Datasets (10.4)
(Please note that in order to run the subset reports, the Usher Analysis cube [Shared Reports > 4.Utilities > Usher Analysis] must be published)
1. Navigate to the Usher Installation images folder typically the one below (or where the Usher folder was saved on the local machine):
Linux: /opt/mstr/Usher/UsherMobile/conf/usherpro
Windows: C:\Usher\UsherMobile\conf\usherpro
2. Copy all the image files in the path of step 1 to the images folder in the JSP Mobile Server typically the one below:
<tomcat_home>/<webapp_directory>/MicroStrategyMobile/images/usherpro
3. Restart the Mobile Server
Usher Professional must be configured using the Mobile Administrator Web Interface using the method below:
1. Configure Usher Professional for iPad and iPhone using the Mobile Administrator
2. Launch the Strategy 10.4 Mobile Administrator and click on Mobile Configuration on the left.
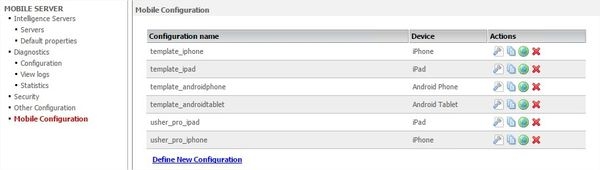
3. Click on "Define New Configuration" and choose "iPad" (Note: For iPhone choose the "iPhone" option.)

4. In the iPad/iPhone Settings tab check the box "Clear caches when the application closes" as shown in the image below:
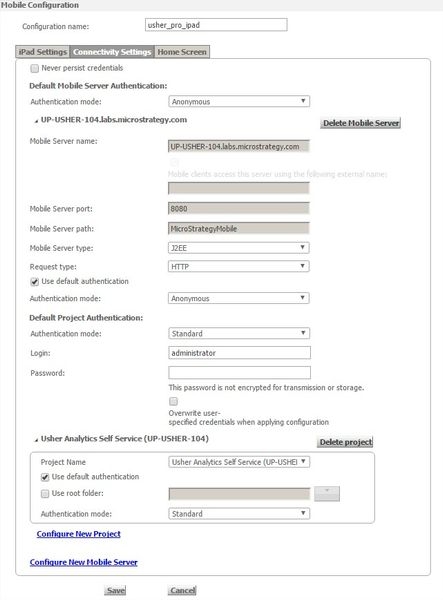
5. In the Connectivity Settings tab fill the information for the Mobile Server and the login and password for the Usher Analytics project.
6. Click on "Configure New Project" and select the Usher Analytics Self Service Project. A sample of the configurations for the above steps is shown below:
7. In the Home Screen tab choose the "Display a custom home screen/Display a report or document" radio button.

8. Provide information for the standard authentication, then click on "Login"
9. Once logged in, navigate to the "Usher Pro iPad" document under the following path:
Public Objects > Shared Reports > 6. Usher Pro Reporting > iPad > Usher Pro iPad
As shown in the image below:

Note: iPhone navigate to the "Usher Pro iPhone" document in the following path:
Public Objects > Shared Reports > 6. Usher Pro Reporting > iPhone > Usher Pro iPhone
10. Now go back to "Connectivity Settings" and change the authenticate mode to "Usher"

11. Click on "Save"

12. Navigate to the Mobile Administrator page and generate the configuration URL by clicking the "Generate URL" button. A sample URL (for iPad & iPhone) are show below:
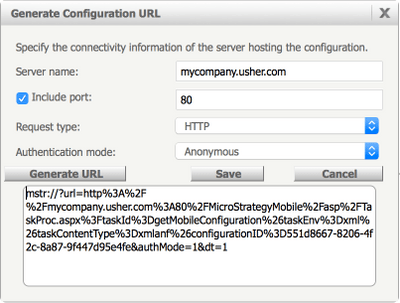
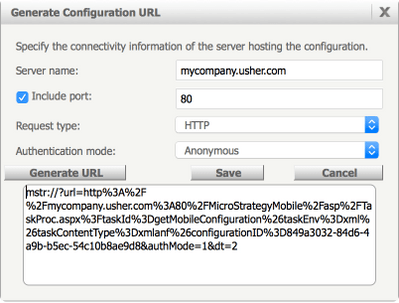
13. Modify the Generated URL according to the device as explained below:
mstrusheripad://?url=http%3A%2F%2Fmycompany.usher.com%3A80%2FStrategyMobile%2Fasp%2FTaskProc.aspx%3FtaskId%3DgetMobileConfiguration%26taskEnv%3Dxml%26taskContentType%3Dxmlanf%26configurationID%3D781d8457-8206-4f2e-8a87-9f423d95e4fe&authMode=1&dt=2
mstrusher://?url=http%3A%2F%2Fmycompany.usher.com%3A80%2FStrategyMobile%2Fasp%2FTaskProc.aspx%3FtaskId%3DgetMobileConfiguration%26taskEnv%3Dxml%26taskContentType%3Dxmlanf%26configurationID%3D551d8667-8206-4f2c-8a87-9f447d95e4fe&authMode=1&dt=1
See the following TechNotes for next steps:
- KB310286 - How to Enable Usher Professional Access for Users in 10.4
- KB310298 - Configuring the Usher Professional Application with Usher Professional Metadata and Assigning Privileges
