Symptom:
Starting in Strategy 10.6 there have been changes to how GIS connectors for mapping are configured in Strategy Web. In order to configure custom area shapes in ESRI the following must be changed in the web application.
Action:
The following steps assume ESRI is already configured in the user's environment.
<mc>
<ec>
<apps>
<key>type your esri key here</key>
</apps>
</ec>
<gc>
<mk isPremier="true">InvalidPremierKey</mk>
</gc>
</mc>
<shape-config>
<layers>
<layer id="111"  title="US STATES VIEW" ml="kml/US-States-View.kml"></layer>
</layers>
<shapes>
<shape id="111"
            custom="true"
            plugin="ConnectorForMap"
            default="false"
            desc="US STATES VIEW"
            roleId="2"
            type="Polygon"
            descWeb="mstrweb.9229"
            descFlash="mstr.1622"
            descDesktop="26973"
            layerId="111" />
</shapes>
</shape-config>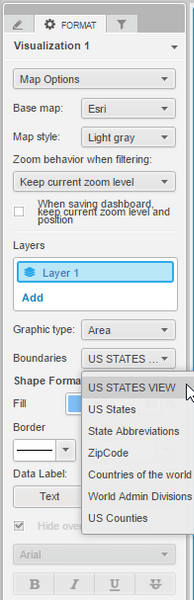
KB330356