EducationSoftwareStrategy.com
StrategyCommunity

Knowledge Base

Product

Community

Knowledge Base

TopicsBrowse ArticlesDeveloper Zone

Product

Download SoftwareProduct DocumentationSecurity Hub

Education

Tutorial VideosSolution GalleryEducation courses

Community

GuidelinesGrandmastersEvents
x_social-icon_white.svglinkedin_social-icon_white.svg
Strategy logoCommunity

© Strategy Inc. All Rights Reserved.

LegalTerms of UsePrivacy Policy
  1. Home
  2. Topics

KB33330: How to run MicroStrategy Subscription Portal on a 64-bit Microsoft Windows 2008 and 2012


Community Admin

• Strategy


MicroStrategy Subscription Portal is developed as a 32-bit application. Since on 64-bit Windows machine, by default, Internet Information Services (IIS) runs in 64-bit mode. A few modifications must be done before the user can run MicroStrategy Subscription Portal properly.

Strategy Subscription Portal is developed as a 32-bit application. Since on 64-bit Windows machine, by default, Internet Information Services (IIS) runs in 64-bit mode. A few modifications must be done before the user can run Strategy Subscription Portal properly.
 
Perform the steps below to successfully configure the Subscription Portal on 64-bit Windows:

  • Navigate to 'C:\inetpubt\adminscripts' and run the following command:
    
    cscript.exe adsutil.vbs set W3SVC/AppPools/Enable32BitAppOnWin64 "true" 

  • Go to Start > Run, and type in "dcomcnfg"
  • Under "COM+ Applications", right mouse click to create new application.
ka04W000000OeP6QAK_0EM440000002Aqt.gif
  • Choose to "Create an empty application"
ka04W000000OeP6QAK_0EM440000002Aqg.gif
  • Type in any name for this new COM+ application. And select "Server application"
ka04W000000OeP6QAK_0EM440000002Aqi.gif
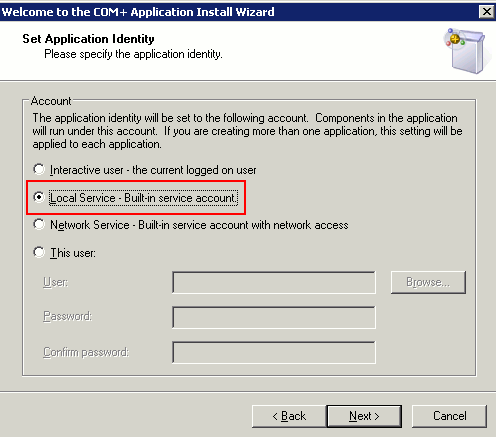
  • In the next window to select application identity, pick "Local Service ..." and click next.
ka04W000000OeP6QAK_0EM440000002AqZ.gif
  • In this step, the user needs to add a user to the Role. Please choose one NT user which is under local administrators group:
ka04W000000OeP6QAK_0EM440000002Aqk.gif
  • Click "Next" to finish the application creation.
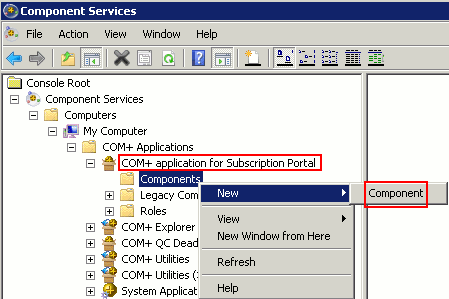
  • Go to the newly created COM+ application and create a new component under "Components"
ka04W000000OeP6QAK_0EM440000002Aqc.gif
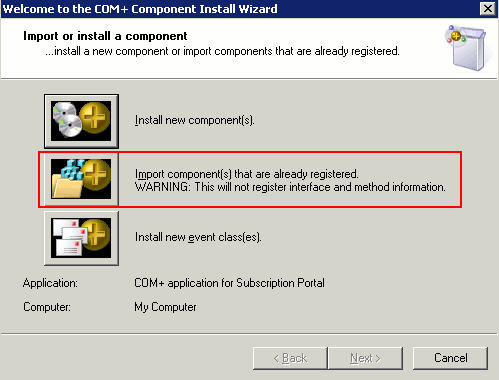
  • Select "Import component(s) that are ..."
ka04W000000OeP6QAK_0EM440000002Aqq.gif
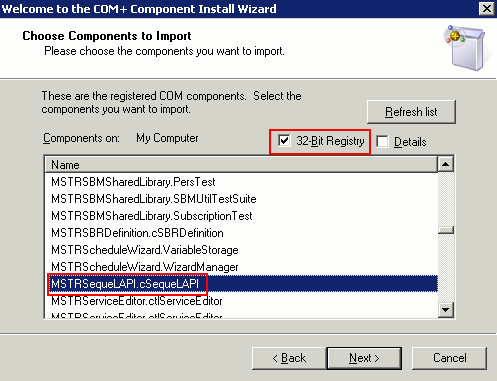
  • Check the "32-bit registry" checkbox and then choose "MSTRSequeLAPI.cSequeLAPI"
ka04W000000OeP6QAK_0EM440000002Aqo.gif
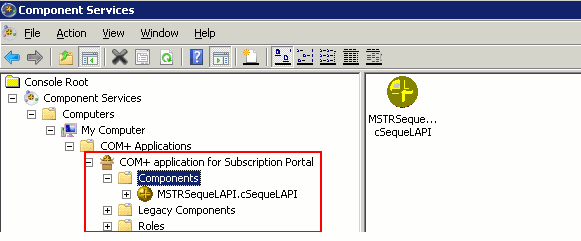
  • Click "Next" to finish the configuration. Here is a view of the final look of the new COM+ application with the registered component:
ka04W000000OeP6QAK_0EM440000002Aqm.gif

Comment

0 comments

Details

Knowledge Article

Published:

May 2, 2017

Last Updated:

June 9, 2017