EducationSoftwareStrategy.com
StrategyCommunity

Knowledge Base

Product

Community

Knowledge Base

TopicsBrowse ArticlesDeveloper Zone

Product

Download SoftwareProduct DocumentationSecurity Hub

Education

Tutorial VideosSolution GalleryEducation courses

Community

GuidelinesGrandmastersEvents
x_social-icon_white.svglinkedin_social-icon_white.svg
Strategy logoCommunity

© Strategy Inc. All Rights Reserved.

LegalTerms of UsePrivacy Policy
  1. Home
  2. Topics
  3. KB38303: How to set up a SNC connection to SAP BW using the SAP Cryptographic Libraries in MicroStrategy 9.0.2 and newer versions on a Microsoft Windows operating system platform.

KB38303: How to set up a SNC connection to SAP BW using the SAP Cryptographic Libraries in MicroStrategy 9.0.2 and newer versions on a Microsoft Windows operating system platform.


Community Admin

• Strategy


This technote explains how to enable an SNC connection using SAP BI via the Intelligence Server.

This technical note details how users can setup a SNC - SAP Cryptographic Library connection between the Strategy Intelligence Server 9.0.2 and newer on a Microsoft Windows operating system platform. This is a "Server - Side Trust" connection, in which the SAP instance trusts the user ID used for the connection without any credentials being validated.
 
Strategy uses the users "User Login" field  as the ID used to make a connection with SAP, so the Strategy side user login should match the user name on the SAP side for this scheme to work as expected. No warehouse/database authentication can be implemented in Strategy for a SNC connection as there is no validation of the users credentials. Starting in 9.4.1 Hotfix 5 support has been introduced for JCO 3.x (Needs to be the most up to date release of JCO 3), earlier versions of Strategy must use JCO 2.


As a prerequisite to implementing the steps in this Technical Note, the SAP Application Server must have already been setup for SNC connections. Users should refer to the SAP documentation "Using the SAP Cryptographic Library for SNC" for details in setting this up for the SAP Application Server. In this process we will use individual PSEs for the Intelligence Server and SAP Application Server.
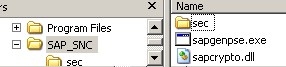
  • Download the  SAP Cryptographic Library files onto the Intelligence Server machine. At this time only the 32 bit libraries can be used with the SAP JCO 2.x connector. SAP JCO 3 connections require the 64 bit variations of the libraries. These files are the sapcrypto.dll, sapgenpse.exe and ticket. Create a folder such as C:\SAP_SNC and place the sapcrypto.dll and sapgenpse.exe files in this location. Create a sub folder called "sec" and place the "ticket" file in this location:
ka04W000000OaeuQAC_0EM440000002AXc.jpeg
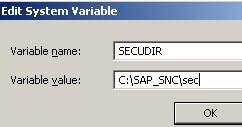
  • On the Intelligence Server machine a new environment variable must be created "SECUDIR" and set to the location of the newly created "sec" folder. In this example:
ka04W000000OaeuQAC_0EM440000002AXP.jpeg
  • If needed the location of the sapcrypto.dll and sapgenpse.exe files may be added to the machine PATH environment variable.
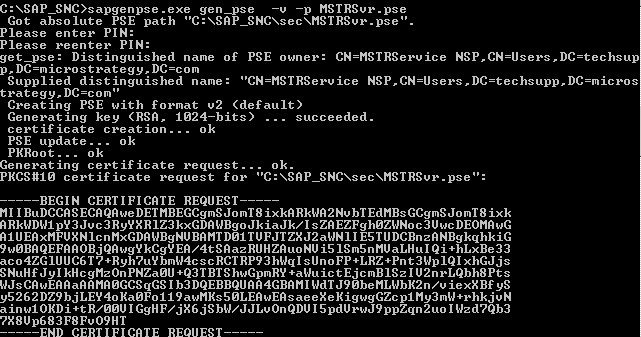
  • Now a new PSE (Personal Security Environment) must be generated for the Intelligence Server. This can be done using the command: 'sapgenpse.exe  gen_pse -v -p <PSE Name>. The name <PSE Name> chosen here is arbitrary and the user may choose any name they desire. The user will be prompted for a PIN used to secure this PSE and for the Distinguished name of the PSE owner.
ka04W000000OaeuQAC_0EM440000002AXN.jpeg
  • The Intelligence Server PSE must now be exported and added to the SAP Application Server. The certificate can be exported using the command 'sapgenpse.exe export_own_cert -v -p <PSE Name> -o <Out File>.crt' - for example:
ka04W000000OaeuQAC_0EM440000002AXb.jpeg
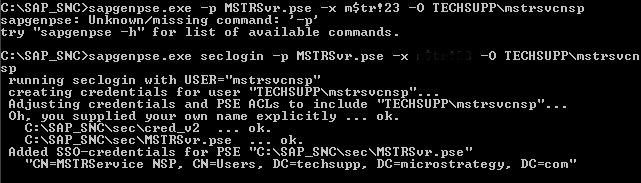
  • We need to assign credentials to the account under which the Intelligence Server runs to access the Intelligence Server PSE. If the Intelligence Server is running under a domain account this can be done using the command 'sapgenpse.exe seclogin -p <PSE Name> -x <PIN> -O <user_id>' for example:
ka04W000000OaeuQAC_0EM440000002AXJ.jpeg
  • If the Intelligence Server is running under the Local System account this can be done as 'sapgenpse.exe seclogin -p <PSE Name> -x <PIN> -O SYSTEM'
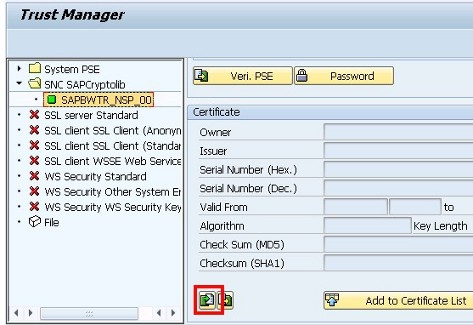
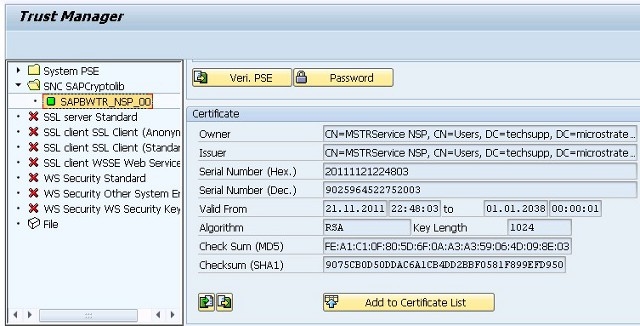
  • The exported certificate must be imported into SAP. Use the transaction STRUST and open the SNC PSE. If you have assigned a password to the PSE, you will be prompted for this. Click on the Import button to import the exported certificate from step (5):
ka04W000000OaeuQAC_0EM440000002AXM.jpeg
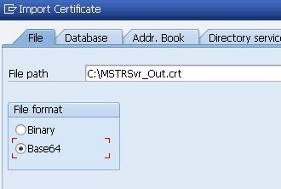
  • Since the certificate is in base-64 format users should ensure that this option is selected when importing:
ka04W000000OaeuQAC_0EM440000002AXF.jpeg
  • Click on "Add to Certificate List"
ka04W000000OaeuQAC_0EM440000002AXa.jpeg
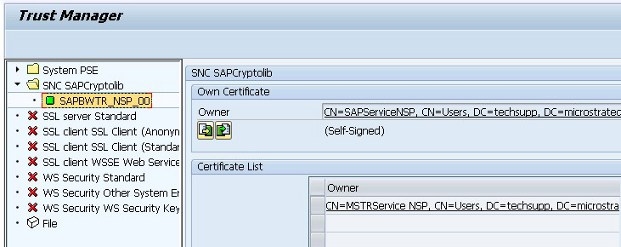
  • The certificate should now show up in list for the SNC PSE:
ka04W000000OaeuQAC_0EM440000002AXL.jpeg
  • In the STRUST transaction we also need to SAP Application Server certificate to be imported into the Intelligence Server PSE later. The user should select the "Owner" certificate and click on the export button at the bottom of the interface. The user will be prompted for the file location to export the file to, and should ensure that the file is exported in Base-64 encoded format. In this example we will export the file as "ABAP_Out.crt"
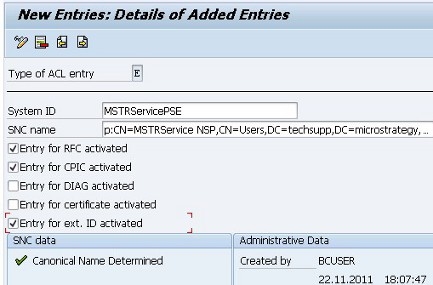
  • The next step is to execute the SNC0 transaction in SAP to create a new entry for the trusted Intelligence Server by its SNC name. The user should create a new entry with the SNC name p:Distinguished Name, where Distinguished Name is the name used to generate the Intelligence Server PSE in step (4). The options for "entry for RFC activated", "Entry for CPIC activated", "Entry for ext. ID activated" should be enabled.
ka04W000000OaeuQAC_0EM440000002AXO.jpeg
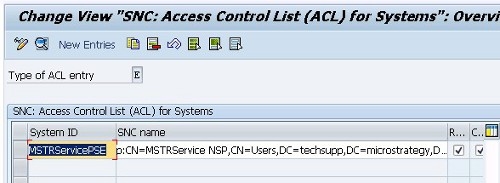
  • Once this entry is saved it should be seen in the SNC ACL. 
ka04W000000OaeuQAC_0EM440000002AXG.jpeg
  • Now going to back to the Intelligence Server machine we need to add the exported SAP application server certificate to the Intelligence Server PSE. The command to accomplish this is 'sapgenpse.exe maintain_pk -a <SAP Application Server crt> -p <PSE Name> -x <PIN>' - for example:
     
ka04W000000OaeuQAC_0EM440000002AXZ.jpeg
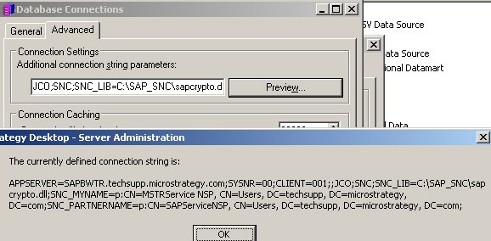
  • Now in Strategy a new Database Instance must be created, with the following connection string set in the database instance -> Database Connection -> Advanced -> Additional connection string parameters:  JCO;SNC;SNC_LIB=<path_to_sapcrypto.dll>;SNC_MYNAME=<IntelligenceServerSNCName>;SNC_PARTNERNAME=<SAP_SNCName>;
ka04W000000OaeuQAC_0EM440000002AXQ.jpeg
  • Now the setup is complete, any user accessing the SAP database instance will have their User ID used to establish the connection against the SAP instance. This can be checked using the SM04 transaction:
ka04W000000OaeuQAC_0EM440000002AXX.jpeg
  • And in the Strategy Database connection Monitor
ka04W000000OaeuQAC_0EM440000002AXE.jpeg

 
Third Party Software Installation WARNING
 
The third-party product(s) discussed in this technical note is manufactured by vendors independent of Strategy. Strategy makes no warranty, express, implied or otherwise, regarding this product, including its performance or reliability.
KB38303


Comment

0 comments

Details

Knowledge Article

Published:

June 5, 2017

Last Updated:

December 30, 2018