EducationSoftwareStrategy.com
StrategyCommunity

Knowledge Base

Product

Community

Knowledge Base

TopicsBrowse ArticlesDeveloper Zone

Product

Download SoftwareProduct DocumentationSecurity Hub

Education

Tutorial VideosSolution GalleryEducation courses

Community

GuidelinesGrandmastersEvents
x_social-icon_white.svglinkedin_social-icon_white.svg
Strategy logoCommunity

© Strategy Inc. All Rights Reserved.

LegalTerms of UsePrivacy Policy
  1. Home
  2. Topics

KB419958: How to create a database instance for project warehouse in MicroStrategy Developer?


Stefan Zepeda

Salesforce Solutions Architect • Strategy


This technical note documents the process of creating a database instance for project warehouse in MicroStrategy Developer.

INTRODUCTION:
Before creating a database instance for a project warehouse, users need to create a Data Source Name (DSN) that points to the database (which holds the project warehouse). It is strongly recommended to create DSN for Strategy ODBC drivers (such as Strategy ODBC Driver for Oracle Wire Protocol) using the Strategy Connectivity Wizard. This tool can be accessed from Start -> Programs -> Strategy -> Tools -> Connectivity Wizard.
 
Note: To any unpredictable behavior, it is highly recommended that users not use the Microsoft ODBC Data Source Administrator for creating DSNs for the Strategy drivers.

  • Once the DSN is created, go back to Strategy Developer and log in to the project source with administrator privileges.
  • Connect to the Project Source and go to the Administration folder. Select 'Database Instance Manager'.
  • From the File, go to 'New ->Database Instance' then follow the steps below:
  • In the Database Instance window (seen below) enter the Database Instance Name and Database Connection Type
ka0PW0000000qt3YAA_0EM440000002GH5.jpeg
  • In the same window, under Database Connection, click New. The following window appears:
ka0PW0000000qt3YAA_0EM440000002GHE.jpeg
  • Enter a Database Connection name and select the ODBC data source (DSN) that was created in before Step 1 above.
  • In the same windows, under Database Login Name, click New and the following window appears
ka0PW0000000qt3YAA_0EM440000002GH6.jpeg
  • Enter the login information and click OK.

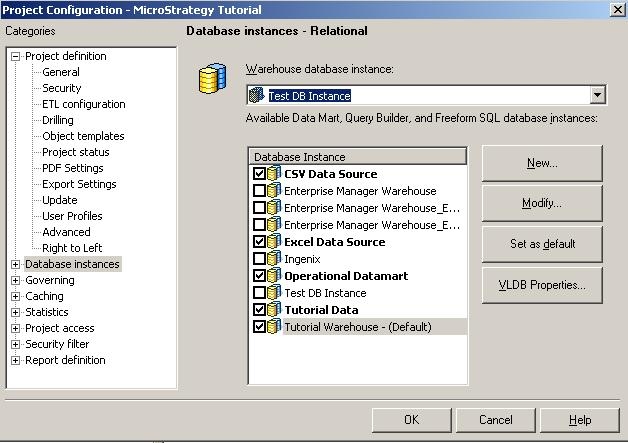
Now the Database Instance to the project warehouse has been created, the user must select this database instance as the project's warehouse. To do this, go to Project Configuration ->Database Instance -> SQL Data warehouses. Under 'Warehouse Database Instance', select the Database Instance created in the above steps (see below):

ka0PW0000000qt3YAA_0EM440000002GH4.jpeg

Comment

0 comments

Details

Knowledge Article

Published:

April 4, 2017

Last Updated:

February 26, 2024