EducationSoftwareStrategy.com
StrategyCommunity

Knowledge Base

Product

Community

Knowledge Base

TopicsBrowse ArticlesDeveloper Zone

Product

Download SoftwareProduct DocumentationSecurity Hub

Education

Tutorial VideosSolution GalleryEducation courses

Community

GuidelinesGrandmastersEvents
x_social-icon_white.svglinkedin_social-icon_white.svg
Strategy logoCommunity

© Strategy Inc. All Rights Reserved.

LegalTerms of UsePrivacy Policy
  1. Home
  2. Topics

KB45064: How to activate cloud-based ESRI maps for MicroStrategy Web and MicroStrategy Library products


Qiong Wu

Product Owner, Senior • MicroStrategy


This article explains how to activate cloud-based ESRI maps for MicroStrategy Web and MicroStrategy Library products

As Strategy and ESRI continue to make improvements to the service/API's, ESRI keys provided for older versions of Strategy may stop working. Please ensure that you stay on the latest supported release of Strategy to avoid interruptions in service.  In particular, ESRI keys provided for Strategy 2021 Update 4 and earlier will cease to operate in April/May 2024. 
INTRODUCTION
Beginning in Strategy Analytics Enterprise 9.4.1, access to cloud-based ESRI maps (ArcGIS Online) is available for free for Strategy Web products. Follow the steps here to configure cloud-based ESRI maps.
Important information regarding upgrades from versions prior to Strategy 2021 Update 5, to Strategy 2021 Update 5 and newer:

  1. You must request and configure a new ESRI key. This is required for the display of ESRI maps. In Strategy 2021 Update 5, ESRI map styles were updated for enhanced readability.
  2. MicroStratgy recommends both upgrading your platform (Web and Library) along with Workstation to the latest version. If you only upgrade your platform to 2021 Update 5 (11.3.5), ESRI maps are not available in Workstation. If you only upgrade Workstation to 11.3.5, then ESRI maps display, but the zoom level is not saved. For the best experience, upgrade both your platform and Workstation to 11.3.5.

PREREQUISITES
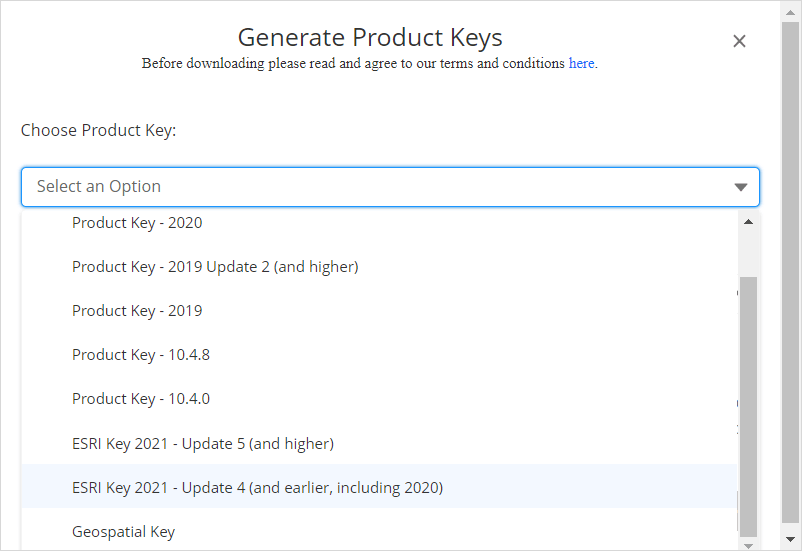
Before configuring cloud-based ESRI maps, obtain a free ESRI Map Key by following the steps here:

  • Navigate to the MicroStrategy download site.
  • Click Generate Keys and choose the applicable ESRI Key.
ka0PW0000002kzdYAA_0EM4W000004YqHA.jpeg
  • Agree to the terms and conditions and click Generate. The key is emailed to you. Once you have the key, you can configure Strategy.

CONFIGURATION STEPS
The steps to configure cloud-based ESRI maps differ depending on your version of Strategy. Follow the steps corresponding to your particular version.
Steps for Strategy Library
For Strategy Library, a plugin is also necessary. Follow these steps to create a new plugin to activate your cloud-based ESRI maps to be used in Library:

  1. Navigate to your parent Strategy Library directory and navigate to the
    plugins
    folder.
  2. Copy the
    mapConfig.xml
    file
  3. Under the plugins folder, create the following folder structure: 
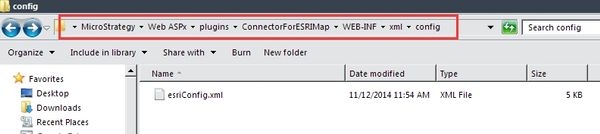
    ConnectorForMap\WEB-INF\xml\config.
  4. Place the copied
    mapConfig.xml
    file into this directory.
  5. Modify the file so the structure looks like the one below, inserting your ESRI Map Key between the <key> nodes, as shown below:
    
    <mc> 
      <ec>
        <apps>
            <key> <![CDATA[XXXXXXXXXXXXXXXXXXXXXXXXXX]]> </key>
        </apps>
      </ec>
    </mc>

  6. Restart the web or application server.

Steps for Strategy Web 10.6 and above 
If you are configuring ESRI for the first time in one of the 10.6 and above releases, a plugin will also be necessary. Follow these steps to create a new plugin to activate your cloud-based ESRI maps:

  1. Navigate to your parent Strategy Web directory and navigate to the plugins folder. Within this folder, create the following folder structure: ConnectorForMap\WEB-INF\xml\config
  2. Navigate to your parent Strategy directory and to WEB-INF\xml\config, where you will find a mapConfig.xml file.
  3. Copy the file mentioned in step 2 to the file location created in step 1.
  4. Modify the file so the structure looks like the one below, inserting your ESRI Map Key between the <key> nodes, as shown below:
    
    <mc> 
      <ec>
        <apps>
            <key> <![CDATA[XXXXXXXXXXXXXXXXXXXXXXXXXX]]> </key>
        </apps>
      </ec>
    </mc>

  5. Restart the web or application server.

Steps for Strategy Web 9.4.1 Hotfix 2 and above, Strategy Web 9.5.x and above, and Strategy Web 10.0 to 10.5 
Beginning in Strategy Analytics Enterprise 9.4.1 Hotfix 2, the ESRI maps plugin has been extended to support user modifications to a separate esriConfig.xml file that can persist through upgrades. The mechanism for this is that users now store their modified esriConfig.xml file in a plugin, using the Strategy plugin architecture to preserve the file through upgrades and to take precedence over the out of the box esriConfig.xml file. Follow these steps to create a new plugin to activate your cloud-based ESRI maps:

  • Navigate to your parent Strategy Web directory and navigate to the plugins folder. Within this folder, create the following folder structure: ConnectorForESRIMap\WEB-INF\xml\config
  • Within the new \config folder, download and unzip the template esriConfig.xml file attached.
  • Open the template esriConfig.xml file and insert your ESRI Map Key between the <key> nodes, like shown below:
     
    
    <apps>
    <key>
    <![CDATA[XXXXXXXXXXXXXXXXXXXXXXXXXX]]>
    </key>
    </apps>

  • Save the file and restart the web server for the changes to take effect. An example of where to save the user-configurable esriConfig.xml file on a Strategy ASP environment is shown below:

ka0PW0000002kzdYAA_0EM440000002HJz.jpeg
  • The user-configurable esriConfig.xml file is stored in a manually created folder structure within the plugins folder

Steps for Strategy Web 9.4.1 and 9.4.1 Hotfix 1

  1. Browse to the esriConfig.xml file, by default located in the parent Strategy Web directory\WEB-INF\xml\config
  2. Edit the esriConfig.xml file in any text editor and enter the ESRI Map Key obtained from the section above into the configuration file between the <key> nodes, like shown below:
     
    
    <apps>
    <key>
    <![CDATA[XXXXXXXXXXXXXXXXXXXXXXXXXX]]>
    </key>
    </apps>

  3. Restart the web server for the changes to take effect.


Note: For more information regarding deploying and configuring ESRI, please refer to the Strategy GIS Integration Help, which can be accessed by navigating to the Strategy Product Manuals, then clicking on GIS Integration Help. For Strategy Analytics Enterprise, this manual is also here.

KB45064


Comment

0 comments

Details

Knowledge Article

Published:

March 30, 2017

Last Updated:

July 22, 2024