EducationSoftwareStrategy.com
StrategyCommunity

Knowledge Base

Product

Community

Knowledge Base

TopicsBrowse ArticlesDeveloper Zone

Product

Download SoftwareProduct DocumentationSecurity Hub

Education

Tutorial VideosSolution GalleryEducation courses

Community

GuidelinesGrandmastersEvents
x_social-icon_white.svglinkedin_social-icon_white.svg
Strategy logoCommunity

© Strategy Inc. All Rights Reserved.

LegalTerms of UsePrivacy Policy
  1. Home
  2. Topics

KB47862: How to hide the magnifying glass for a grid within a specific document in MicroStrategy Web


Community Admin

• Strategy


How to hide the magnifying glass for a grid within a specific document in MicroStrategy Web 9.4.1

SYMPTOM:
 
The following technical note describes how to hide the magnifying glass for a grid within a document in Strategy Web 9.4.1.
 

ka04W000000OdsgQAC_0EM44000000263U.png

 
ACTION:
 
These steps outline what needs to be done to achieve the seamless removal of the magnifying glass on the grid's title:

  • Make note of the existing grid information
    • Edit the document in either design mode or editable view mode.
    • Edit the grid, go to Properties and Formatting... 
    • Click on Layout on the left hand side and note the Left and Top position (in this example, Left is set to 1.3750 and Top is set to 0.6250)
       
ka04W000000OdsgQAC_0EM44000000263N.png
    • Click on Color and Lines on the left hand side.  Using the dropdown selectors at the top, select Grid Container and Title.  Click the dropdown selector for Color and click on Gradients...


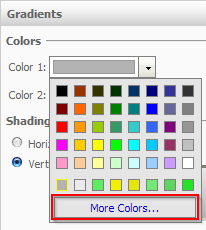
    • Click the dropdown selector for Color 1 and click on More Colors...
       
ka04W000000OdsgQAC_0EM44000000263A.png
    • Note the Hex value for Color 1 (in this example, the Hex is B3B3B3)
       
ka04W000000OdsgQAC_0EM44000000263M.png
    • Click Cancel to return to the Gradients editor.
    • Click the dropdown selector for Color 2 and click on More Colors...
    • Note the Hex value for Color 2 (in this example, the Hex is EAEAEA)
       
ka04W000000OdsgQAC_0EM44000000263K.png
    • Click Cancel to return to the Gradients editor.
    • On the Gradients editor, note the Shading Style (in this example, the Shading Style is vertical progressing light to dark)
       
ka04W000000OdsgQAC_0EM44000000263c.png
    • Click Cancel to return to the Properties and Formatting editor.
    • Click Cancel to exit the Properties and Formatting editor.
  • Create a rectangle to hide the magnifying glass
    • In design mode for the document, go to Insert > Shape > Rectangle.
    • Edit the rectangle and go to Properties and Formatting...
    • Click on Layout on the left hand side.
    • Set the Left and Top position to the values noted in Step 1c.
    • Set the Width to 0.2500 and Height to 0.2100
    • Click on Color and Lines on the left hand side.
    • Click the dropdown selector for Color and click on Gradients...
    • Click the dropdown selector for Color 1 and click on More Colors... and set the Hex to the value noted in Step 1f.
    • Click OK.
    • Click the dropdown selector for Color 2 and click on More Colors... and set the Hex to the value noted in Step 1i.
    • Click OK.
    • Set the Shading Styles to the value noted in Step 1k.
    • Click OK, click OK.
    • A rectangle will appear over the magnifying glass but appear seamless as if it were part of the title bar.
       
ka04W000000OdsgQAC_0EM44000000263B.png
  • Save the changes made to the document


Comment

0 comments

Details

Knowledge Article

Published:

June 15, 2017

Last Updated:

June 15, 2017