EducationSoftwareStrategy.com
StrategyCommunity

Knowledge Base

Product

Community

Knowledge Base

TopicsBrowse ArticlesDeveloper Zone

Product

Download SoftwareProduct DocumentationSecurity Hub

Education

Tutorial VideosSolution GalleryEducation courses

Community

GuidelinesGrandmastersEvents
x_social-icon_white.svglinkedin_social-icon_white.svg
Strategy logoCommunity

© Strategy Inc. All Rights Reserved.

LegalTerms of UsePrivacy Policy
  1. Home
  2. Topics

KB485849: Connect to Databricks Unity Catalog in MicroStrategy 2021 Update 8 or Earlier


Yufei Chen

Software Engineer, Principal • MicroStrategy


This article describes how to connect to the Databricks Unity Catalog.

Starting with the release of Strategy ONE (March 2024), dossiers are also known as dashboards.

Introduction

Note: Starting in Strategy 2021 Update 9, Databricks' Unity Catalog is supported and the SQL customizations mentioned below are no longer necessary. Use the Retrieval Mode, ODBC Calls, to browse Unity Catalog instead.
 
In Strategy 2021 Update 8 and older, Databricks' Unity Catalog is not certified. Therefore, this article describes a set of configurations necessary to access Unity Catalog.
 

  • Configuration changes
  • Access Databricks Unity Catalog through MicroStrategy Web data import
  • Access Databricks Unity Catalog through MicroStrategy Workstation

Configuration changes

Make the following configuration changes:
 

  • Modify the unified quoting pattern for Databricks
  • Enable data source SQL for catalog retrieval mode
  • Add data mapping for Databricks

Modify the unified quoting pattern for Databricks

By default, MicroStategy has Databricks set with unified quoting enabled in a "'#0'" pattern, which adds backticks to table names in SQL. To resolve this issue, you must change the unified quoting pattern to remove the backticks.
 

Modify Database.PDS

  1. On the machine with Strategy Developer, open
    C:\Program Files (x86)\Common Files\MicroStrategy\DATABASE.PDS
     for editing.
     
  2. Search for Databricks and find the following line in the Databricks DBMS section.

    <PROPERTY NAME="Unified Quoting Pattern" VALUE="'#0'" />


  3. Change it to:

    <PROPERTY NAME="Unified Quoting Pattern" VALUE="#0" />


Load Databricks DBMS with the modified Database.PDS

  • On the machine with Strategy Developer installed, login to Developer to the Intelligence server you want to use.
     
  • Open Developer > Administration > Configuration Managers > Database Instance.
     

ka0PW0000004gDZYAY_0EM4W000006HhoW.jpeg
  • Edit a Databricks database instance (see the section below for Databricks Database Instance Creation details) and click Upgrade.
     

ka0PW0000004gDZYAY_0EM4W000006Hhob.jpeg
  • In the left panel, click Load to load the configs from the previously modified Database.PDS file.
     
  • In Available database types, click Databricks and the right arrow to move it to Existing database types.
     

ka0PW0000004gDZYAY_0EM4W000006HhoR.jpeg
  • Click OK.
     
  • Save the database instance and restart the Intelligence server.

Enable data source SQL for catalog retrieval mode

  • By default the Databricks retrieval mode switch is disabled, with ODBC calls as default selection. To enable the switch, go to your Strategy Web deployment folder and open
    DBProperties.xml
    for editing.
     
  • You must change the Databricks database setting in the file. For example, If you are using Strategy Web deployed in Linux Tomcat, the location may be something like
    /apache-tomcat-9.0.45/webapps/MicroStrategy/WEB-INF/xml/DBProperties.xml.


    Change the following line:

    <dbtype catsql="0" disp="1" n="Databricks" v="15100">


    to:

    <dbtype catsql="1" disp="1" n="Databricks" v="15100">
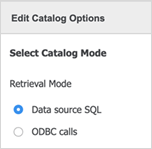

  • Save the file and restart the BIWeb deployment.
     
  • Now you can switch Retrieval Mode between Data source SQL and ODBC calls.
     

ka0PW0000004gDZYAY_0EM4W000006HrOO.jpeg

Add data mapping for Databricks

Since you are using data source SQL to fetch catalog info, you must add the data mapping information so the column data type is detected.
 

Modify DTMapping.PDS

  1. For Windows, locate
    DTMapping.PDS
    in
    C:\Program Files (x86)\Common Files\MicroStrategy\
    . For Linux, locate this file in the Strategy installation home path.
     
  2. Open
    DTMapping.PDS
    for editing.
     
  3. Add the following lines in the
    <ABELL_TO_MSI>
    section.

            <DATABASE NAME="DB_TYPE_NEWDB_71" VERSION="345" MDTYPE="MD_CATALOG"> <!-- DATABRICKS -->
                <ABELL TYPE="bigint" MSITYPE="DssDataTypeInt64" PRECISION="8" SCALE="DDT_NULL_SCALE" PRECISION_SCALE="LENGTH"/>
                <ABELL TYPE="long" MSITYPE="DssDataTypeInt64" PRECISION="8" SCALE="DDT_NULL_SCALE" PRECISION_SCALE="LENGTH"/>
                <ABELL TYPE="tinyint" MSITYPE="DssDataTypeInteger" PRECISION="1" SCALE="DDT_BIT_PRECISION" PRECISION_SCALE="LENGTH"/>
                <ABELL TYPE="char" MSITYPE="DssDataTypeChar" PRECISION="DDT_NULL_PRECISION" SCALE="DDT_NULL_SCALE" PRECISION_SCALE="LENGTH"/>
                <ABELL TYPE="decimal" MSITYPE="DssDataTypeDecimal" PRECISION="10" SCALE="0" PRECISION_SCALE="NONE"/>
                <ABELL TYPE="real" MSITYPE="DssDataTypeDouble" PRECISION="DDT_NULL_PRECISION" SCALE="DDT_BIT_PRECISION" PRECISION_SCALE="LENGTH"/>
                <ABELL TYPE="double" MSITYPE="DssDataTypeDouble" PRECISION="DDT_NULL_PRECISION" SCALE="DDT_BIT_PRECISION" PRECISION_SCALE="LENGTH"/>
                <ABELL TYPE="float" MSITYPE="DssDataTypeFloat" PRECISION="DDT_NULL_PRECISION" SCALE="DDT_BIT_PRECISION" PRECISION_SCALE="LENGTH"/>
                <ABELL TYPE="int" MSITYPE="DssDataTypeInteger" PRECISION="4" SCALE="DDT_NULL_SCALE" PRECISION_SCALE="LENGTH"/>
                <ABELL TYPE="smallint" MSITYPE="DssDataTypeInteger" PRECISION="2" SCALE="DDT_NULL_SCALE" PRECISION_SCALE="LENGTH"/>
                <ABELL TYPE="string" MSITYPE="DssDataTypeVarChar" PRECISION="32767" SCALE="DDT_NULL_SCALE" PRECISION_SCALE="LENGTH"/>
                <ABELL TYPE="timestamp" MSITYPE="DssDataTypeTimeStamp" PRECISION="DDT_NULL_PRECISION" SCALE="DDT_NULL_SCALE" PRECISION_SCALE="LENGTH"/>
                <ABELL TYPE="varchar" MSITYPE="DssDataTypeVarChar" PRECISION="DDT_NULL_PRECISION" SCALE="DDT_NULL_SCALE" PRECISION_SCALE="LENGTH"/>
                <ABELL TYPE="boolean" MSITYPE="DssDataTypeBinary" PRECISION="1" SCALE="DDT_BIT_PRECISION" PRECISION_SCALE="LENGTH"/>
                <ABELL TYPE="date" MSITYPE="DssDataTypeDate" PRECISION="DDT_NULL_PRECISION" SCALE="DDT_NULL_SCALE" PRECISION_SCALE="NONE"/>
                <ABELL TYPE="binary" MSITYPE="DssDataTypeVarBin" PRECISION="DDT_NULL_PRECISION" SCALE="DDT_NULL_SCALE" PRECISION_SCALE="LENGTH"/>
            </DATABASE>		


  4. Restart the Intelligence server.

Access Databricks Unity Catalog through Strategy Web data import

You can create a connection to Databricks with Unity Catalog from Strategy Web, add tables to build a data import cube, and then create a report or dossier against the cube.
 

  • Create a Databricks data source from MicroStrategy Web
  • Modify catalog options
  • Use the connection to import tables

Create a Databricks data source from Strategy Web

  • Go to the Strategy Web home page and click Add External Data.
     

ka0PW0000004gDZYAY_0EM4W000006HrX1.jpeg
  • Search for the Databricks data source by typing it in the search box.
     

ka0PW0000004gDZYAY_0EM4W000006HrZ2.jpeg
  • Click Databricks.
     

  • Choose Select Tables.
     

  • In the left panel, click the plus (+) icon.
     

  • Choose from the following types of data sources:

    • DSN-less: This uses the JDBC connection
    • DNS: This requires you to create a DSN (ODBC) on the Intelligence server machine.
       
  • Enter the corresponding fields to connect to Databricks. In this example, we are using a DSN-less data source.

Modify catalog options

  • In the left panel, hover over the data source you just created, click the drop-down arrow, and choose Edit Catalog Options.
     

ka0PW0000004gDZYAY_0EM4W000006HrfB.jpeg
  • Set the catalog options as shown below.

    • Retrieval Mode: Data source SQL
    • Namespaces: Current only
    • Caching: Table names only
       
ka0PW0000004gDZYAY_0EM4W000006Hrha.jpeg
  • Edit the SQL statements as shown below, replacing "xxx" with your catalog name.
     

    • Retrieve namespaces available in the data source

      select catalog_name || '.'||  schema_name as NAME_SPACE from system.information_schema.schemata where catalog_name = "xxx"


    • SQL statement to retrieve tables available in a data source

      select  table_catalog || '.' || table_schema  as NAME_SPACE, TABLE_NAME TAB_NAME  from system.information_schema.tables where table_catalog = "xxx"


    • SQL statement to retrieve columns for the selected tables

      select  table_catalog || '.' || table_schema as NAME_SPACE, TABLE_NAME TAB_NAME, column_name COL_NAME, data_type DATA_TYPE,
      CASE WHEN data_type = 'TINYINT' THEN 1
      WHEN data_type IN ('BIGINT', 'LONG','DOUBLE') THEN 8
      WHEN data_type IN ('INT','FLOAT')  THEN 4
      WHEN data_type IN ('SMALLINT') THEN 2
      ELSE -1 END AS data_len
      from system.information_schema.columns where table_catalog = "xxx"


  • Save the catalog option.

Use the connection to import tables

Browse into the catalog you set in the previous procedure, then load your tables and create data import cubes.
 

Access Databricks Unity Catalog through Strategy Workstation

In this procedure, you will:
 

  • Create a data source to Databricks with Unity Catalog from MicroStrategy Workstation
  • Load Databricks tables into the Worksation Schema Editor
  • Create attribute/metric objects in Workstation
  • Create schema objects based on loaded table

Create the data source in Workstation

See Create and Edit Data Sources to create a new Databricks data source in Workstation. The data source created here uses JDBC. Make sure to add the project you want to use to this data source before saving the data source.
 

Modify catalog options

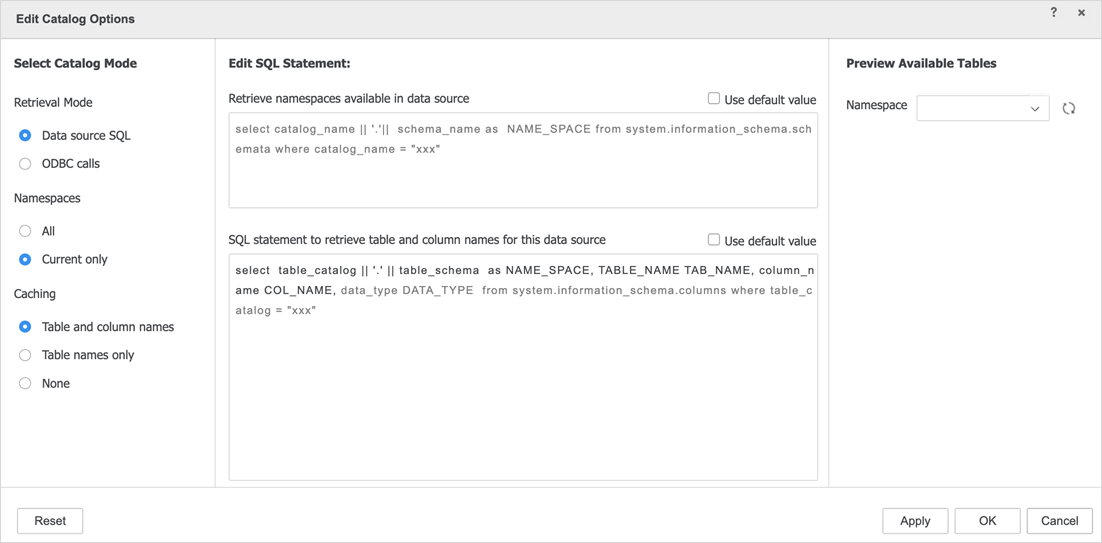
  • Similar to the steps in Modify catalog options for Strategy Web, go to the Databricks import page, select the data source you created, and click Edit Catalog Option.
     

  • Set the catalog options as shown below.

    • Retrieval Mode: Data source SQL
    • Namespaces: Current only
    • Caching: Table names only
       
ka0PW0000004gDZYAY_0EM4W000006Hrv3.jpeg
  • Edit the SQL statements as shown below, replacing "xxx" with your catalog name.
     

    • Retrieve namespaces available in the data source

      select catalog_name || '.'||  schema_name as  NAME_SPACE from system.information_schema.schemata where catalog_name = "xxx"


    • SQL statement to retrieve table and column names for this data source

      select  table_catalog || '.' || table_schema as NAME_SPACE, TABLE_NAME TAB_NAME, column_name COL_NAME, data_type DATA_TYPE,
      CASE WHEN data_type = 'TINYINT' THEN 1
      WHEN data_type IN ('BIGINT', 'LONG','DOUBLE') THEN 8
      WHEN data_type IN ('INT','FLOAT')  THEN 4
      WHEN data_type IN ('SMALLINT') THEN 2
      ELSE -1 END AS data_len
      from system.information_schema.columns where table_catalog = "xxx"


  • Save the catalog option.

Load the table into the schema

See View Schema Information for more details.
 

  • In the Navigation pane of the Workstation window under Modeling, click Schemas.
     

ka0PW0000004gDZYAY_0EM4W000006Hrxx.jpeg
  • Double-click the project you want to use.
     

  • In the left panel of the Schema Editor, under Data Catalog, find the data source you created in step 1. Click it, choose the schema in the pop-up, and click connect to list the tables.
     

  • Double-click a table to load it. You can see the table preview data and table columns.
     

ka0PW0000004gDZYAY_0EM4W000006Hs1a.jpeg
  • Right-click the newly loaded table and in the drop-down list and choose Change name prefix.
     

  • Enter the prefix in <
    catalog_name>.<schema_name>
    format.
     

ka0PW0000004gDZYAY_0EM4W000006Hs1f.jpeg
  • Click Apply. The table is loaded into the project's schema.
     

Create schema objects based on loaded table

You can now create schema objects, such as attributes and metrics, in Workstation. See Manage Objects for more information.


Comment

0 comments

Details

Knowledge Article

Published:

December 12, 2022

Last Updated:

February 19, 2025