EducationSoftwareStrategy.com
StrategyCommunity

Knowledge Base

Product

Community

Knowledge Base

TopicsBrowse ArticlesDeveloper Zone

Product

Download SoftwareProduct DocumentationSecurity Hub

Education

Tutorial VideosSolution GalleryEducation courses

Community

GuidelinesGrandmastersEvents
x_social-icon_white.svglinkedin_social-icon_white.svg
Strategy logoCommunity

© Strategy Inc. All Rights Reserved.

LegalTerms of UsePrivacy Policy
  1. Home
  2. Topics

KB5078: How to create a value prompt in MicroStrategy Developer 9.4.x - 10.x


Stefan Zepeda

Salesforce Solutions Architect • Strategy


This document explains how to create value prompts using an attribute qualification in MicroStrategy Developer 9.4.x - 10.x

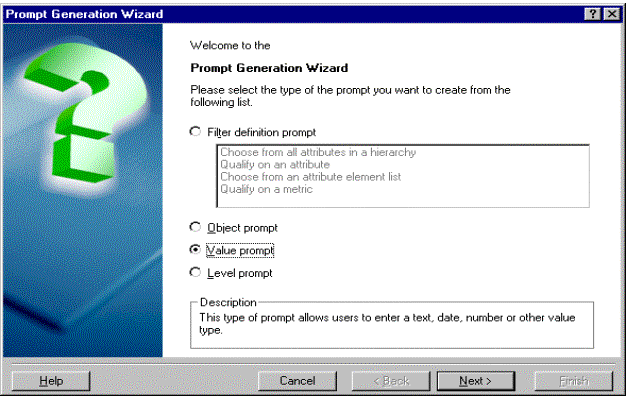
Value prompts allow users to enter dates, numbers or text, depending on the type of value prompts built, instead of choosing from an element list. Users enter filtering criteria when prompted during report execution rather than waiting for the attribute element list to load and then choosing from the list.
To create a value prompt, execute the following steps:
 

  • Launch the Prompt Generation Wizard in Strategy Developer by going to File menu > New and choosing 'Prompt'.
  • Choose the option to create a 'Value prompt' in the Prompt Generation Wizard and click on 'Next', as shown below:
ka02R000000kcQTQAY_0EM440000002GGD.gif
  • Choose 'Date prompt' and click on 'Next'.
ka02R000000kcQTQAY_0EM440000002GGA.gif
  • A screen appears where users can choose to create a specific type of value prompt (i.e., choose to create a date prompt, a numeric prompt or a text prompt).
     
    For example, a date prompt is a prompt for a date value and is answered as '2/6/01'. A numeric prompt is answered as '2500' for a metric value. This screen also allows users to specify a default value for the prompt and a valid range for the prompt answer. These settings are optional.

 
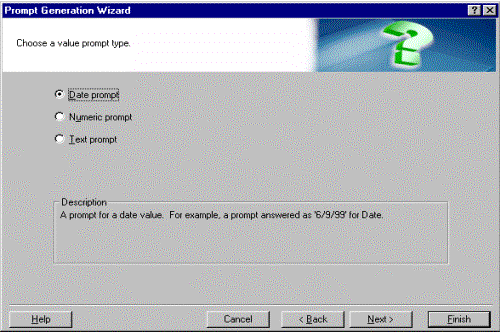
The following steps explain how to set up a date value prompt. Users can follow the same steps to create a numeric or text value prompt.
 

  • Choose 'Next'.
  • Enter the name for the date prompt that was created and click on 'Finish' to save the prompt. This prompt is used in the filter editor as an attribute qualification.
  • Go to File menu > New and choose 'Filter' to launch the filter editor.
  • Double-click on the filter definition to reveal the filtering options and choose to add an attribute qualification. Click on 'OK' and the 'Attribute Qualification' dialog box appears.
  • Execute one of the following steps to add an attribute to the Attribute box:
     
    • Enter the name of an attribute in the Attribute box and click on 'OK'.
      OR
       
    • Click on '...' and select an attribute from the list, then click on 'OK'.
      OR
       
    • Select and drag an attribute from the Object Browser to the Attribute box.
  • Choose to qualify on 'ID' and drag the date prompt that was created from the object browser. The operator automatically changes to 'Simple Prompt'. Click 'Save and Close' to save the filter.
ka02R000000kcQTQAY_0EM440000002GG8.gif
  • Choose the 'Add a shortcut to a filter' option to use the new filter in the report editor of the filter definition.
  • Use the shortcut created earlier by clicking on '...' and selecting the filter or by selecting and dragging the filter from the Object Browser. Click on 'OK'.
  • Build the template and run the report.

 
Once execution of the report begins, the prompt is loaded, as shown below:

ka02R000000kcQTQAY_0EM440000002GGE.gif

Users have the flexibility of inputting the data or, in the case of a date prompt, using the date editor or the calendar. The date editor appears to the right of the input box; the calendar appears by clicking the drop down arrow of the data input box.


Comment

0 comments

Details

Knowledge Article

Published:

April 25, 2017

Last Updated:

April 25, 2017