EducationSoftwareStrategy.com
StrategyCommunity

Knowledge Base

Product

Community

Knowledge Base

TopicsBrowse ArticlesDeveloper Zone

Product

Download SoftwareProduct DocumentationSecurity Hub

Education

Tutorial VideosSolution GalleryEducation courses

Community

GuidelinesGrandmastersEvents
x_social-icon_white.svglinkedin_social-icon_white.svg
Strategy logoCommunity

© Strategy Inc. All Rights Reserved.

LegalTerms of UsePrivacy Policy
  1. Home
  2. Topics

KB485483: MicroStrategy Platform JDK


Muna Abdi Yussuf

Product Manager • Strategy


This article outlines how to reconfigure the MicroStrategy platform to run with a non-AdoptOpen JDK certified configuration such as Oracle JDK.

Description


The Strategy platform is bundled with AdoptOpen JDK.  Depending on your version, a different JDK version will be used.  As an example, customers on a version released on or after March 2024, such as Strategy ONE (March 2024), utilize JDK 17.  Versions released before March 2024, such as Strategy 2021 Update 12 and earlier, utilize JDK 11.  The Strategy 2020 platform utilizes JDK 8.  The article below utilizes JDK 11 in example paths.  Customers will need to reflect their JDK version in those example paths.  The article below is provided for customers looking to reconfigure the platform with the other certified Java Development Kit, Oracle JDK and provides per-product details on how to reconfigure:
 

Prerequisites


To reconfigure any Strategy component to work with Oracle JDK, ensure the following:

  1. Download the supported Oracle JDK version from the Java Downloads page. Suppose you download jdk-11.0.15, save the file in the following location: 
    • Linux:
      /home/admin/Downloads/
    • Windows:
      C:\Users\admin\Downloads\
  2. Unzip it or Install it in a different location or path from AdoptOpenJDK, preventing any backup related issues. Suppose after installing or unzipping, the JDK files are in the following locations: 
    • Linux:
      /home/admin/Downloads/jdk-11.0.15_linux-x64_bin/jdk-11.0.15
    • Windows:
      C:\Program Files (x86)\Common Files\MicroStrategy\JRE\jdk-11.0.15
  3. Stop all Strategy services


To change the registry key or environment variables for each component, detailed steps for each component can be found below.

  • Enable Oracle JDK for Strategy Web, Library, Mobile, and REST Server
  • Enable Oracle JDK for Gateways and Data Imports
  • Enable Oracle JDK for Distribution Services
  • Enable Oracle JDK for the New Export Engine
  • Enable Oracle JDK for the Modeling Service
  • Enable Oracle JDK for Cloud Object Connectors
  • Enable Oracle JDK for QuickSearch
  • Enable Oracle JDK for DBMigrator
  • Appendix

Note: In the steps below, the use case is for a user reconfiguring to use the certified Oracle JDK 11 with Strategy 2021. For customers on Strategy 2020, Oracle JDK 8 is a supported configuration and an alternative to AdoptOpenJDK. For a full list of certified configurations, see Platform Certifications.

ka0PW0000001VeTYAU_0EM4W000004ZyRt.jpeg
ka0PW0000001VeTYAU_0EM4W000004ZyRy.jpeg
ka0PW0000001VeTYAU_0EM4W000004ZyS3.jpeg


Enable Oracle JDK for Strategy Web, Library, and REST Server

Linux installation environment

  1. Go to where Tomcat is installed. For example,
    /home/admin/apache-tomcat-9.0.58/bin.
  2. Open
    catalina.sh
    in editable mode and add the following two lines:
    JAVA_HOME=/JavaPath/jdk-11.0.15_linux-x64_bin/jdk-11.0.15	JRE_HOME=/JavaPath/jdk-11.0.15_linux-x64_bin/jdk-11.0.15

  3. Save the file.
  4. Restart Tomcat.

Windows installation environment

For Tomcat

  1. Go to 
    C:\Program Files (x86)\Common Files\MicroStrategy\Tomcat\apache-tomcat-9.0.58\bin.
  2. Open
    Catalina.bat
    in editable mode and change
    JRE_HOME
    to
    "JRE_HOME=C:\Program Files (x86)\Common Files\MicroStrategy\JRE\jdk-11.0.15".
  3. Set the Java Virtual Machine (JVM) path in the following registry key entries:
  • <HEY_LOCAL_MACHINE>\Software\Wow6432Node\MicroStrategy\JNI Bridge 64\Configuration

    JVM Path -
    C:\Program Files (x86)\Common Files\MicroStrategy\JRE\jdk-11.0.15\bin\server\jvm.dll 

  • <HEY_LOCAL_MACHINE>\Software\Wow6432Node\Apache Software Foundation\Procrun 2.0\Tomcat9\Parameters\Java

    JVM Path -
    C:\Program Files (x86)\Common Files\MicroStrategy\JRE\jdk-11.0.15\bin\server\jvm.dll  

  • Restart Tomcat.

For ASP Web

  1. Set the JVM path in the following registry key entries:
    • For a 64-bit Windows system:
      <HEY_LOCAL_MACHINE>\Software\Wow6432Node\MicroStrategy\JNI Bridge 64\Configuration

      JVM Path -
      C:\Program Files (x86)\Common Files\MicroStrategy\JRE\jdk-11.0.15\bin\server\jvm.dll 

    • For a 32-bit Windows system:
      <HEY_LOCAL_MACHINE>\Software\Wow6432Node\MicroStrategy\JNI Bridge\Configuration

      JavaVM Path -
      C:\Program Files (x86)\Common Files\MicroStrategy\JRE\jdk-11.0.15\bin\server\jvm.dll  

  2. Restart ASP from IIS.
    1. In the search bar, type "IIS" and choose Internet Information Services (IIS).
    2. From the left, choose the Intelligence server that ASP Web uses.
    3. On the right, under "Manager Server", click Restart.
ka0PW0000001VeTYAU_0EM4W000004ZyS8.jpeg

Enable Oracle JDK for Gateways and Data Imports

Linux installation environment

  1. Set the JVM path to Oracle Java 11 by modifying the registry key, "
    HKEY_LOCAL_MACHINE\SOFTWARE\MicroStrategy\JNI Bridge\Config for DataServices\64-bit JVM
    ”
    • From “
      /InstallPath/_jre/lib/server/libjvm.so
      ”
    • To “
      /JavaPath/jdk-11.0.15/lib/server/libjvm.so
      ”
  2. Start the Intelligence server.

Windows installation environment

  1. Set the JVM path to Oracle JDK by modifying the registry key, "
    HKEY_LOCAL_MACHINE\SOFTWARE\WOW6432Node\MicroStrategy\JNI Bridge\Config for DataServices\64-bit JVM
    ”
    • From
      C:\Program Files (x86)\Common Files\MicroStrategy\JRE\11.0.14.1.1\Win64\bin\server\jvm.dll
    • To
      C:\Program Files (x86)\Common Files\MicroStrategy\JRE\jdk-11.0.15\bin\server\jvm.dll
  2. Start the Intelligence server.


Enable Oracle JDK for Distribution Services

Linux installation environment

  1. Set the JVM path to Oracle Java 11 by modifying the registry key,
    “HKEY_LOCAL_MACHINE\SOFTWARE\MicroStrategy\JNI Bridge\Config for DataServices\64-bit JVM”

    • From "
      /InstallPath/_jre/lib/server/libjvm.so
      "
    • To "
      JavaPath/jdk-11.0.15/lib/server/libjvm.so
      "
  2. Start the Intelligence server.

Windows installation environment

  1. Set the JVM path to Oracle JDK 11 by modifying the registry key, "
    HKEY_LOCAL_MACHINE\SOFTWARE\WOW6432Node\MicroStrategy\JNI Bridge 64\Configuration
    "
    • From
      C:\Program Files (x86)\Common Files\MicroStrategy\JRE\11.0.14.1.1\Win64\bin\server\jvm.dll
    • To
      C:\Program Files (x86)\Common Files\MicroStrategy\JRE\jdk-11.0.15\bin\server\jvm.dll
  2. Start the Intelligence server.


Enable Oracle JDK for the New Export Engine

Linux Installation Environment 

  1. Go to the New Export Engine directory at
    ../../MicroStrategy/install/Export.
  2. Close the New Export Engine by using the command:
    ./pdfexporter.sh stop
  3. Modify the JDK version by editing the
    pdfexporter.sh
    file. 
    1. Run the command:
      vim pdfexporter.sh
    2. Enter
      i
      to enter edit mode.
    3. Find the 
      JAVA_BIN= 
      keyword and overwrite the original JDK path with the Oracle JDK path.
      For example,
      JAVA_BIN="${SCRIPT_PATH}/jdk1.8.0_333/bin/java".

    4. Save and exit by using the command:
      :wq
  4. Start the New Export Engine by using the command:
    ./pdfexporter.sh start
  5. Check the JDK used by the New Export Engine by using the command:
    ps aux | grep Export

    For example,
    mstr 2876 21.4 0.7 5230540 490436 pts/0 Sl 09:06 0:21 /opt/mstr/MicroStrategy/install/Export/jdk1.8.0_333/bin/java

Windows installation environment

  1. Stop the New Export Engine by services.
  2. Modify the value of the registry,
    Computer\HKEY_LOCAL_MACHINE\SYSTEM\CurrentControlSet\Services\MSTR_PDFExport\Parameters\Java\Jvm,
    to the Oracle JRE JVM path.
    For example,
    Jvm = C:\jdk1.8.0_333\jre\bin\server\jvm.dll

  3. Start the New Export Engine by services.
  4. Check the JDK used by the New Export Engine by Resource Monitor.
    1. Open the Resource Monitor system.
    2. Switch to the CPU tab.
    3. Select
      MSTRPDFExportService.exe.
    4. Verify that Oracle JDK is used in the New Export Engine by looking at Associated Modules.


Enable Oracle JDK for the Modeling Service

Linux installation environment

  1. Stop the Modeling service.
    • If your Linux environment is from AWS Cloud provisioning, you may use the console to stop or start the Modeling service.
      1. Log into AWS Cloud provisioning and navigate to your current environments.
      2. Select your desired environment and the options and environment details appear.
      3. Go to Services > Modeling Service and click on the elipse icon under the Actions column > Stop.
    • If your Linux environment is not from AWS Cloud provisioning, you may run the executable files under the Modeling service to stop or start it.
      • Navigate to
        /<install_directory>/mstr/MicroStrategy/install/ModelingService/bin.
      • In the terminal, run
        ./bin/modelservice.sh [action]
        where
        [action]
        can be
        stop
        ,
        start
        ,
        restart
        , or
        status.
    • To learn more about configuring the Modeling service on a Linux server, see Manually Configure the Modeling Service on a Linux Server.
  2. Set environment
    JAVA_HOME
    to the JVM path of Oracle JDK.
    • Alternatively, set the new Java version by opening
      modelservice.sh
      under
      /opt/mstr/MicroStrategy/install/ModelingService/bin
      . Then, change the default
      JAVA_HOME
      path to the new path at:
      export JAVA_HOME={/JavaPath}
  3. Start the Modeling service.

Windows installation environment

  1. Stop the Modeling service.
    Assuming the Modeling service was installed with the Intellignce server as normal, then you may use Windows Services to stop the Modeling service.
    1. Search and find the "Services" in the Windows machine.
    2. Scroll down to find "Strategy Modeling Service". The status should be "Running".
    3. Right-click Strategy Modeling Service and select Stop. The status should be "Stopped".
  2. Set the JVM path of Oracle JDK 11 by modifying the registry key,
    “HKEY_LOCAL_MACHINE\SOFTWARE\CurrentControlSet\Services\MSTR_ModelingService\Parameters\Java”.
  3. Set environment 
    JAVA_HOME
     to JVM path of Oracle JDK.
  4. Start the Modeling service.


Enable Oracle JDK for Cloud Object Connector

Note: Cloud Object Connectors are available starting in Strategy 2021, and not in versions prior to it.

Linux installation environment

  1. Stop Cloud Connector by using the command:
    <install_dir>/CloudObjectConnector/CloudObjectConnector.sh stop
  2. Edit line 27 of
    CloudObjectConnector.sh
    file:
    1. The raw config item is export
      JAVA_HOME=
       <MSTR_install_dir/_jre>
      referring to the JDK distributed by Strategy.
    2. Update it to refer to your Oracle JDK path.
    3. Save the updated file.
  3. With the expected OS user, restart Cloud Connectors by using the command: 
    <install_dir>/CloudObjectConnector/CloudObjectConnector.sh start

Windows installation environment

  1. From the Windows Services panel (
    service.msc
    ), locate the Strategy Cloud Object Connector service and stop it. 
  2. In the
    <install_dir>/CloudObjectConnector
    directory, edit line 43 of the 
    CloudObjectConnectorService.xml
    file. 
    1. In the "
      executable
      " node, replace the value with the Oracle JDK path:
      <executable>C:\Program Files\Java\jdk-11.0.15\bin\java.exe</executable>
    2. Save the updated file.
  3. From Windows Services, start the Strategy Cloud Object Connector service.


Enable Oracle JDK for QuickSearch

Linux installation environment

  1. Assuming Oracle JDK is installed in
    /opt/java-10.0.15
    , set the JVM path to Oracle JDK 11 by modifying the registry key, "
    HKEY_LOCAL_MACHINE\SOFTWARE\MicroStrategy\JNI Bridge\Config for DataServices\64-bit JVM
    ”
    For example:
    • [HKEY_LOCAL_MACHINE\SOFTWARE\MicroStrategy\JNI Bridge\Config for DataServices\64-bit JVM]
    • "HeapMaxSize"="1200M"
    • "JavaVM Path"="/build/Strategy11.3.5.2/_jre/lib/server/libjvm.so"
  2. Given that Oracle JDK is installed in
    /opt/java/jdk-10.0.15
    , change it to:
    • [HKEY_LOCAL_MACHINE\SOFTWARE\MicroStrategy\JNI Bridge\Config for DataServices\64-bit JVM]
    • "HeapMaxSize"="1200M"
    • "JavaVM Path"="/opt/java/jdk-11.0.15/lib/server/libjvm.so"
  3. Start the Intelligence server.


Reconfiguring Oracle JDK 8 on a Strategy 2020 Windows Installation Environment

  1. Assuming Oracle JDK is installed in
    C:\Program Files (x86)\Java\jdk1.8.0_333
    , set the JVM path to Oracle JDK 8 by modifying the registry key, "
    HKEY_LOCAL_MACHINE\Software\Wow6432Node\MicroStrategy\JNI Bridge\Config for DataServices\32-bit JVM
    ”
    For example:
    • Computer\HKEY_LOCAL_MACHINE\SOFTWARE\MicroStrategy\JNI Bridge\Config for DataServices\64-bit JVM
    • "HeapMaxSize"="1200M"
    • "JavaVM Path"="/build/Strategy11.3.5.2/_jre/lib/server/libjvm.so"
  2. Given that Oracle JDK is installed in
    /opt/java/jdk-10.0.15
    , change it to:
    • [HKEY_LOCAL_MACHINE\SOFTWARE\MicroStrategy\JNI Bridge\Config for DataServices\64-bit JVM]
    • "HeapMaxSize"="1200M"
    • "JavaVM Path"="/opt/java/jdk-11.0.15/lib/server/libjvm.so"
  3. Start the Intelligence server.


Why doesn't QuickSearch support Oracle JDK 11 on Windows? 


Currently, QuickSearch on Windows environments utilizes 32-bit JRE. The detailed path is

1HKEY_LOCAL_MACHINE\SOFTWARE\MicroStrategy\JNI Bridge\Config for DataServices\32-bit JVM
.
However, following the release of JDK 9, Oracle no longer provides 32-bit JRE. For more information, see this Oracle documentation.


Enable Oracle JDK for DBMigrator


You can run DBMigrator's backup and restore commands under any path.

Linux installation environment

  1. Configure an environment variable by modifying the profile file:
    sudo vi/etc/profile

    1. Append the following two lines at the end of the file:
      export JAVA_HOME=/home/mstr/java_11.0.15/jdk-11.0.15

      export PATH=$JAVA_HOME/bin:$PATH

  2. Apply the new environment variables by running the command:
    source /etc/profile
  3. Check if JDK 11.0.15 works by running the command:
    java -version


Windows installation environment

  1. Set the environment variable. For example, when installing JDK-11.0.15 under
    C://Program Files/Java/jdk-11.0.15
    , set the following environment variables:
    Variables:JAVA_HOME	Value:C:\Program Files\Java\jdk-11.0.15

    Variables:CLASSPATH	Value:.;%JAVA_HOME%\lib\dt.jar;%JAVA_HOME%\lib\tools.jar;

    Variables:Path	Value:%JAVA_HOME%\bin;%JAVA_HOME%\jre\bin;

  2. Check if JDK 11.0.15 works by running the command:
    java -version


Appendix

How do I carry out a sanity test for DBMigrator?


The following scenarios can be covered through sanity tests:

  • Backup metadatas from SQL Server, Oracle, MySQL, DB2, Teradata, and PostgreSQL with native drivers. 
  • Backup metadatas from SQL Server, Oracle, DB2, and PostgreSQL with progress drivers. 
  • Restore metadatas into PostgreSQL with native driver.
  • Restore metadatas into PostgreSQL with progress driver. 


To carry out a sanity test

  1. Create a folder named
    DBMigrator
    . 
  2. Download
    DBMigrator-3.0.17.jar
    from Nexus.
  3. Rename it as
    DBMigrator.jar
    and put it in the
    DBMigrator
    folder.
  4. Put the native and progress drivers into the
    lib
    folder. Due to licensing restrictions, you should download the native JDBC drivers from the official websites. 
  5. Back up the metadatas from SQL Server, Oracle, DB2, and PostgreSQL with progress drivers. 
  6. Restore the metadatas into PostgreSQL with the native driver. 
    • Use the command:
      java -cp DBMigrator.jar;lib/* com.Strategy.db.utils.DBMigrate -d jdbc:postgresql://<DB ENDPOINT>
      :5432/ <DB NAME> 
      -u <DB USER> 
      -p <DB PASSWORD>
       restore 
  7. Restore the metadatas into PostgreSQL with the progress driver.
    • Use the command:
      java -cp DBMigrator.jar;lib/* com.Strategy.db.utils.DBMigrate -d jdbc:Strategy:postgresql:// <HostName>
      :5432;DatabaseName=
       <DBName> -u <UserName> 
      -p <Password> 
      restore 
  8. Open the target metadata with Strategy Developer to check whether DBMigrator successfully migrates the source metadata.


How do I carry out a sanity test for Distribution Services Smart Host?

  1. Open Strategy Developer and confirm that the device being used is correctly configured for Smart Host "Generic Email". For more information, see KB13568
    Ensure "Always use Smart Host" is enabled.
  2. Create an email subscription and choose a user with an email with the gmail domain.
  3. Trigger the subscription. You should receive an email.
  4. Open your Gmail inbox and click on the original email.
  5. Search the content to get the last "Received: from". It should contain "
    version=TLS
    " which indicates the email is encrypted.
 

How do I carry out a sanity test for QuickSearch?

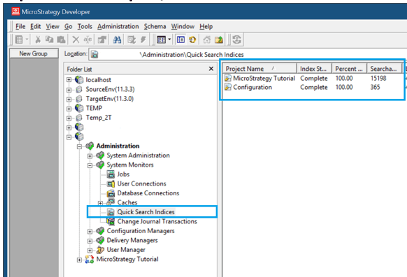
Check the index status

  • Open Strategy Developer.
  • Go to Administration > System Monitors > Quick Search indices.
ka0PW0000001VeTYAU_0EM4W000004ZoZ9.jpeg
  • The index status should be complete.


Test QuickSearch functionalities via Web

  1. Configure Web.
  2. Search in Web. The suggestion and search functionalities should work as expected.

For any questions related to the support status or requests pertaining to third party software, please contact Strategy Support.


Comment

0 comments

Details

Knowledge Article

Published:

May 19, 2022

Last Updated:

April 9, 2024