EducationSoftwareStrategy.com
StrategyCommunity

Knowledge Base

Product

Community

Knowledge Base

TopicsBrowse ArticlesDeveloper Zone

Product

Download SoftwareProduct DocumentationSecurity Hub

Education

Tutorial VideosSolution GalleryEducation courses

Community

GuidelinesGrandmastersEvents
x_social-icon_white.svglinkedin_social-icon_white.svg
Strategy logoCommunity

© Strategy Inc. All Rights Reserved.

LegalTerms of UsePrivacy Policy
  1. Home
  2. Topics

KB484078: Migration from MicroStrategy on AWS Trial Environment to a MicroStrategy on AWS Production Environment


Community Admin

• Strategy


This article explains how to migrate from an AWS Trial environment to an AWS Production environment on MicroStrategy.

After configuring and testing a Strategy on AWS Trial environment, there are four main steps to further configure the environment to a full production environment.
 

  1. Change the default passwords
  2. Configure the SMTP Server
  3. Reconfigure MicroStrategy Identity for DNS change
  4. Update SSL Certificates

Change the default passwords

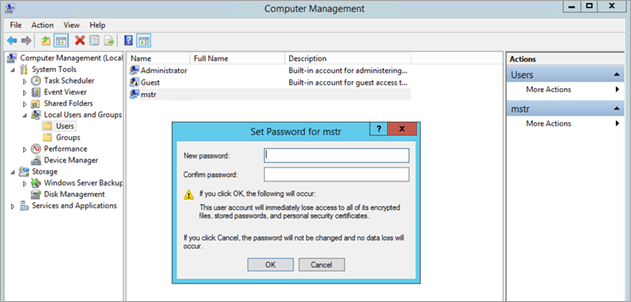
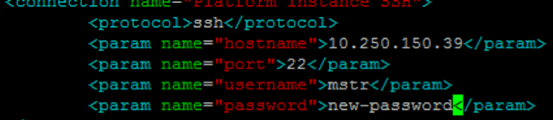
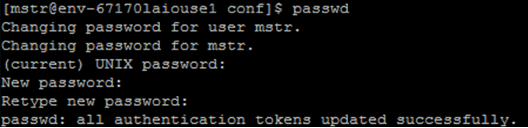
Change the default passwords for:
 

MSTR User from a Windows Developer Instance

  • Log in to the Windows machine as the MSTR user.
  • Open Computer Management.
  • Navigate to Local User and Groups>Users.
  • Right-click the mstr user > Set Password.
  • Enter the new password.
  • Retype the new password.
ka04W000001IwtXQAS_0EM2R000000o0HN.jpeg
  • Click OK.

Remote Access for Guacamole

  • Log in to your Linux machine.
  • In the console, navigate to the guacamole folder using the following command:
ka04W000001IwtXQAS_0EM2R000000o0HS.jpeg
  • Open the user-mapping.xml file using the following command:
ka04W000001IwtXQAS_0EM2R000000o0Hi.jpeg
  • Locate <param name="password"> and enter your new password. 
  • Make sure to update all "password" fields with the new password in the file:
ka04W000001IwtXQAS_0EM2R000000o0Hm.jpeg

VNC

  1. Log in to your Linux machine.
  2. In the console, enter vncpasswd.
  3. Next to Password, enter your new password.
  4. Next to Verify, retype the new password.

MSTR User on a Linux Server 

  • Log in to your Linux machine as the MSTR user.
  • In the console, enter passwd.
  • Enter the current password for the MSTR user.
  • Enter the new password and press Enter.
  • Retype the new password and press Enter. A message appears indicating the password is successfully changed.
ka04W000001IwtXQAS_0EM2R000000o0Gj.jpeg
  • Restart tomcat by running:
    service mstr tomcatrestart.

MSTR User in MySQL via Command Line (Strategy 2019 and earlier)

  • Log in to the MySQL database using command line.
ka04W000001IwtXQAS_0EM2R000000o0Gt.jpeg
  • Enter the following command to change your password:
ka04W000001IwtXQAS_0EM2R000000o0Gy.jpeg
  • Press Enter.
ka04W000001IwtXQAS_0EM2R000000o0H3.jpeg

PostgreSQL User in PostgreSQL via Command Line (Strategy 2020 and later)

  • Log in to the Postgres database using command line.
    
    opt/mstr/MicroStrategy/install/Repository/bin/mstr_psql -d poc_metadata -h HOSTNAME -U mstr
    

  • Run the following command to change the password in Postgres:
ka04W000001IwtXQAS_0EM2R000000o0HD.jpeg
  • Enter the new password twice and quit Postgres using \q.

Strategy Web

  1. Open Strategy Web.
  2. From the drop-down, select Preferences.
  3. In User Preferences, select Change Password.
  4. In Old password, enter your existing password.
  5. In New password, enter your new password.
  6. In New password verification, retype the new password.
  7. Click Change Password.

For steps to change another user's password, see How to Change a User's Password .

Strategy Web Admin

  • Log in to your Linux machine.
  • In the console, navigate to the Tomcat directory using the following command:
ka04W000001IwtXQAS_0EM2R000000o0IQ.jpeg
  • Open the tomcat-users.xml file using the following command:
ka04W000001IwtXQAS_0EM2R000000o0IV.jpeg
  • Locate <user password=""> and enter your new password.
ka04W000001IwtXQAS_0EM2R000000o0Ia.jpeg
  • Restart Tomcat using the following command:
ka04W000001IwtXQAS_0EM2R000000o0If.jpeg

Configure the SMTP Server

  • Create an SES SMTP username and password via Amazon SES console.
  • Log into the machine for which you want to change the Postfix configuration.
  • Upload new certificates which verify the Amazon SES server (/xxx.ct).
  • Modify /etc/postfix/sasl_passwd with the new endpoint name, username, and password.
  • Generate a hashmap database file:
ka04W000001IwtXQAS_0EM2R000000o0Ik.jpeg
  • Tell Postfix where to find the proper certificates:
ka04W000001IwtXQAS_0EM2R000000o0Ip.jpeg
  • Restart Postfix:
ka04W000001IwtXQAS_0EM2R000000o0Iu.jpeg

Reconfigure Strategy Identity for DNS Change

  • Change the DNS host file.
    Location: /etc/hosts – the last line
    [IP address] [old_DNS] [hostname] -> [IP address] [new_DNS] [hostname]
    For example:
ka04W000001IwtXQAS_0EM2R000000o0J9.jpeg
  • changes to
ka04W000001IwtXQAS_0EM2R000000o0JE.jpeg
  • Change the IDM and Gateway properties.
    Location: /opt/usher/usherserver/usherApps/shardGateway/conf/gateway.properties
    • Update the IDM URL in the following properties:
      idm.url=<IDM_URL>
      idm.2tls.url=<IDM2way_URL>
    • Update the Gateway URL and port in the following properties:
      gateway.url=<gateway_URL>
      gateway.port=<gateway_port>
  • Restart Tomcat to activate new Strategy Badge URLs.
ka04W000001IwtXQAS_0EM2R000000o0JT.jpeg
  • Reconfigure Identity Manager.
    Location: <New Identity Manager URL>/networkmanager/manageSystem
  • Restart Strategy Badge Tomcat for Identity Manager reconfiguration to take effect.
ka04W000001IwtXQAS_0EM2R000000o0Jx.jpeg
  • Change Strategy Badge configuration on the Strategy Web Server.
    Location: <New Web DSN>/MicroStrategy/servlet/mstrWebAdmin
  • Click Modify.
  • Click Setup.
ka04W000001IwtXQAS_0EM2R000000o0K7.jpeg
  • Enter the new IDM URL in the Strategy Identity Server URL field.
ka04W000001IwtXQAS_0EM2R000000o0KC.jpeg
  • To get the latest Strategy Badge, resend the Welcome to MicroStratgey AWS email.
  • Log in to the new DNS with new Strategy Badge.

Update SSL Certificates

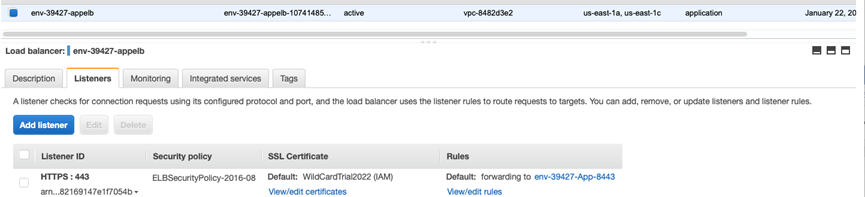
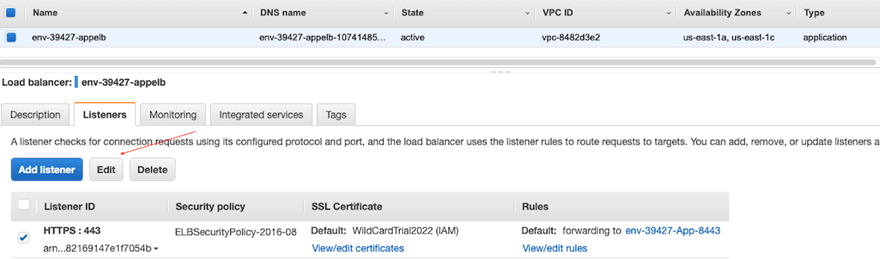
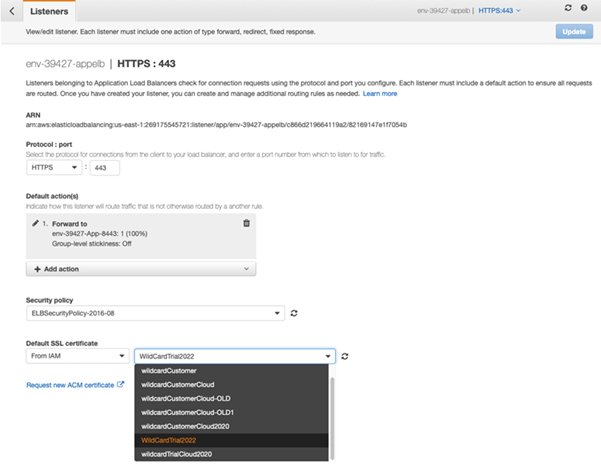
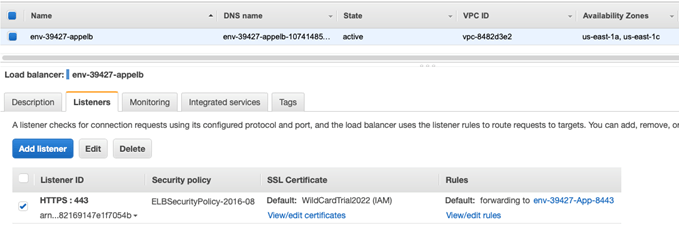
Add certificates to the AWS Account:

  • Open the Amazon EC2 console here.
  • On the navigation pane, go to LOAD BALANCING > Load Balancers.
  • Select your load balancer. For the environments deployed via the MCP console, you can type env- and search for loadbalancer.
ka04W000001IwtXQAS_0EM2R000000o0KR.jpeg
  • On the Listeners tab, under SSL Certificate, click View/edit certificates.
  • Click on the + sign at the top of the screen and click Import Certificate.
  • Select IAM. Do not use ACM.
  • Name the certificate: wildcardTrialCloud2022.
  • In Certificate Private Key, add contents from server.key.
  • In Certificate body, add contents from server.crt.
  • In Certificate chain, add contents from intermediate.crt.
  • Click Import.

Edit the Listener to use the New Certificates

  • Open the Amazon EC2 console here.
  • On the navigation pane, go to LOAD BALANCING > Load Balancers.
  • Select your load balancer. For the environments deployed via the MCP console, you can type env- and search for loadbalancer.
  • Select the checkbox next to the Listener ID for your certificate and click Edit.
ka04W000001IwtXQAS_0EM2R000000o0KW.jpeg
  • Choose the newly added certificates.
ka04W000001IwtXQAS_0EM2R000000o0Kg.jpeg
  • Once the certificates are updated, you can see it on the console.
ka04W000001IwtXQAS_0EM2R000000o0Kl.jpeg

Comment

0 comments

Details

Knowledge Article

Published:

February 27, 2020

Last Updated:

August 4, 2020