EducationSoftwareStrategy.com
StrategyCommunity

Knowledge Base

Product

Community

Knowledge Base

TopicsBrowse ArticlesDeveloper Zone

Product

Download SoftwareProduct DocumentationSecurity Hub

Education

Tutorial VideosSolution GalleryEducation courses

Community

GuidelinesGrandmastersEvents
x_social-icon_white.svglinkedin_social-icon_white.svg
Strategy logoCommunity

© Strategy Inc. All Rights Reserved.

LegalTerms of UsePrivacy Policy
  1. Home
  2. Topics

Quick Start: Deploy MicroStrategy in your existing AWS VPC


Shreyas Shah

Product Manager, Director •


Description

This Quick Start reference guide will help you deploy the Strategy Platform on the AWS Cloud offering in your existing VPC following the best practices from AWS and the Strategy Platform. 
To get started, click here to watch a Quick Start tutorial video.
 
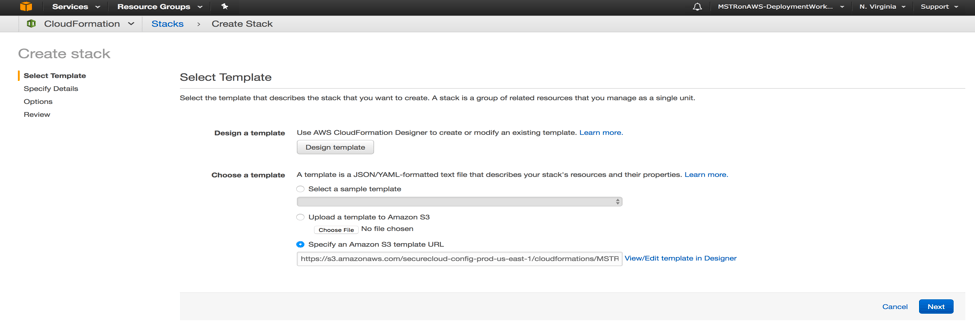
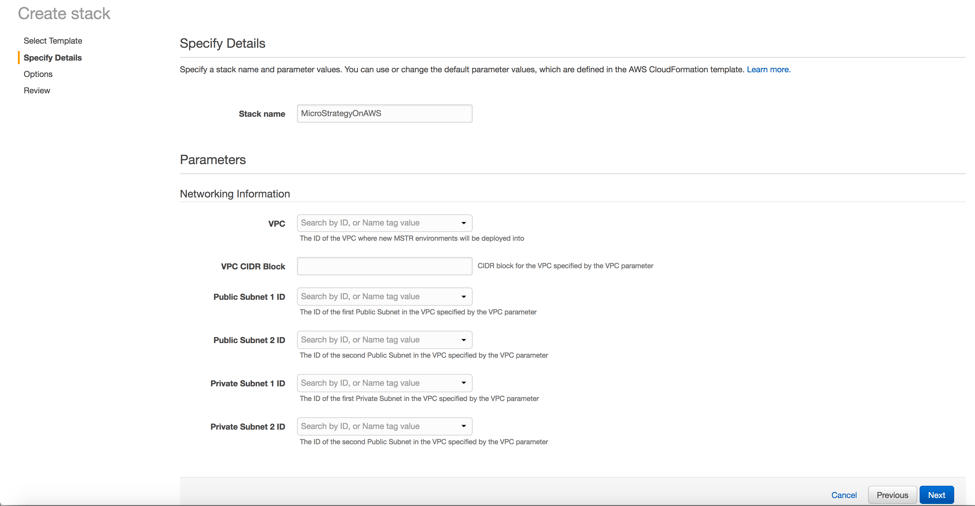
This Quick Start uses AWS CloudFormation templates which will help you to use existing infrastructure and network configurations(VPC) to support the Strategy Platform.
 

What We’ll Cover


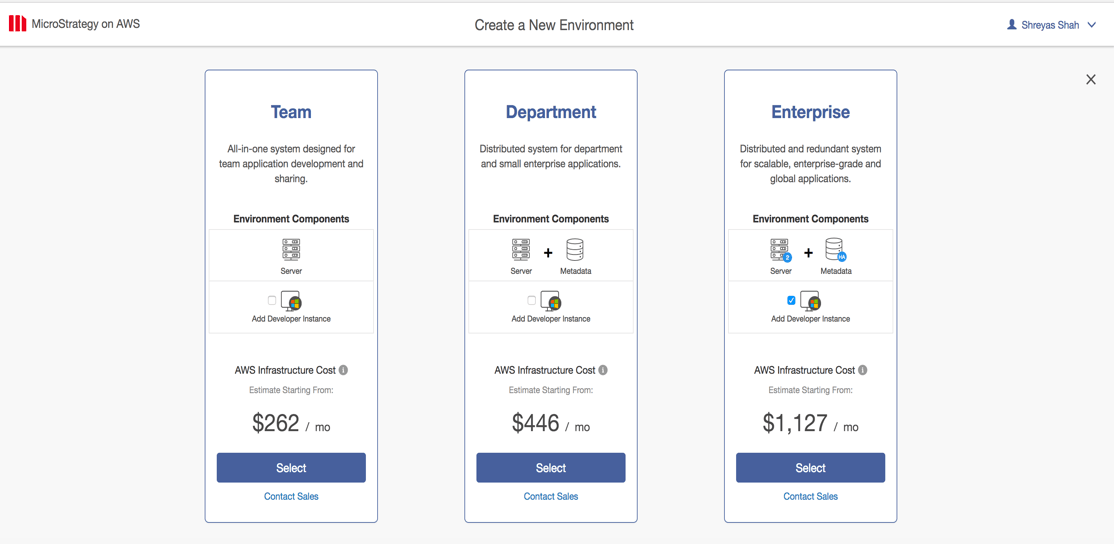
This procedure for deploying Strategy on AWS consists of the following steps.
For detailed instructions, follow the links on every step below:
 

1. Prepare an AWS Account.

  • Sign up for an AWS account, if you don't already have one by going to https://aws.amazon.com
  • Choose the region where you want to deploy the stack on AWS.
  • Review account limits for Amazon EC2 instances, and request a limit increase, if needed.


2. Log into the Strategy on AWS.

  • Click on the URL: https://aws.cloud.microstrategy.com
  • Login with your Resource center credentials.  

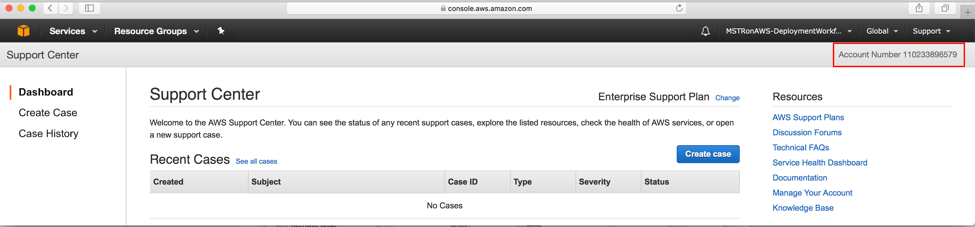
If you don’t have a resource center account sign up for a new account.
 

3. Select Strategy on AWS Platform Edition.

  • Once you log into the Strategy on AWS, Click on one of the editions (Team/Department/Enterprise) based on your requirements.

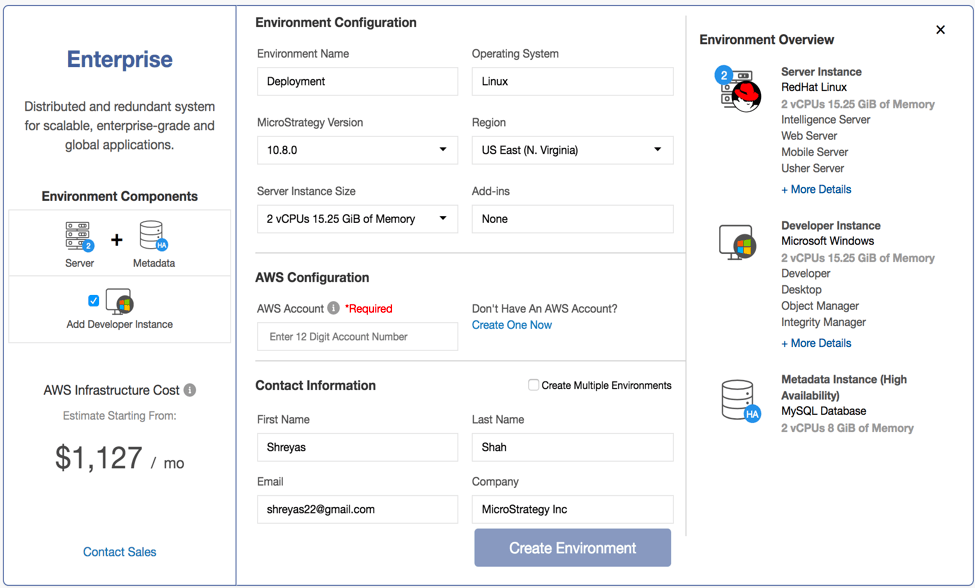
See the description below for your reference:

  1. Team: Team Edition is all-in-one server and is meant to be used by small teams of up to 10-25 users to collaborate together.
  2. ​Department: The Strategy on AWS Department Edition is designed to cover the main requirements of small businesses or departments within large corporations.
  3. Enterprise: The Strategy on AWS Enterprise Edition is designed for customers looking for increased performance, scalability and availability of their Strategy Enterprise applications by leveraging clustering and failover capabilities.


ka02R000000g2i9QAA_0EM44000000PzOL.png


4. Enter Environment Information Details for your deployment.

  • Enter the Environment name (Limit to 25 characters).
  • Select the Strategy Version.
  • Select the Region in which you want to deploy in.
  • Select the Server Instance Size.


ka02R000000g2i9QAA_0EM44000000PzOQ.png


  • In AWS Configuration Section Enter your AWS account number (Account numbers should be 12 digits long).
     
  1. There are multiple ways to get your AWS account ID. One of the options it to login into your AWS account and navigate to “Support”. AWS account number should be displayed on the right hand corner of the screen as displayed in the screenshot below.


ka02R000000g2i9QAA_0EM44000000PzOV.png


  1. Check the box for “Use Existing VPC”, this will ensure that we use your existing infrastructure and networking resources.


ka02R000000g2i9QAA_0EM44000000PzOa.png


  1. Click on “Configuration” URL.

 
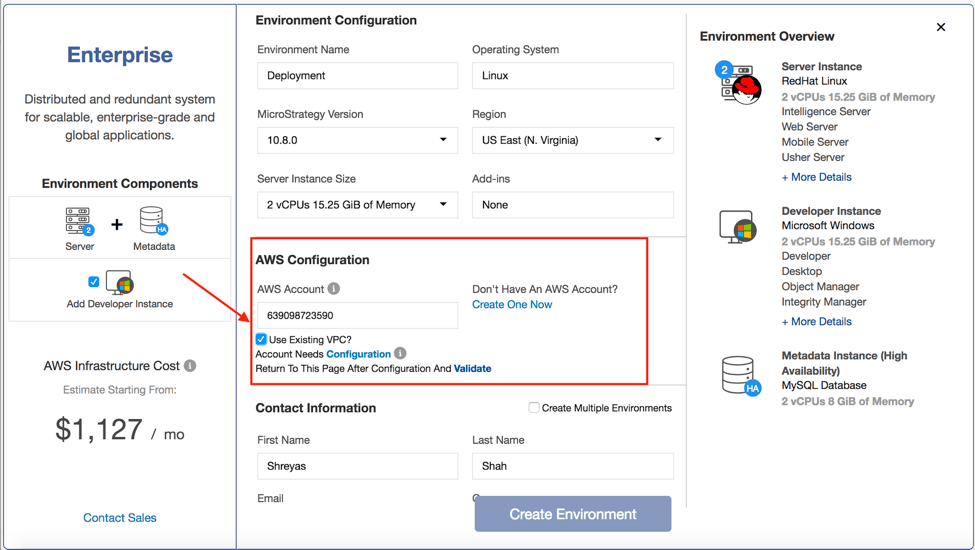
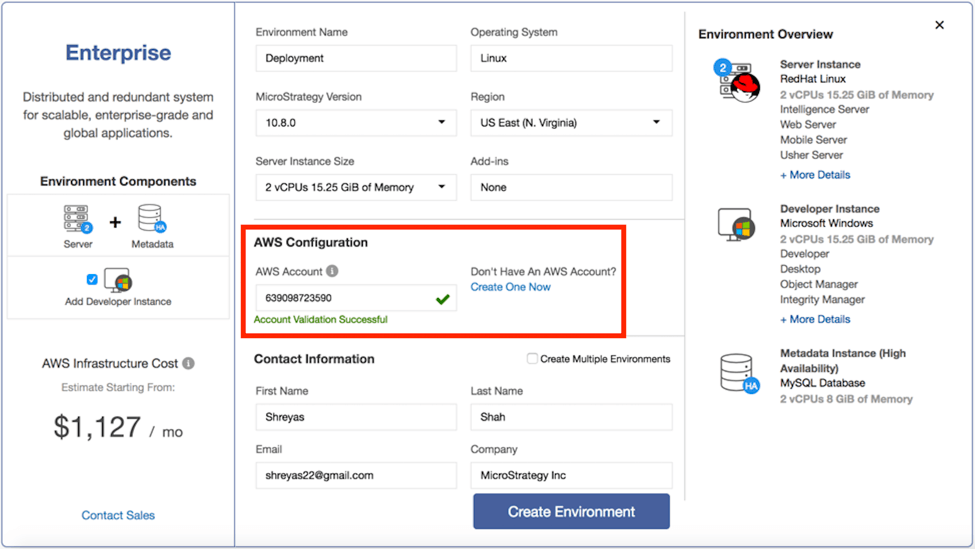
You will see a message informing that you will be redirected to AWS Console for your account configuration process.
 

  1. Click “OK” to proceed.


ka02R000000g2i9QAA_0EM44000000PzOf.png


  1. Login into your AWS account.
  2. Once you are authenticated, our process will take you directly to the CloudFormation AWS service.

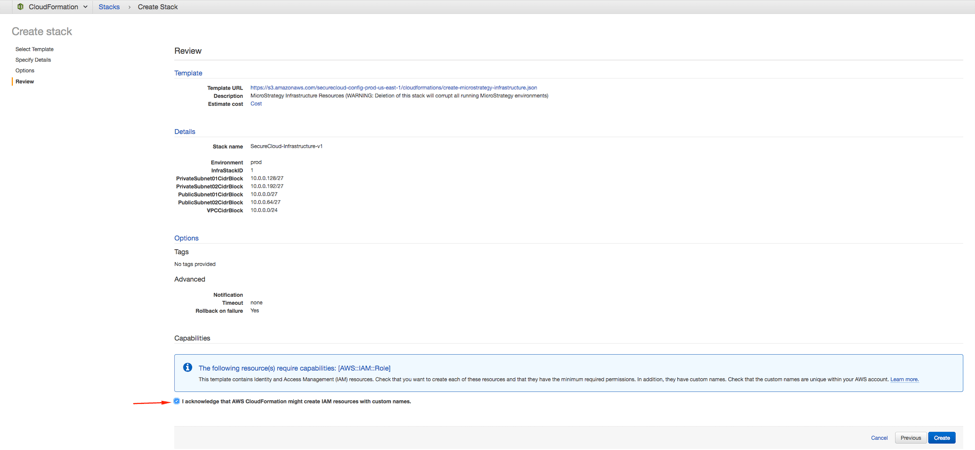
We use CloudFormation templates to configure and deploy Strategy Platform.
 

  1. First Step is to “Select Template”. We have already pre-filled the Cloudformation Template URL.

    Please do not change the URL. Click “Next”.


ka02R000000g2i9QAA_0EM44000000PzOk.png


  1. On the Specify Details page, enter the following Information:


ka02R000000g2i9QAA_0EM44000000PzOp.png


  1. Stack Name: Enter name of the Cloudformation stack, you can use any name you prefer.
  2. VPC: From the Dropdown menu select the VPC in which you want to deploy the Strategy Platform.
  3. VPC CIDR Block: Enter the CIDR range of your VPC. You can check the CIDR range assigned to your VPC in the VPC dropdown menu.
  4.  Public Subnet 1 ID: Select the Public Subnet ID from the dropdown menu.
  5. Public Subnet 2 ID: Select the Public Subnet ID from the dropdown menu.
  6. Private Subnet 1 ID: Select the Private Subnet ID from the dropdown menu.
  7. Private Subnet 2 ID: Select the Private Subnet ID from the dropdown menu.

If you have any questions about the AWS Information above please contact your AWS Administrator

  1. On the Options Page, you can specify tags for the resources in your stack and set advanced options if necessary or leave everything default.
  2. Click Next to continue on.


ka02R000000g2i9QAA_0EM44000000PzOu.png


  1. On the Review page, review and confirm template settings. Under Capabilities select the check box to acknowledge that the template will create IAM resources. We use IAM role for the Strategy on AWS Console to deploy the Strategy Platform in your account.


ka02R000000g2i9QAA_0EM44000000PzOz.png


  1. Click “Create” to deploy the stack. Monitor the status of the stack using the current screen, you can refresh the page for periodic updates as well as you can check the “Resources” and “Events” tabs which will show you the current status. When the status of the stack is CREATE_COMPLETE, the deployment is complete.


ka02R000000g2i9QAA_0EM44000000PzP4.png


5. Validate the AWS Account.

  • Once the infrastructure stack is completed go back to thStrategy on AWS console and click on “Validate”.


ka02R000000g2i9QAA_0EM44000000PzP9.png


  • If the “Validate” is successful there will be a green check box. The “Create“ Environment button is enabled as soon as the AWS Account is Validated


ka02R000000g2i9QAA_0EM44000000PzPE.png


6.  Creating an Environment.

  • Check the details on the Contact Information. Confirm the email address is correct since we will use that email to send all environment details after it is provisioned.
  • Click on the “Create Environment” button to provision a Strategy environment.

Learning Resources


Interested in learning more about our Cloud offerings? Visit the Learning Center on Community!
Or go to our Documentation pages for more product information.


Comment

0 comments

Details

Knowledge Article

Published:

September 21, 2017

Last Updated:

September 16, 2019