EducationSoftwareStrategy.com
StrategyCommunity

Knowledge Base

Product

Community

Knowledge Base

TopicsBrowse ArticlesDeveloper Zone

Product

Download SoftwareProduct DocumentationSecurity Hub

Education

Tutorial VideosSolution GalleryEducation courses

Community

GuidelinesGrandmastersEvents
x_social-icon_white.svglinkedin_social-icon_white.svg
Strategy logoCommunity

© Strategy Inc. All Rights Reserved.

LegalTerms of UsePrivacy Policy
  1. Home
  2. Topics

KB484833: SharePoint Files connector single tenant configuration


Zhen Yao

Software Engineer, Senior • MicroStrategy


This article provides instructions for registering a single-tenant app to support OAuth authentication to Microsoft Azure to successfully use the Microsoft SharePoint Files connector.

Description

Starting November 9th, 2020, Microsoft announced that end users will no longer be able to grant consent to newly registered multi-tenant apps without verified publishers.
To use the Strategy SharePoint Files connector, you need to register an app to support OAuth authentication to Microsoft Azure.
You are required to complete the following 4 steps for a successful configuration:

  1. Register an OAuth app with single-tenant and grant permissions.
  2. Deploy the connectors.
  3. Modify the configuration file of the MicroStrategy SharePoint Files connector to support the single-tenant app.
  4. Update the configuration file in all cluster nodes to avoid conflicts.

Register the app

  • Log into Azure.
  • Navigate to App Registrations.
ka04W000000XQ0CQAW_0EM4W000001KVIV.jpeg
  • Go to New registrations > Single tenant account type.
  • Input the Redirect URI in the following format:
    https://your-host-name/CommunityConnectors/redirect

ka04W000000XQ0CQAW_0EM4W000001KVIa.jpeg
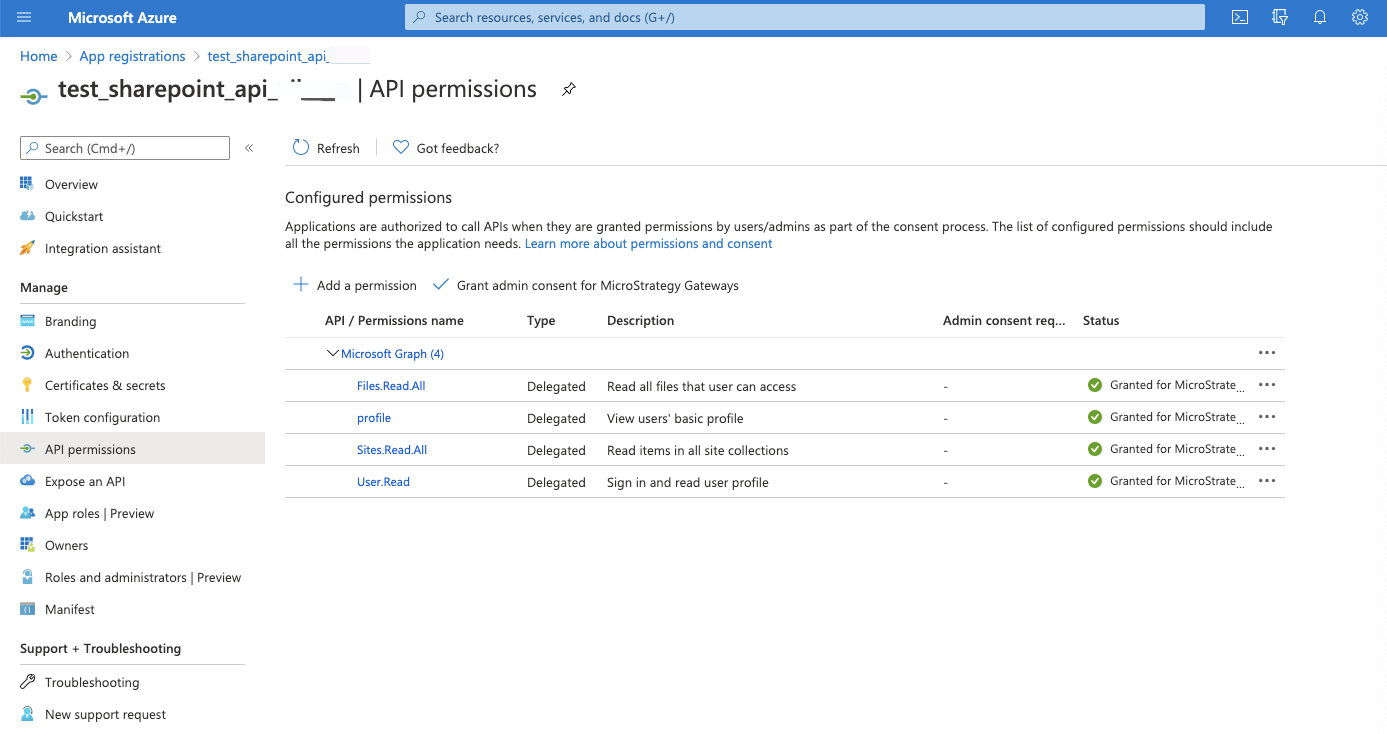
  • Click on the newly registered app and go to API permissions.
  • Add the following permissions in Microsoft Graph.
    
    Files.Read.All
    profile
    Sites.Read.All
    User.Read
    

ka04W000000XQ0CQAW_0EM4W000001KVIl.jpeg
  • Ensure your Azure Admin grants consent for these permissions.
  • Click Certificates & secrets and create a new Client Secret. (Copy and save the value because they will not be displayed once you leave the page.)
ka04W000000XQ0CQAW_0EM4W000001KYGN.jpeg
  • Click Overview.
  • Copy and save the Application (client) ID and Directory (tenant) ID for later use.

Deploy the connector

  • Log into Strategy with the Administrator user.
  • In the user drop-down, open Preferences.
  • On Project Defaults, input the Link to Community Connectors with your Strategy Community Connectors Server URL.
  • Go back to the Home page.
  • Click Add External Data, scroll to the bottom, and click Deploy Community Connectors.
  • On SharePoint Files configuration, fill in the fields with the values from the Register App section.
ka04W000000XQ0CQAW_0EM4W000001KVIu.jpeg

Modify the configuration file to support single tenant

  1. Go to the Community Connectors web server and edit the
    config.json
    file under
    webapps/CommunityConnectors/sharepointfiles/config.json.
  2. Find the properties and replace both of the common substrings with the Directory (tenant) ID you retrieved when registering the app.
    
    "oauth.authorize_uri": {
          "value": "https://login.microsoftonline.com/common/oauth2/v2.0/authorize",
          "editable": false
      },
    "oauth.token_uri": {
        "value": "https://login.microsoftonline.com/common/oauth2/v2.0/token",
        "editable": false
    }
    

  3. Save the file and restart the application.

Update the configuration file in all cluster nodes


Please refer to KB484387.


Comment

0 comments

Details

Knowledge Article

Published:

January 17, 2021

Last Updated:

January 20, 2021