Starting from version 25.06, support has been introduced to allow the use of Email or a custom user identifier for Teams SSO login. In Workstation → Add-ins → Library for Teams Add-in, a new option called Primary User Identifier has been added under Authentication Settings.
This setting provides three options:
Note: This setting only applies to Teams SSO login.

Below are the detailed steps to configure Email or custom user identifier in Workstation Teams Add-in section.
Follow the steps below to set Email as the Primary User Identifier in the Workstation Teams Add-in:
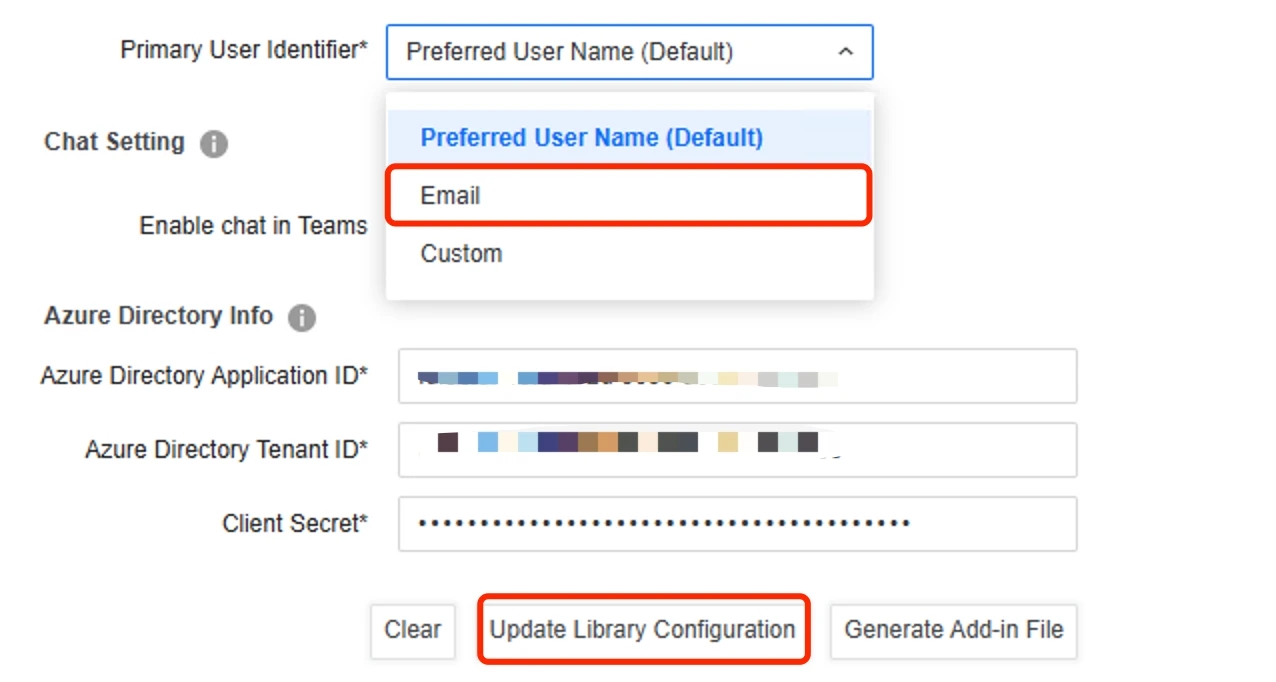
Follow the steps below to set a custom user identifier in the Workstation Teams Add-in:
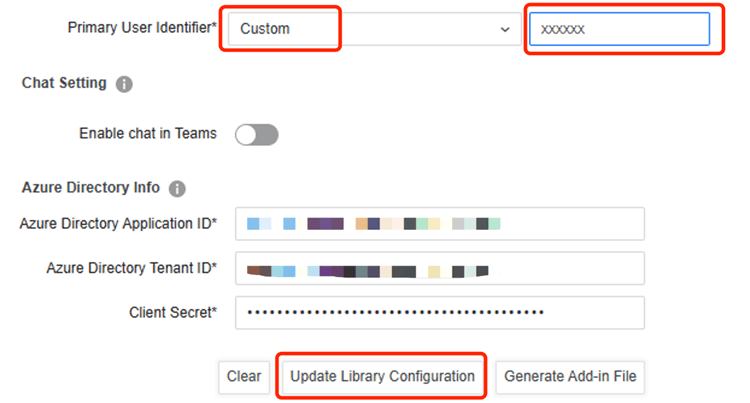
After completing the above configuration, the changes take effect immediately. There is no need to re-upload the Teams Add-in package to Teams.
In addition to the configuration on the Strategy Library side, corresponding settings must also be configured in the Azure portal to ensure that the correct user claim information is included in the authentication token during Azure login.
To use Email as the Primary User Identifier, you must configure the email claim in both API Permissions and Token Configuration.
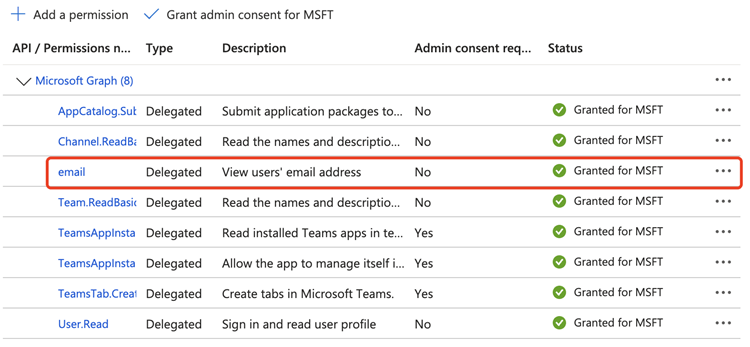
After completing these steps, the email claim will be included in both the Access token and ID token.


If using Custom identifier, you need to have this customized user claim configured in Azure portal as well.
Example: Configure Custom User Identifier (sAMAccountName)
When using a Custom user identifier, ensure that the corresponding claim is properly configured in the Azure portal. Below is a real customer scenario for reference.
The issue occurred because the customer configured sAMAccountName as the trust ID. However, by default, the Microsoft Teams ID token does not include this claim. As a result, Library could not match the user when performing trust-based authentication.
To use sAMAccountName as the Primary User Identifier, complete the following steps:

3. Go to Manage → Single sign-on → Attributes & Claims and click Edit.
4. Add a new custom claim:
Name: samAccountName
Source attribute: user.onpremisessamaccountname
5. Return to the App Registration and open the application manifest (Azure AD Graph format).
6. Set the following property:
"acceptMappedClaims": true
7. In the Library Teams plugin:
Set Primary User Identifier to Custom
Enter samAccountName as the value
8. Retry signing in from the Library Teams app (either desktop or web) to force a new token to be issued.
The Teams ID token should include a claim similar to:
"samAccountName": "johndoe"Library will then be able to use this value as the Primary User Identifier to successfully resolve and authenticate the user.
When switching the Primary User Identifier in Workstation and updating the Library configuration, the changes will take effect on the next login.
Since there is no logout option available in the Teams Library app, you may need to wait for the session to time out in the Teams desktop client before the changes take effect.
Alternatively, if you are using the Teams web app, you can clear the browser cookies to force a new login immediately and apply the updated configuration.
Reference: Customize app JSON Web Token (JWT) claims - Microsoft identity platform and Understanding the app manifest (Azure AD Graph format) - Microsoft identity platform
