EducationSoftwareStrategy.com
StrategyCommunity

Knowledge Base

Product

Community

Knowledge Base

TopicsBrowse ArticlesDeveloper Zone

Product

Download SoftwareProduct DocumentationSecurity Hub

Education

Tutorial VideosSolution GalleryEducation courses

Community

GuidelinesGrandmastersEvents
x_social-icon_white.svglinkedin_social-icon_white.svg
Strategy logoCommunity

© Strategy Inc. All Rights Reserved.

LegalTerms of UsePrivacy Policy
  1. Home
  2. Topics

KB438832: Improve Intelligence Cube Publishing from Amazon Redshift


Sergio Sainz Palacios

Software Architect • MicroStrategy


This tech-note describes how to speed up Redshift based Intelligent Cube publishing time. The main idea is to avoid using JDBC/ODBC and instead export the Redshift table to S3, then download the data files from S3 to Intelligence Server host local file system and finally publishing from the local file system data files.
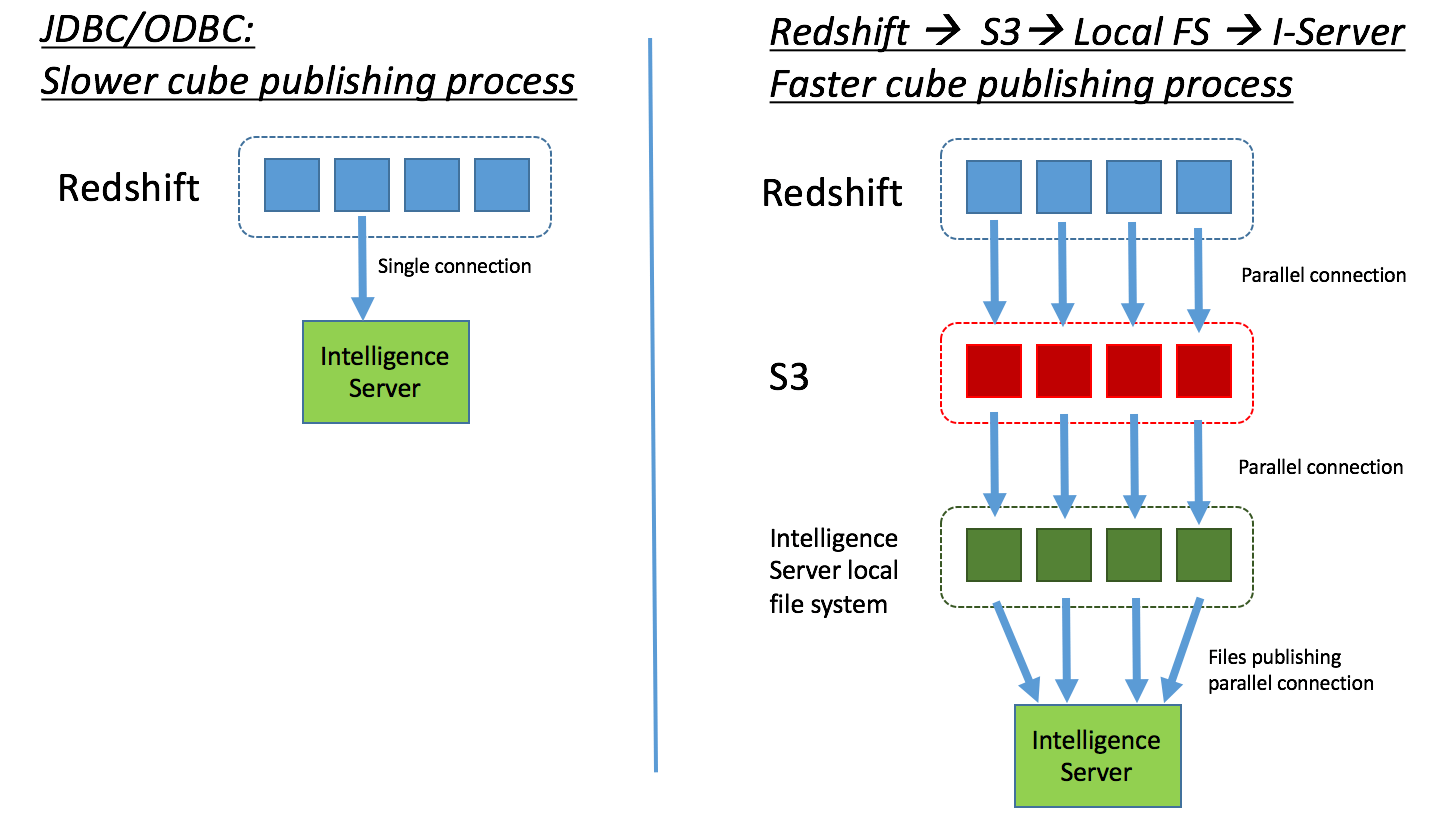
(1) JDCB/ODBC: Publishing an Intelligent Cube from Redshift JDBC/ODBC connection does not take advantage of Redshift parallelism. The JDBC/ODBC connection to Redshift connects Intelligence Server process to a single node in Redshift cluster and all data must go through this single connection. 
(2) Redshift → S3 → Local file system → Intelligence Server: When exporting a redshift table to S3, the exporting process is done in parallel. Therefore this export is faster. Also, when exporting data files S3 to local filesystem, the process is also parallel. Furthermore, when publishing the Intelligent Cube from local file system data files, we can parallelize the reading of the files into Intelligence Server memory.
ka02R000000g5KFQAY_0EM44000000Q5Nd.png


Redshift → S3 → Local FS → Strategy Intelligence Server

Next, we describe the process of publishing the Intelligent Cube through exporting the data files from Redshift to S3, then to local file system and finally to Strategy Intelligence Server. Each step is described below.

Redshift to S3.

The command to export a redshift table to S3 is as follows:


unload ('select * from fact_table')
to 's3://transfer_bucket/unload/'
credentials 
'aws_access_key_id=AAAAA;aws_secret_access_key=BBBBB'
maxfilesize 6 GB
DELIMITER ',';


Requirements:

  • The amazon web services (AWS) user  (owner of the access key and secret access key) has access to S3 bucket "s3://transfer_bucket/unload".
  • Authorizing redshift service to use other AWS services:
    • For details, please follow this note from Amazon: http://docs.aws.amazon.com/redshift/latest/mgmt/authorizing-redshift-service.html

Notes:

  • The measure of parallelism is the number of final files. There will be as many threads exporting to S3 as many files there will be.
  • The maxfilesize maximum value is between 5 MB to 6.2 GB.

S3 to Local File System

After the files are stored in S3, we can list them:


$aws s3 ls s3://transfer_bucket/unload/
2017-08-18 16:57:28          0
2017-08-19 09:32:44 6442453435 0000_part_00
2017-08-19 09:40:19 6442454142 0000_part_01
2017-08-19 09:46:54 6442452707 0000_part_02
2017-08-19 09:55:52 6316871688 0000_part_03
2017-08-19 09:32:45 6442455018 0001_part_00
2017-08-19 09:39:21 6442451180 0001_part_01
2017-08-19 09:46:34 6442453662 0001_part_02
2017-08-19 09:54:19 6316613046 0001_part_03
2017-08-19 09:32:48 6442452194 0002_part_00
2017-08-19 09:39:33 6442453551 0002_part_01
2017-08-19 09:48:23 6442454438 0002_part_02
2017-08-19 09:55:44 6314228180 0002_part_03
2017-08-19 09:32:48 6442455049 0003_part_00
2017-08-19 09:40:21 6442455773 0003_part_01
2017-08-19 09:47:30 6442451353 0003_part_02
2017-08-19 09:55:02 6315592856 0003_part_03
2017-08-19 09:32:44 6442453070 0004_part_00

 
Then, we can store them into Strategy Intelligence Server host local file system:

$aws s3 cp s3://transfer_bucket/unload/ output/ --recursive

 
Then add the headers to the files:

ls | xargs sed -i '1 i\col1_id,col1_desc,col2_id,col2_desc'

 
Rename the files with ".csv" postfix

cd output/
for f in * ; do mv "$f" "$f".csv ; done


Requirements:

  1. Install AWS CLI: http://docs.aws.amazon.com/cli/latest/userguide/installing.html

Local File System to Strategy Intelligence Server

Tune Strategy Intelligence Server:

  1. In Intelligence Server Configuration:
    1. Go to "Governing Rules > Default > Memory settings > Enable web throttling = uncheck"
    2. Go to "Governing Rules > Default > Memory settings > Enable web memory contract = check"
      1. Maximum reserved memory = 0
      2. Maximum use of virtual address space = 90
      3. Maximum RAM for working set cache > than the size of the approximate size of cube.
    3. Go to "Governing rules > Default > Import data > Number of connections by priority" = as many as number of files.
  2. Project configuration:
    1. Go to "Project Definition > Advanced > Project-Level VLDB Setting > Configure > in the new dialog, go to Tools menu > Show advanced settings".
      1. Then in the VLDB editor, go to "Query Optimizations > Parallel Query Execution" set it to "Enable parallel query execution for all reports that support it".
      2. in the VLDB editor, go to "Query Optimizations > Parallel Query Execution Improvement Estimate in SQL View" set it to "Enable parallel query execution improvement estimate in SQL view"
    2. Go to "Governing > Default > Result Sets" turn all the settings as -1 which is unlimited.
    3. Go to "Governing > Default > Import data > Enable URL file upload via" turn "File" on.
    4. Go to "Caching > Auxilary Cache > Object cache / Element cache" set both t to 1 GB
    5. Go to "Intelligent Cubes > General > Maximum RAM" set as estimated size of the cube times 2 .
    6. Go to "Intelligent Cubes > General > Load intelligent cube on startup" set as False.
    7. Go to "Intelligent Cubes > General > Load intelligent cube upon publication" set as False.
  3. Restart Intelligence Server

Tune Strategy Web:

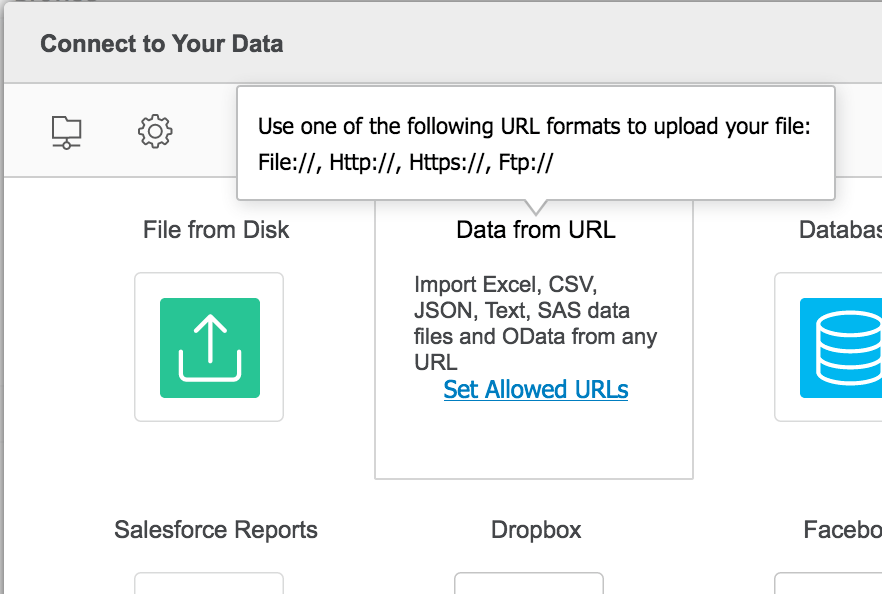
  1. Enter Strategy Web, in the data import screen:
ka02R000000g5KFQAY_0EM44000000Q5Nn.png
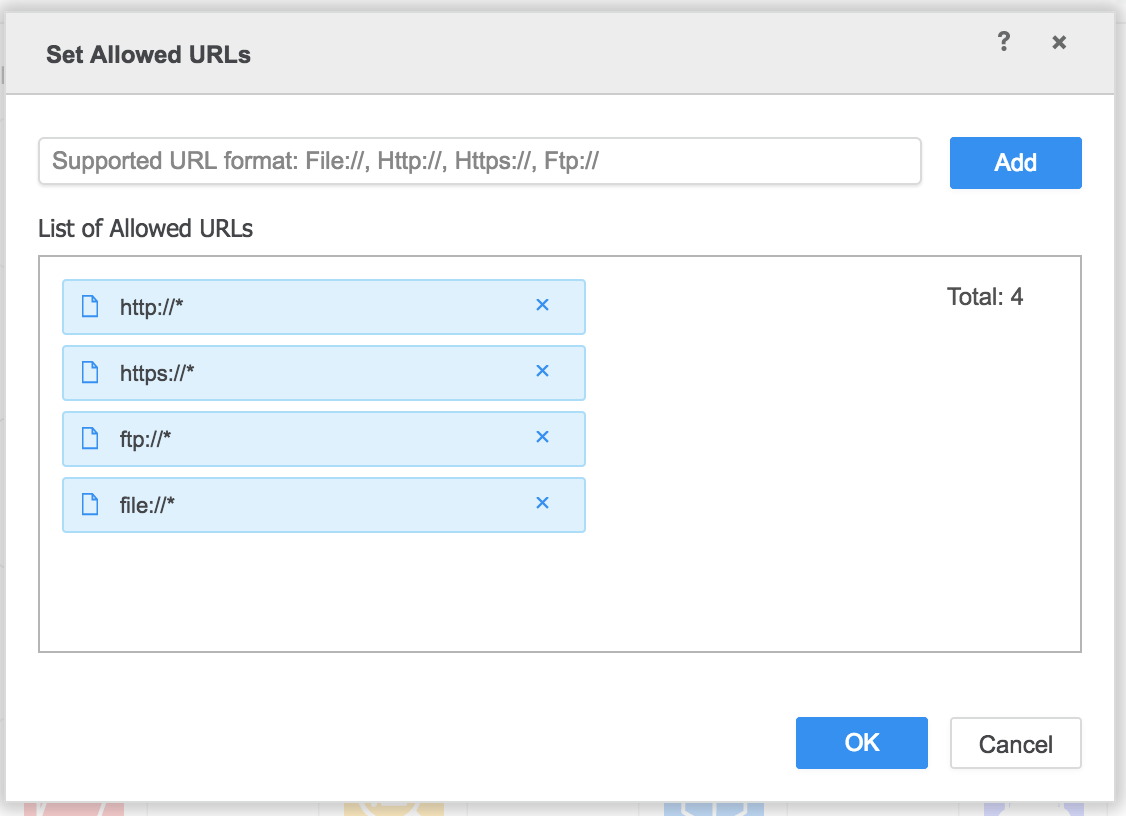
  1. For the connector "Data from URL" go to the  "Allowed URLs" link and add "file://*"
ka02R000000g5KFQAY_0EM44000000Q5Ns.png
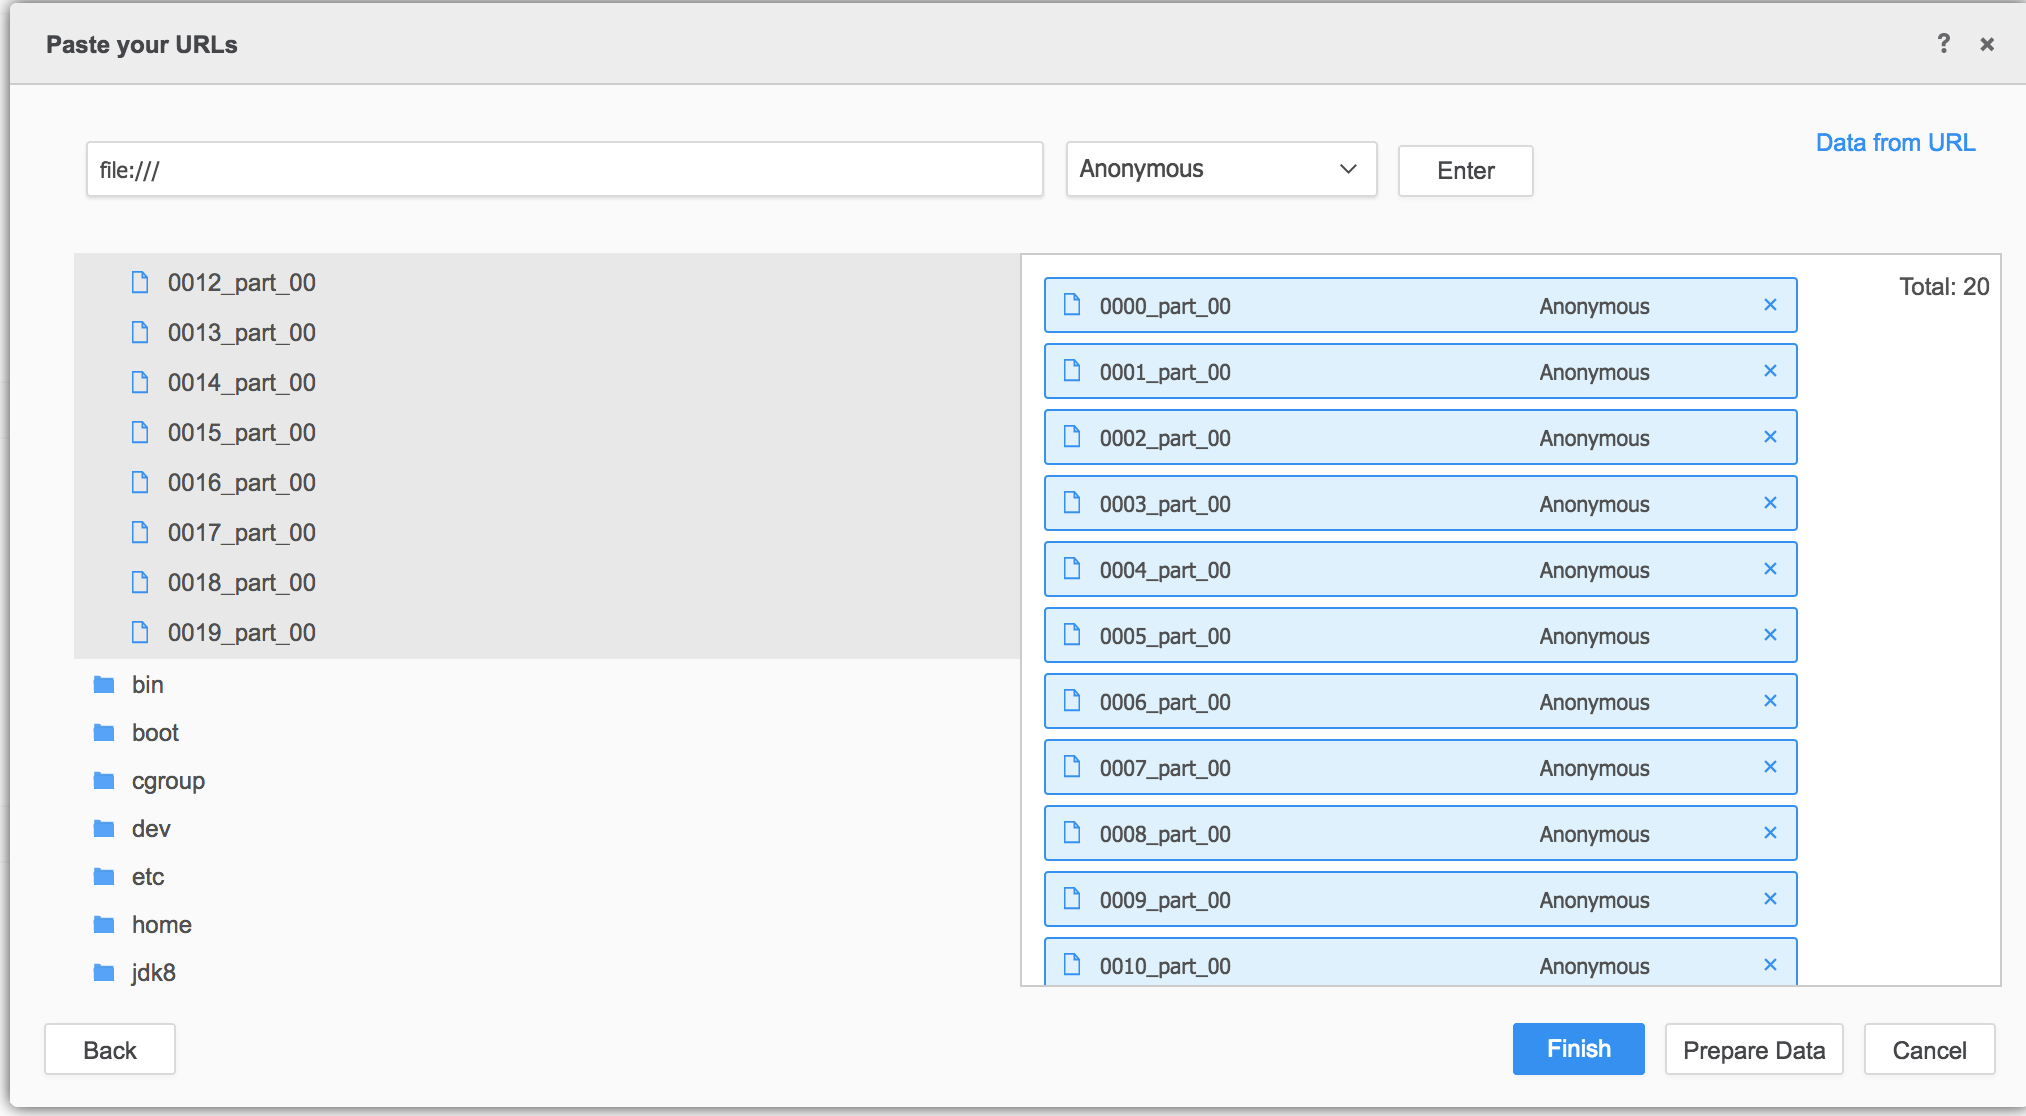
  1. Go to Data URL connector, then click on the "Network Browser' link. In the text box type "file:///" and click Enter.
  2. Browse to the files location, and drag and drop them to the right hand side. You can multi select several files.
ka02R000000g5KFQAY_0EM44000000Q5Nx.png
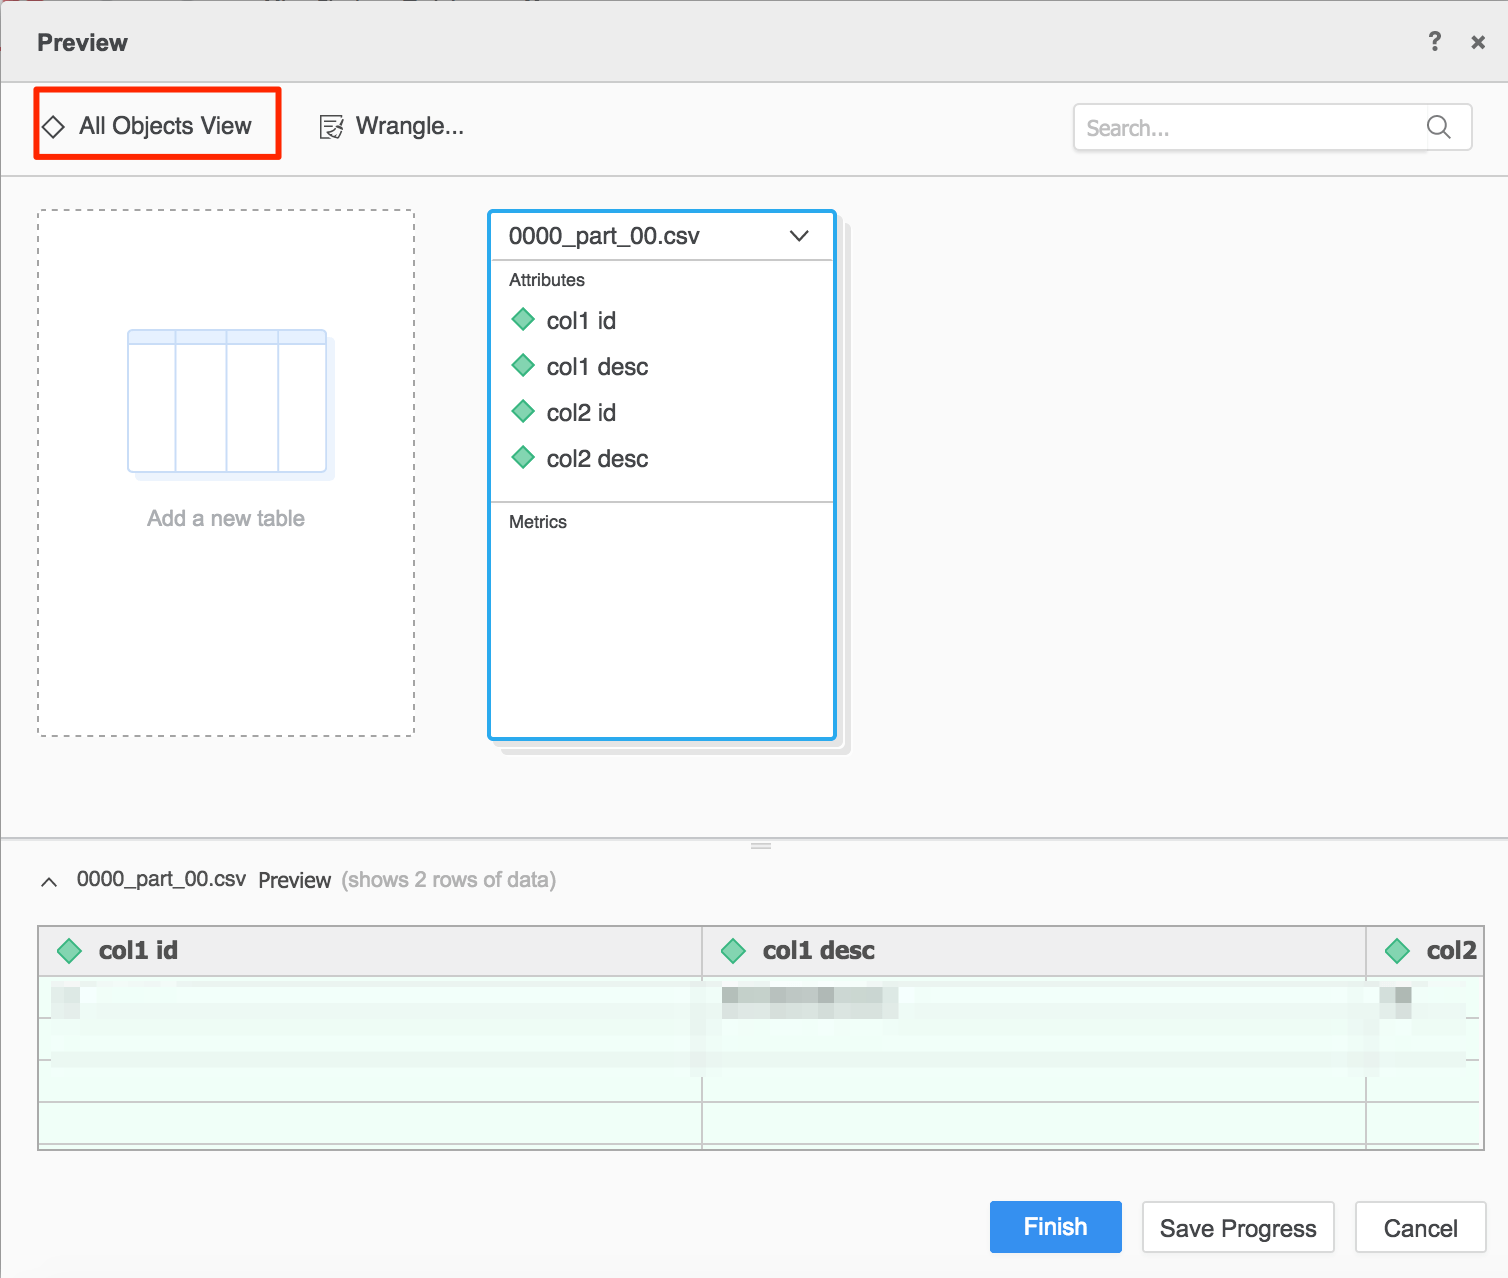
  1. Click on "Prepare data". If prompt appears to group the files, click YES.
  2. Go to the "All Objects View" option in the top left corner.
ka02R000000g5KFQAY_0EM44000000Q5O2.png
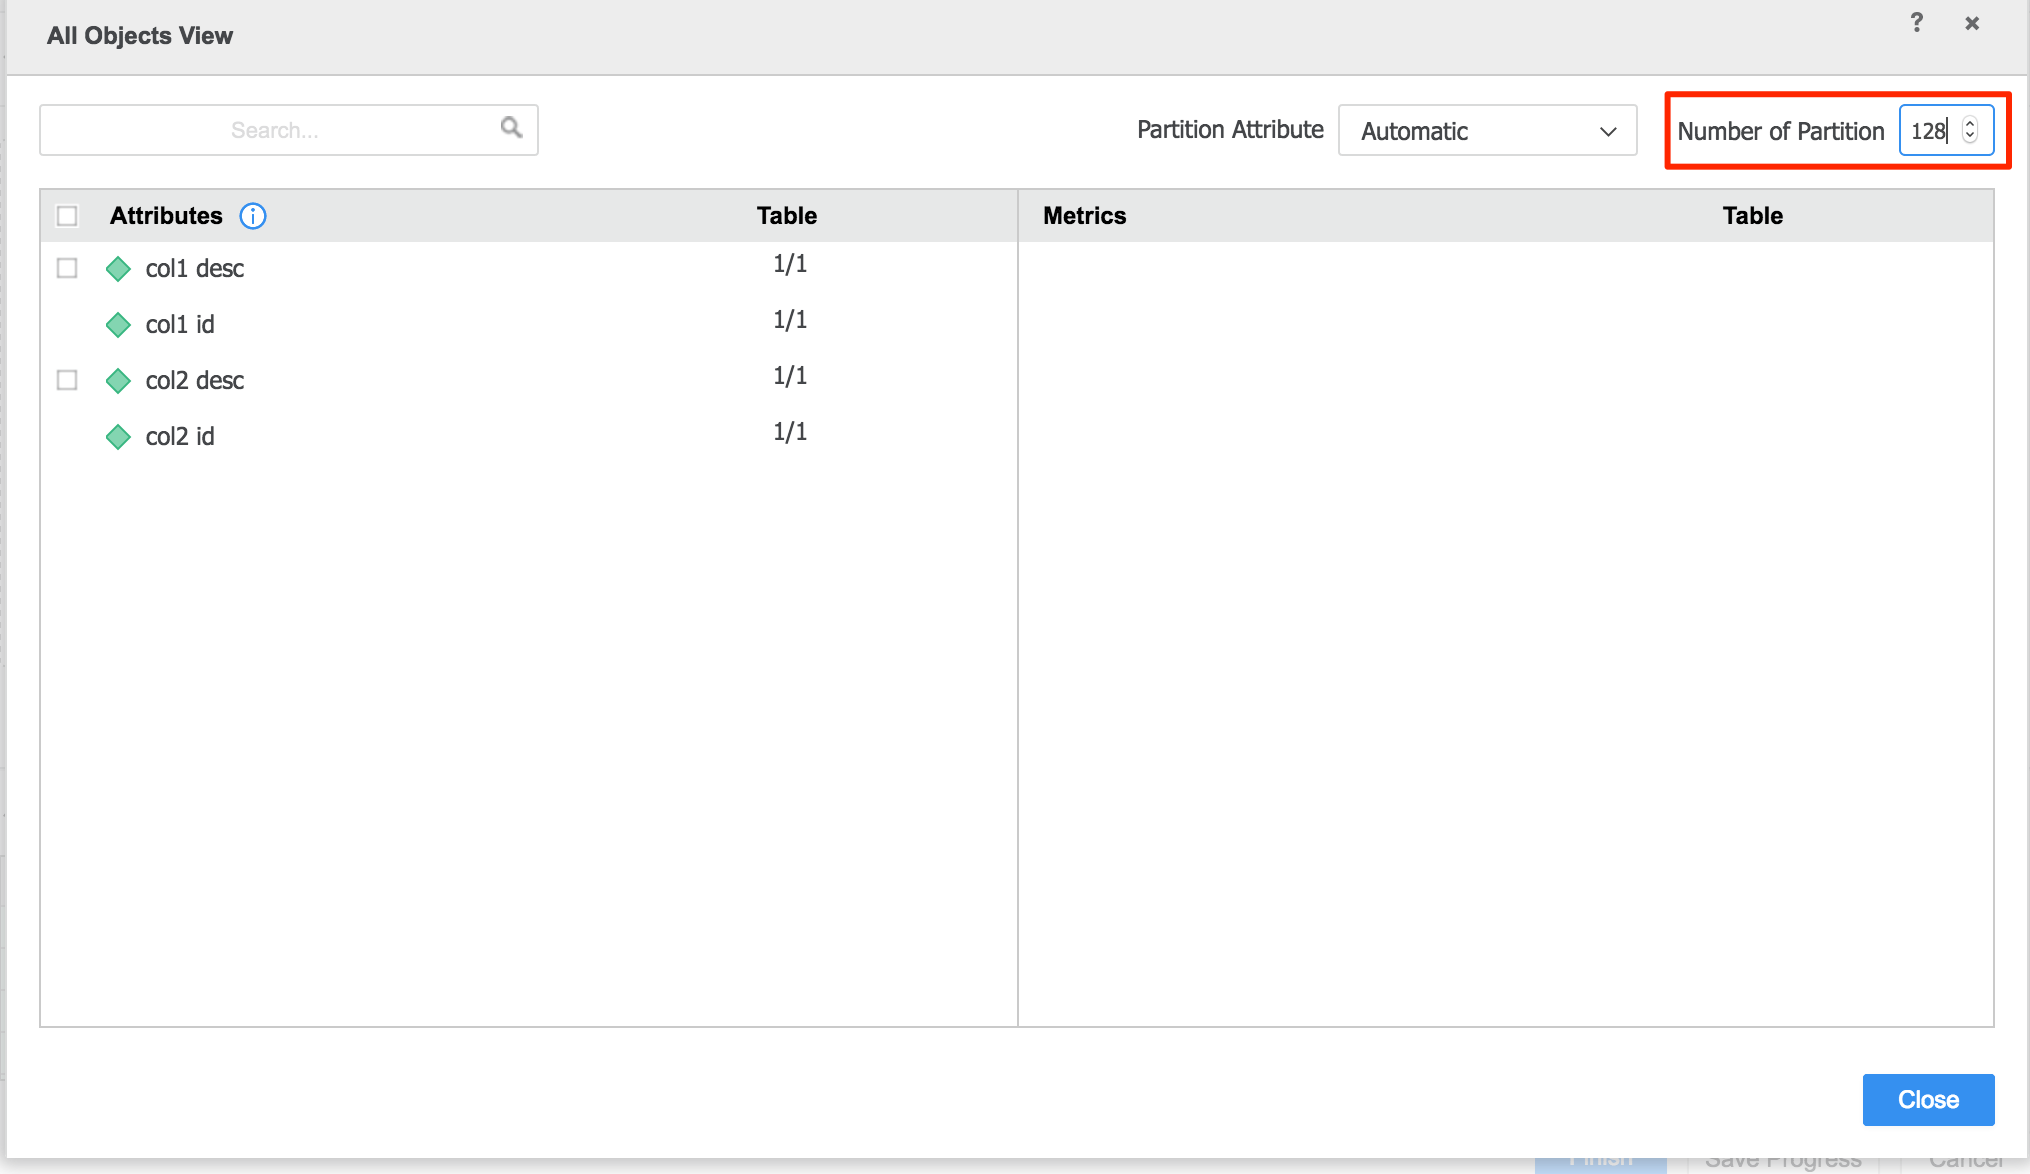
  1. Set the number of partitions equal to the number of CPU cores in Strategy Intelligence Server host computer.
ka02R000000g5KFQAY_0EM44000000Q5O7.png
  1. Click Close, then "Finish" on the "prepare data" view and save the cube. Afterwards the cube will start executing.

438832


Comment

0 comments

Details

Knowledge Article

Published:

November 3, 2017

Last Updated:

December 18, 2019