Splunk 6.0 is post-supported with Strategy Analytics Enterprise 9.4.1. Refer to the following technical note for details:
KB46461 - Support for Splunk 6.0 with Strategy Analytics Enterprise 9.4.1
Below are the steps needed to connect Strategy Analytics Enterprise 9.4.1 to a Splunk 6.0 server for reporting.
1. Install Splunk ODBC driver on Strategy Intelligence Server running on Windows
2. Create an ODBC DSN for Splunk Warehouse
The Splunk ODBC driver does not ship with Strategy, so the native Splunk ODBC driver needs to be installed on the Strategy Intelligence Server running on Windows. At this time, the driver has to be exclusively requested from Splunk as it is not publicly available for download.
Once the ODBC driver installer is available, unzip the file. The Splunk ODBC Driver contains both a 32-bit installer and a 64-bit installer. Be sure to install the 32-bit version of the driver.
Open the appropriate installer, click Next, read the license agreement, accept the terms, and select the top option and click Next.
The default install directory is within the Program Files directory; but this path can be changed. Click Next.
On the Create a Data Source screen, do not enter any requested information; creating a data source is in the next section. Click Next, and then click Install. When the install is finished, click Finish.
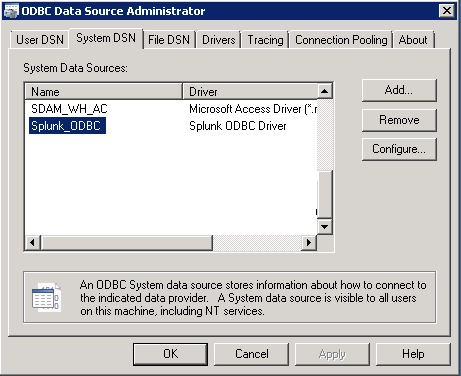
Verify Installation by looking in the 32-bit “ODBC Data Source Administrator” window, click “System DSN” tab and look for "Splunk ODBC" in the list of system data sources as shown below:
Create an ODBC DSN for Splunk Warehouse
This step involves creating ODBC DSN for Splunk Warehouse on the Windows Intelligence Server Machine on which Splunk ODBC driver was installed.
In the 32-bit “ODBC Data Source Administrator” window, click “System DSN” tab, click “Splunk_ODBC” and click “Configure”. The Splunk ODBC Connection Options window appears, as shown here:
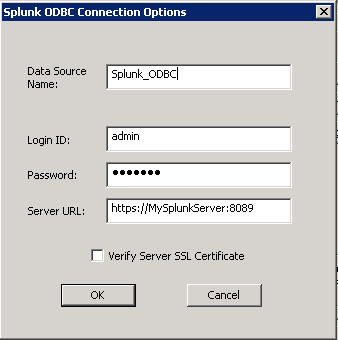
In this window specify the Splunk “Server URL” (Note https:// is in the URL and the default port for Splunk ODBC connection is 8089), “Login ID” and “Password”. Fill in the “Data Source Name” on this screen. Click OK
