EducationSoftwareStrategy.com
StrategyCommunity

Knowledge Base

Product

Community

Knowledge Base

TopicsBrowse ArticlesDeveloper Zone

Product

Download SoftwareProduct DocumentationSecurity Hub

Education

Tutorial VideosSolution GalleryEducation courses

Community

GuidelinesGrandmastersEvents
x_social-icon_white.svglinkedin_social-icon_white.svg
Strategy logoCommunity

© Strategy Inc. All Rights Reserved.

LegalTerms of UsePrivacy Policy
  1. Home
  2. Topics

How to connect to Impala


Norman Matos

Associate Scrum Master • Strategy


This tutorial explains how to connect to Impala in MicroStrategy.

The following tutorial covers the following topics:
1. Connectivity in Strategy Web and Strategy Desktop
2. Connectivity via DSN
3. Best Practices for Security

Connectivity in Strategy Weband Strategy Desktop

  1. Open Strategy Web and click Add external data.
  2. Mouse over the Hadoop data source options and choose Impala.
ka044000000kQ34AAE_0EM440000002LKb.png
  1. Select any of the 3 presented options (Build a Query, Type a Query, or Pick Tables).
  2. Click Add... link in the top right of the Data Sources pane.
  3. Fill out the data source information by creating a DSN-less data source.
ka044000000kQ34AAE_0EM440000002LKg.png
  1. Click OK to save the changes.


Users can now use Web Data Import with the newly created DSN Less connection.


Connectivity via DSN

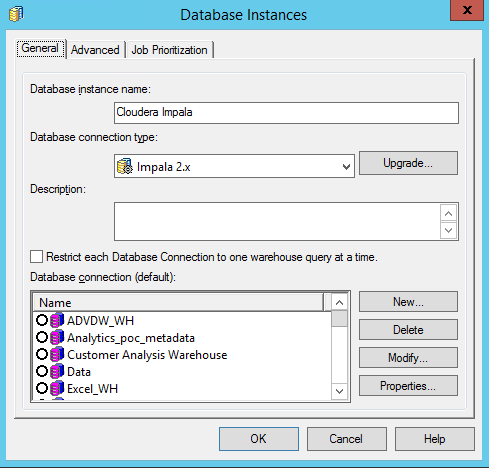
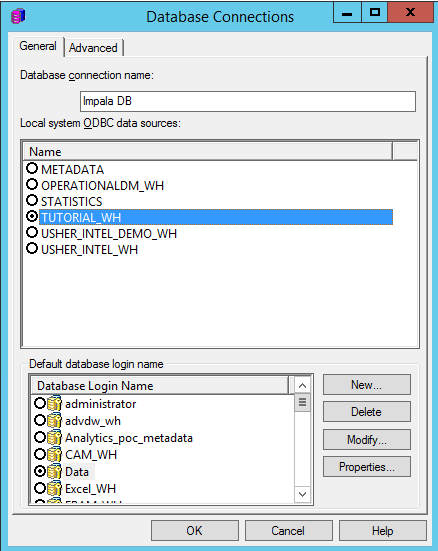
Configuration consists of three steps: create database instance, create a database connection, and configure and store credentials.

  1. Create a new database instance:
ka044000000kQ34AAE_0EM440000002LIV.png


  1. Create a database connection that points to the DSN:
ka044000000kQ34AAE_0EM440000002LIa.png


  1. Configure and store credentials for the login:
ka044000000kQ34AAE_0EM440000002LIf.png


Best Practices for Security

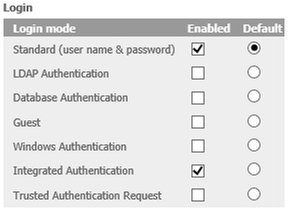
Three modes of authentication are supported for Impala:

  • Username and password authentication
  • LDAP authentication
  • Kerberos authentication


Unsupported authentication methods include:

  • SASL encryption
  • Windows authentication


The sections below provide details for each of the methods for connecting to Impala.
 
If you have a non-secure Cloudera Data Platform set up with no authentication, use the “No authentication” mode while connecting.


Login/ Password Authentication


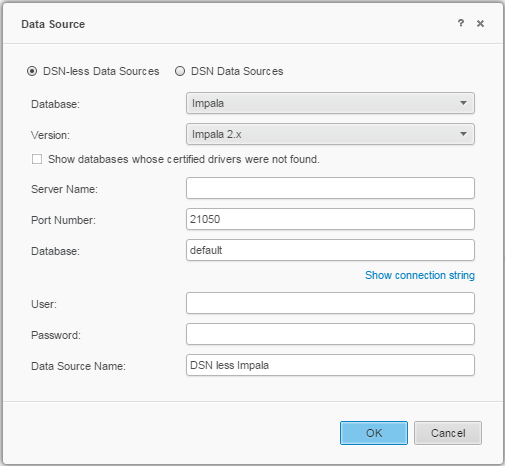
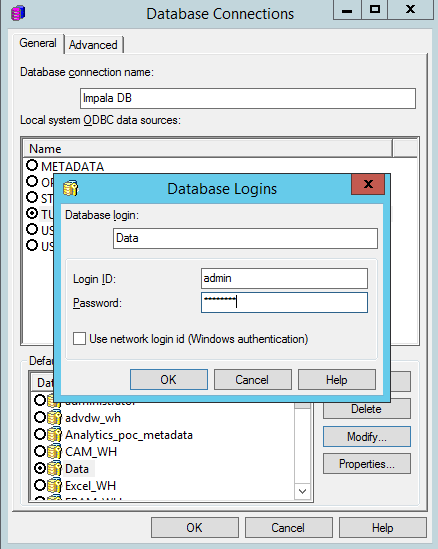
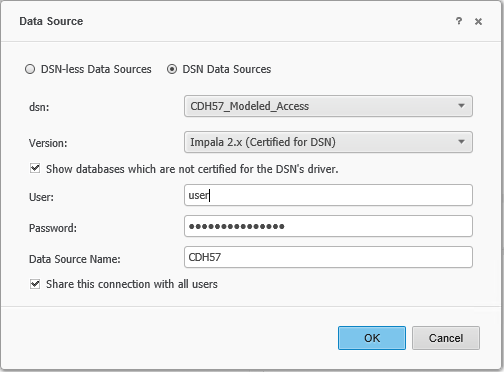
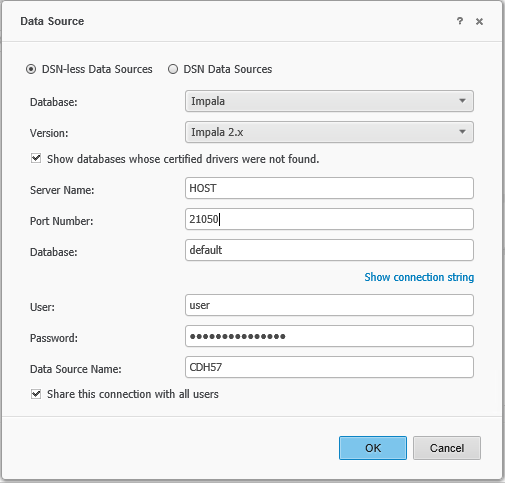
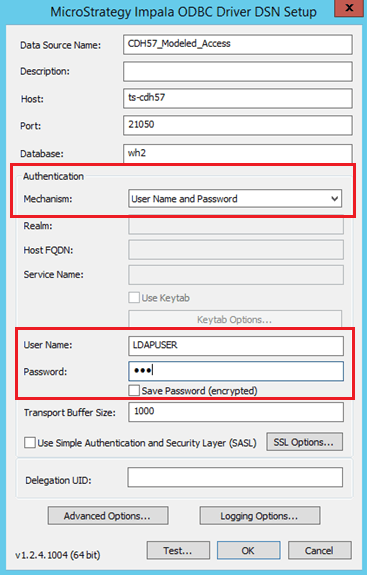
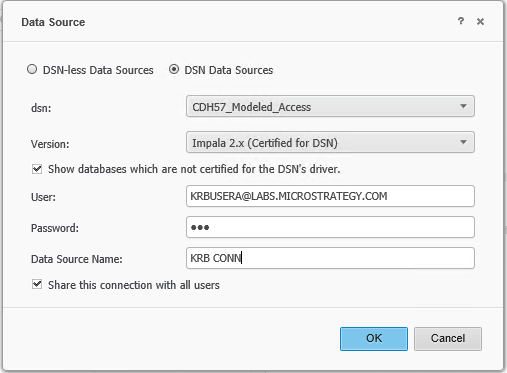
Password authentication is the default authentication mechanism for Strategy users when connecting to Impala. The screenshots below show how to set it in the ODBC driver, and for DSN and DSN-less connection.

  • Driver configuration: Select the Strategy Impala ODBC driver from 64-bit ODBC Administrator.
  • When configuring the Impala ODBC DSN, pick the User Name and password as the authentication mechanism. Note that this Username and password can be LDAP user.
ka044000000kQ34AAE_0EM440000002MKN.png


  • In Strategy Web/Desktop:
    • When using an existing DSN there is no option to choose the type of authentication as the underlying DSN determines the authentication mechanism.
       
ka044000000kQ34AAE_0EM440000002MKS.png


  • When using a DSN-less connection, the default is username/password authentication.
     
ka044000000kQ34AAE_0EM440000002MKX.png


LDAP Authentication 


If the Cloudera Impala Server is configured to use the LDAP server for authentication, Strategy users can take advantage of the Impala-LDAP integration. The users then authenticate against Strategy using LDAP authentication, and the same credentials are then passed through for authentication when connecting to the database during report execution.
 
LDAP support must be configured on the Impala server, ODBC driver, and Intelligence Server as follows:
 
On the Impala Server Configuration settings: Through Cloudera manager, enable LDAP Authentication under Impala. Also add a parameter “LDAP URL” which is URL of the LDAP server.
 
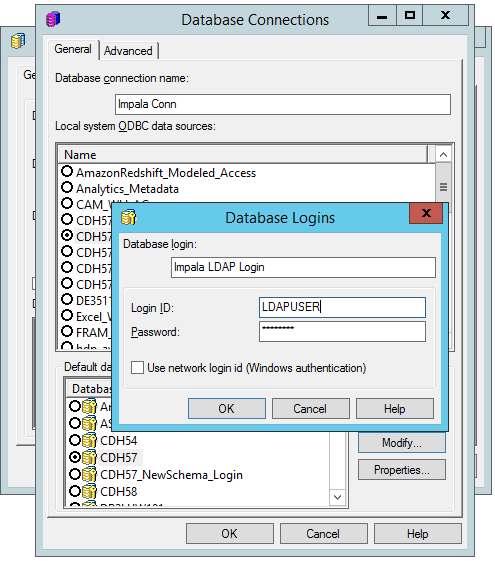
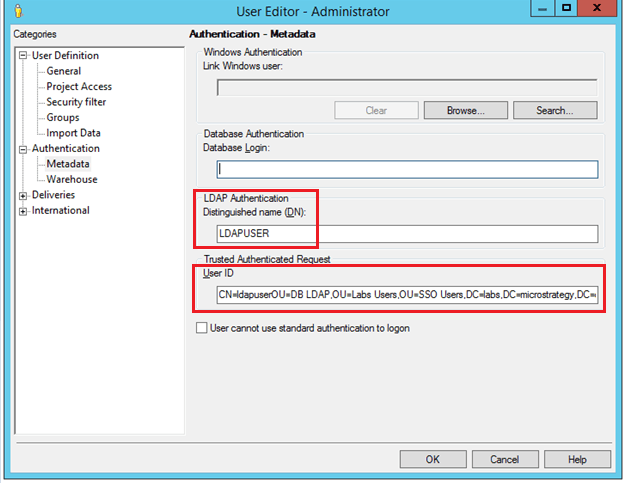
On the ODBC DSN, choose the Username and Password authentication option and enter the LDAP username and password.
 

ka044000000kQ34AAE_0EM440000002MKc.png

 
After completing the above action, users can perform basic LDAP connectivity and query their data via reports and do further data modeling. The next steps describe configuration of advanced Strategy features like LDAP with warehouse pass-through.
 

  • Intelligence Server: Use Strategy Intelligence Server Configuration editor > LDAP settings
    • Edit the project's warehouse DB Instance > DB Connection > DB Login and provide the username and password for the domain user.
ka044000000kQ34AAE_0EM440000002MKh.png


  • Project Configuration: Edit the project configuration and go to database instances > authentication > warehouse. Make sure that the option Use warehouse pass-through credentials from User Editor for warehouse execution is selected, and choose the second option For selected database instances… Then select the required Impala database instance.
ka044000000kQ34AAE_0EM440000002MKm.png

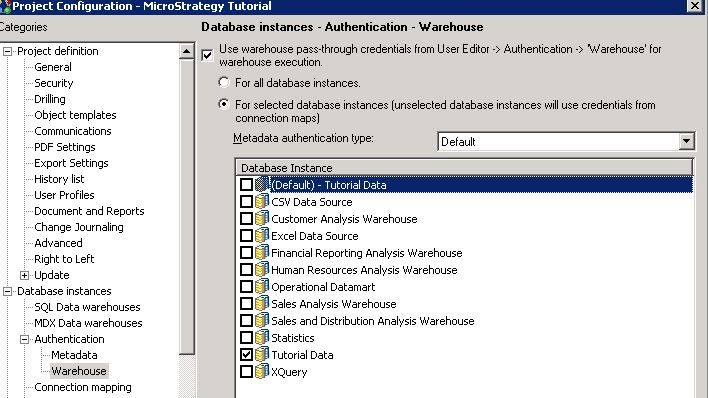
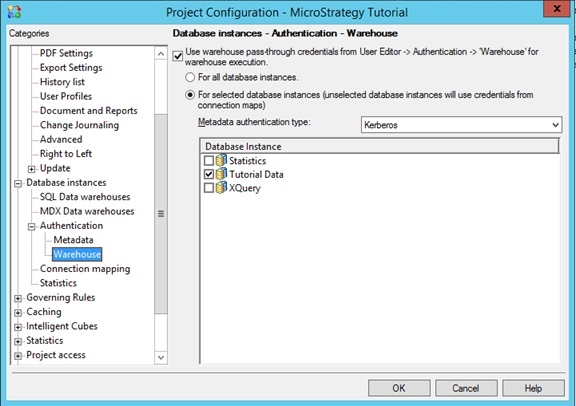
Strategy also supports passing separate credentials to the warehouse for particular LDAP users.
 

  • When the option to import LDAP users is checked, and the user logs in to Strategy for the first time, Strategy creates a user object in the metadata under the LDAP Users group. This user object will have the LDAP DN populated, as shown below. Optionally, administrators have the ability to bulk import LDAP users into the metadata.


ka044000000kQ34AAE_0EM440000002MKr.png


  • The administrator can manually populate the credentials for warehouse pass-through in the user editor, as shown in the following figure.


Kerberos Authentication


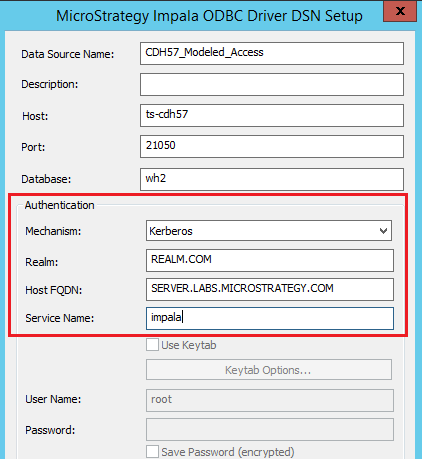
The following Kerberos flavor is supported:

  • MIT Kerberos
  • Active Directory Kerberos


Strategy supports Single Sign-On (SSO) access to Impala (using Kerberos) when Strategy Intelligence Server resides on a Windows operating system and Linux operating system. Before Strategy Secure Enterprise 10.2, users could only configure Kerberos authentication to databases when Strategy Intelligence Server was running on Windows operating systems. Starting with Strategy Secure Enterprise 10.2, users can use integrated authentication to access some databases when Strategy Intelligence Server is running on Linux/Unix operating systems.
 
The following steps outline the SSO Connectivity:

  • Create a user on Active Directory and assign the SPN.
  • Setup the Database server to allow Kerberos authentication.
    • This action is a database side configuration that is configured outside of Strategy. Users should work with the database administrators to finish this configuration step.
  • Configure Strategy Intelligence Server:
    • Setup Kerberos (integrated) authentication for Strategy Intelligence Server. Reference here [https://community.strategy.com/article/KB19580-How-to-setup-Kerberos-Integrated-authentication-for-the]
    • Finish the configuration to setup Kerberos with Impala and Strategy
    • For the required Strategy user, a trusted user ID should be added as shown in the following figure
ka044000000kQ34AAE_0EM440000002ML1.png


  • Configure the database instance for Kerberos
    • Create an ODBC DSN with authentication mode setting to Kerberos
ka044000000kQ34AAE_0EM440000002ML6.png
  • Configure the database instance under Project Configuration > Database Instances > Impala Data warehouse and set the database login to Use network login id (Windows Authentication), as shown in the following figure.

ka044000000kQ34AAE_0EM440000002MLB.jpeg


  • Configure Kerberos authentication for the warehouse under Project Configuration > Database instances > Authentication > Warehouse.
  • Select the check box for Use warehouse pass-through credentials from User Editor -> Authentication -> 'Warehouse' for warehouse execution.
  • Select the radio button For selected database instances".  
  • Set Metadata authentication type to Kerberos.
  • Select the database instances for which you want to use Kerberos.
ka044000000kQ34AAE_0EM440000002MLG.jpeg

At this point Kerberos authentication is setup and you can do an end-to-end integrated authentication by logging on to the client machine using the Kerberos user defined in Active Directory. The user can now login to Strategy Intelligence Server without being prompted for credentials and the same credentials are passed to the Impala database server for report execution.
 
Delegation
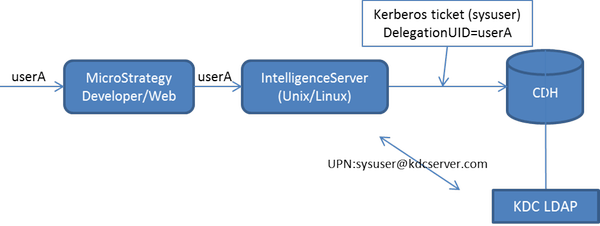
The following section explains the steps that must be taken to configure connectivity to a secured CDH 5.x cluster and leverage the delegation feature of the Cloudera Impala ODBC Driver to enforce access policy on users that are logged into Strategy Intelligence Server 10.2 on Unix/Linux platforms.
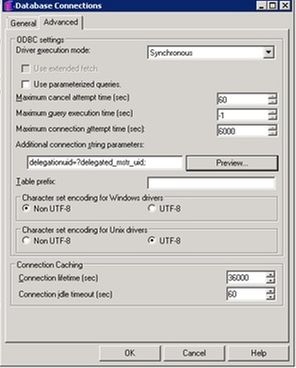
The Cloudera Impala ODBC driver has a connection parameter called DelegationUID, which can delegate all operations against Impala to a user that is different than the authenticated user for the connection.
By leveraging this delegation feature when connecting to a secured CDH 5.x cluster, users can connect to Cloudera Impala via Kerberos ticket generated by one fixed user, for example, sysuser. During the connection, the DelegationUID parameter is used to pass a Strategy user ID (for example, userA, the user logged on from Strategy Developer or Web) in order to allow the authorized proxy user userA to execute queries through the connection established by sysuser.
 

ka044000000kQ34AAE_0EM440000002MLL.png

 
    Steps:

  1. Configure the Cloudera Impala clusters to use sentry to use “DelegationUid” and an authorized proxy user. For more information, see the following Cloudera documentation:
    • Sentry for Hive Authorization page
    • Setting Up Hive Authorization with Sentry page
       
  2. Install Kerberos 5 libraries on the machine hosting Strategy Intelligence Server. The UNIX/Linux operating system may come with Kerberos installed and if so this step can be skipped. For steps on how to install these libraries, users should refer to the Kerberos documentation for their specific Operating System.
     
  3. Configure the KRB5.conf file which is pointed to by the KRB5CONF environment variable. If it does not exist, users can create the file and then set the environment variable themselves. An example is below:


[libdefaults]
default_realm = <DOMAIN REALM>
default_keytab_name = /etc/krb5.keytab
forwardable = true
no_addresses = true
[realms]
<DOMAIN_REALM> = {
   kdc = DC_IPAddress:88
   admin_server = DC_Admin_IPAddress:749
}
[domain_realm]
.domain_realm = DOMAIN_REALM
domain_realm = DOMAIN_REALM

  • DOMAIN_REALM: The domain realm used for authentication purposes. A domain realm is commonly of the form example.com.
    Note: The capitalization of DOMAIN_REALM must match the capitalization used in the syntax for krb5.conf listed above. For example, if DOMAIN_REALM is in uppercase, include the domain realm in uppercase.
  • DC_IPAddress: The IP address of the Kerberos KDC or the Windows machine that hosts the Active Directory domain controller. This can be the same IP address as DC_Admin_IPAddress.
    Note: The Port number may not need to be specified for the KDC parameter.
  • DC_Admin_IPAddress: The IP address of the Windows machine that hosts the Active Directory domain controller admin server. This can be the same IP address as DC_IPAddress.
     
  • Create a TGT (ticket granting ticket) for the connectivity to Cloudera Impala. The user can do this by running 'kinit <Principal Name>'. Users should make sure that the KRB5_CCNAME environment variable is set and pointing to the desired location for the credentials cache to be saved.

    Note: This principal should be enabled with access to Cloudera Impala and act as the delegating user as configured in step (1), the fixed user whose ticket will be used to establish the connection. Take sysuser as an example, to run command kinit sysuser@kdcserver.com.
     
  • Configure the Database Instance in Strategy Developer.
    • Create an ODBC DSN using Cloudera Impala ODBC driver v2.5.29 or higher and set the authentication mechanism as Kerberos.
    • Create a Database Instance with the newly created DSN.
    • Modify the Database connection in the Database instance to set the "additional connection string parameters" to include delegationuid=?delegated_mstr_uid as shown below.

ka044000000kQ34AAE_0EM440000002MKT.jpeg
    • The ?delegated_mstr_uid wildcard will be replaced at run-time with the currently logged on Strategy user ID which will act as the delegated user when connecting to Cloudera Impala.
  • Configure the Database Login for the Database Connection object configured above to "use network login id (Windows Authentication)" 

Users should now be able to leverage the delegation feature of the Cloudera Impala ODBC Driver to enforce access policy on users that are logged into the Strategy Intelligence Server.
Integrated Authentication
Follow the same steps as given above for Kerberos authentication and when the setup is complete, login to the client machine using the Kerberos user defined in Active Directory. The user should be able to login to Strategy Intelligence Server without being prompted for credentials and the same credentials should be passed to the Impala database server for report execution.
Often, customers want to make sure that credentials users provide to authenticate to Strategy web are passed on to Cloudera (Impala). The following steps are required to implement this.
 
For Integrated authentication on Strategy Web, perform the following steps:

  1. Configure Web-Server (IIS) with Integrated Authentication:
    1. Enable Kerberos (Integrated) authentication through Strategy Web on IIS in Strategy.
    2. Enable integrated authentication in Strategy Web:
      1. Go to http://hostname:8080/MicroStrategy/asp/Admin.aspx.
      2. Go to Intelligence Server -> Default Properties -> Login.
      3. Enable Integrated Authentication as shown below.
ka044000000kQ34AAE_0EM440000002MLQ.png


  1. Configure Client Browser. Reference: [https://community.strategy.com/article/KB33291-How-to-configure-Internet-Explorer-Firefox-and-Chrome]
  1. Create DSN/DSNless data sources on Strategy Web.
    1. To add a DSN based connection:
      Choose an ODBC DSN with Kerberos authentication; fill User/Password with any characters (Kerberos authentication will not use these) and click OK.
ka044000000kQ34AAE_0EM440000002MLV.png


  1. To add a DSN-less connection:
    Users can create DSN-less data sources, by choosing the appropriate drivers and edit the connection string to provide with the required connection parameters to enable Kerberos connection against the database. Users should refer to the specified ODBC driver documentation for the connection parameters, as these values differ from one version to the next.


ka044000000kQ34AAE_0EM440000002MLa.png

 
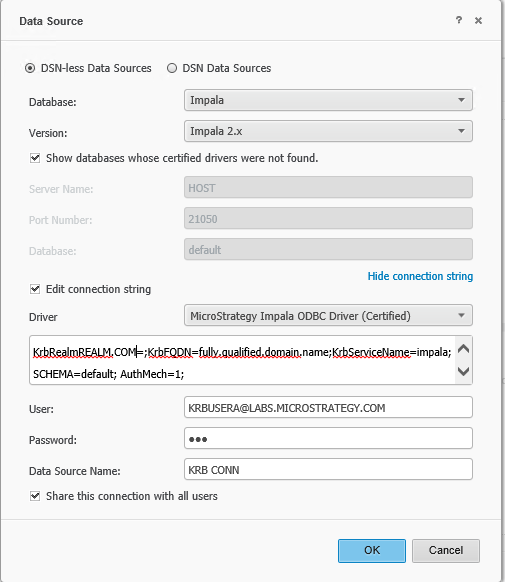
The connection string can be:
DRIVER={Strategy Impala ODBC Driver}; Host=HOST; Port=21050; KrbRealmREALM.COM=;KrbFQDN=fully.qualified.domain.name;KrbServiceName=impala;SCHEMA=default; AuthMech=1;


Comment

0 comments

Details

Knowledge Article

Published:

August 4, 2017

Last Updated:

December 31, 2018