EducationSoftwareStrategy.com
StrategyCommunity

Knowledge Base

Product

Community

Knowledge Base

TopicsBrowse ArticlesDeveloper Zone

Product

Download SoftwareProduct DocumentationSecurity Hub

Education

Tutorial VideosSolution GalleryEducation courses

Community

GuidelinesGrandmastersEvents
x_social-icon_white.svglinkedin_social-icon_white.svg
Strategy logoCommunity

© Strategy Inc. All Rights Reserved.

LegalTerms of UsePrivacy Policy
  1. Home
  2. Topics

KB205622: How to setup Windows Authentication with Microsoft IIS 7.x for MicroStrategy Web, Mobile or Office


Community Admin

• Strategy


Before using Windows Authentication in MicroStrategy Web, Mobile, or Office, the Administrator must link MicroStrategy users to a Windows user account. Refer to technical note KB6781 for steps on linking the MicroStrategy user to a Windows user account.

PREREQUISITE:
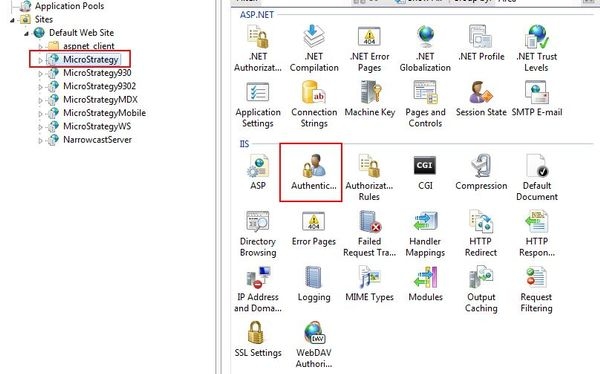
Before using Windows Authentication in Strategy Web, Mobile, or Office 9.x, the Administrator must link Strategy users to a Windows user account. Once the Strategy users are linked to a Windows user account, follow the steps below to setup Windows Authentication for a Strategy Web, Mobile, or Web Services 9.x server using Microsoft IIS 7.x.
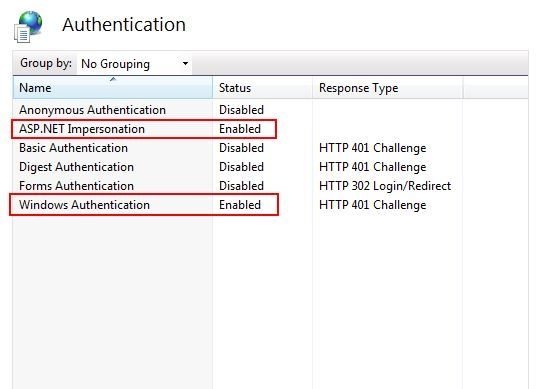
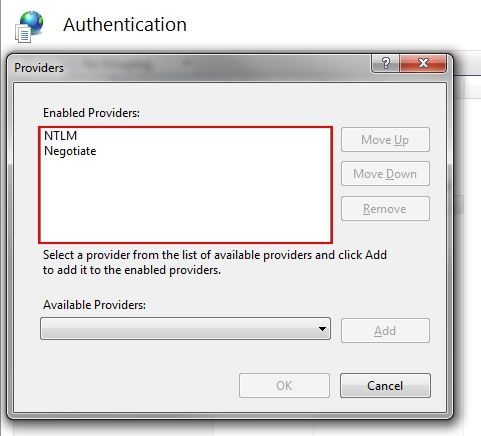
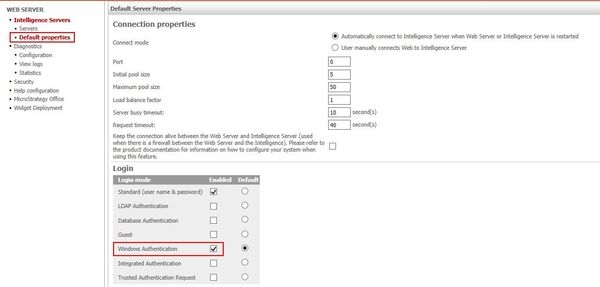
 
ACTION:

  • Open IIS on the Strategy Web, Mobile, or Web Services 9.x or 10.x server machine.
  • Navigate to Sites > Default Web Site > Strategy > Authentication, like shown below.
ka04W00000148Z0QAI_0EM4400000025vy.jpeg
  • Double-click Authentication.
  • Disable Anonymous authentication and Enable Windows Authentication and ASP.NET Impersonation, like shown below.
ka04W00000148Z0QAI_0EM4400000025vf.jpeg
  • Right-click Windows Authentication, and select Providers.
  • Move 'NTLM' to the top of the list, like shown below.
ka04W00000148Z0QAI_0EM4400000025vx.jpeg
  • Follow the steps in technical note KB44742 to set the proper permissions for Windows Authentication.
  • Repeat steps 2-7 for any other application in IIS, such as the StrategyMobile or StrategyWS applications
  • Restart IIS.

 
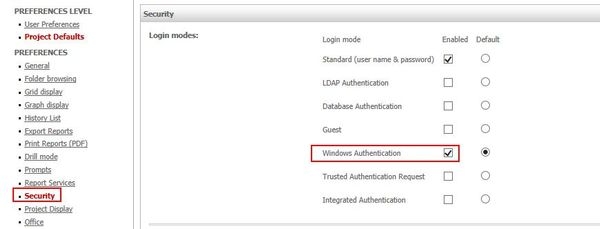
For Strategy Web 9.x and 10.x only:

  • Configure the browser to use Automatic Logon for Windows Authentication as per tech note KB42890 - step 8.
  • In the Strategy Web Administrator page, enable Windows Authentication by navigating to Default Properties > Login, like shown below.
ka04W00000148Z0QAI_0EM4400000025ve.jpeg
  • Set Windows Authentication at the Project level in the Web Preferences by navigating to Project Defaults > Security, like shown below.
ka04W00000148Z0QAI_0EM4400000025vv.jpeg
  • Note: To ensure all projects have Windows Authentication selected, check the option 'Override project login mode settings' in the Web Administrator page under Default Properties > Login, like shown below: 

 
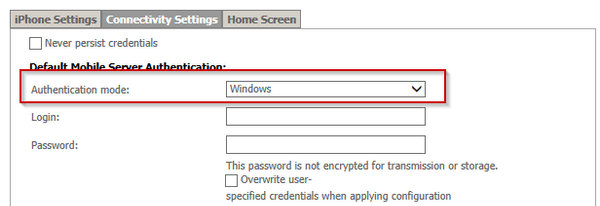
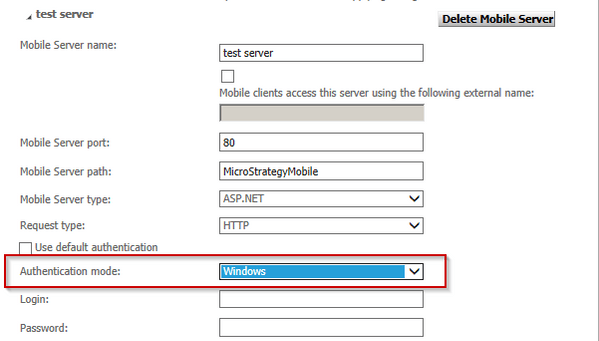
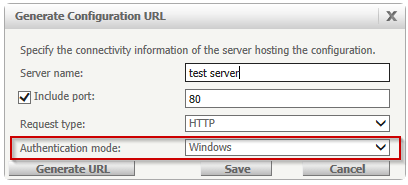
For Strategy Mobile 9.x and 10.x only:

  • In the Mobile Administrator page, open to the Mobile Configuration.
  • Set the 'Default Mobile Server Authentication' to Windows, like shown below.
ka04W00000148Z0QAI_0EM4400000025vw.jpeg
  • Set the 'Authentication Mode' under Mobile Server to Windows, like shown below.
ka04W00000148Z0QAI_0EM4400000025vz.jpeg
  • Save the mobile configuration.
  • Generate the URL, change the 'Authentication mode' to Windows, like shown below.
ka04W00000148Z0QAI_0EM4400000025w2.jpeg

 
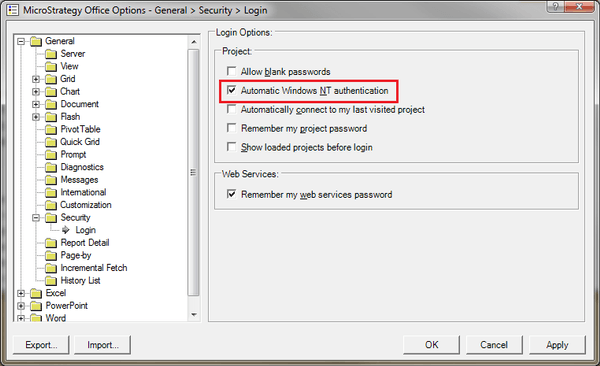
 For Strategy Office 9.x and 10.x only:

  • In the Strategy Web Services machine, locate the projectsources.xml file. This file is located by default under:

    C:\Program Files (x86)\Strategy\Web Services

    Note: Following best practices, save a backup of this file before modifying.
     
  • Find the <AuthMode> tag and replace its content with MWSNTCredential, like shown below:
    
    <ProjectSource>
       <ProjectSourceName>Strategy Tutorial</ProjectSourceName>
       <ServerName>localhost</ServerName>
       <AuthMode>MWSNTCredential</AuthMode>
       <PortNumber>0</PortNumber>
       <MaxPooledConnections>100</MaxPooledConnections>
    </ProjectSource>

  • Save the changes to the file.
  • In the Microsoft Office client machine, access the Strategy Office 9.x Configuration.
  • Navigate to General > Security > Login.
  • Enable Automatic Windows NT authentication, like shown below:
ka04W00000148Z0QAI_0EM4400000025vu.jpeg
  • Close and reopen the Microsoft Office client for the changes to take effect.

 
Third Party Software Installation Warning:
The third-party product(s) discussed in this technical note is manufactured by vendors independent of Strategy. Strategy makes no warranty, express, implied or otherwise, regarding this product, including its performance or reliability.
KB02014


Comment

0 comments

Details

Knowledge Article

Published:

March 29, 2017

Last Updated:

August 26, 2022