EducationSoftwareStrategy.com
StrategyCommunity

Knowledge Base

Product

Community

Knowledge Base

TopicsBrowse ArticlesDeveloper Zone

Product

Download SoftwareProduct DocumentationSecurity Hub

Education

Tutorial VideosSolution GalleryEducation courses

Community

GuidelinesGrandmastersEvents
x_social-icon_white.svglinkedin_social-icon_white.svg
Strategy logoCommunity

© Strategy Inc. All Rights Reserved.

LegalTerms of UsePrivacy Policy
  1. Home
  2. Topics

KB43595: How to setup connectivity to Cloudera Impala 1.0


Community Admin

• Strategy


Cloudera Impala 1.0 has been post-certified as a warehouse in MicroStrategy 9.3.1 for MicroStrategy Intelligence Servers running on Windows and Linux Operating Systems. Refer to the following MicroStrategy Community Article for further information:

Introduction
Cloudera Impala 1.0 has been post-certified as a warehouse in Strategy 9.3.1 for Strategy Intelligence Servers running on Windows and Linux Operating Systems. Refer to the following Strategy Community Article for further information:
 
KB43588: Post-Certification of Cloudera Impala 1.0 with Strategy 9.3.1
 
The section below provides steps to establish ODBC connectivity to Cloud Impala 1.0 from Windows and Linux Operating Systems.
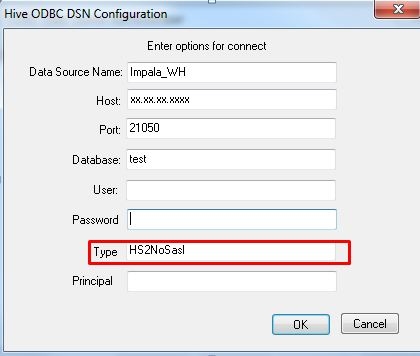
 
Windows

  • Install the certified ODBC driver (32-bit Cloudera ODBC Driver for Apache Hive, Version 2.0) to connect to Cloudera Impala 1.0.
  • From Windows ODBC Administrator (32-bit), choose to create a new system DSN and choose 'Cloudera Driver for Apache Hive'.
  • On the DSN configuration editor, provide the required server parameters to connect to Cloudera Impala.
  • For the 'Type' parameter, input the value as 'HS2NoSasl', as shown below.
     
ka04W00000148TMQAY_0EM440000002JDr.jpeg

 
Linux

  1. Install the certified ODBC driver (32-bit Cloudera ODBC Driver for Apache Hive, Version 2.0) to connect to Cloudera Impala 1.0
  2. Locate the odbc.ini file found in the home directory of the Strategy installation.
  3. Edit the odbc.ini and add the following content at the end of the file to create a newDSN for Impala. Sections marked with <> should be filled in by users based on their environment. 


    [Impala-WH]
    Driver=<full_path_to_driver_location>/cloudera/20v2/lib/libhiveodbc.so.1
    Description=Hive Driver
    DATABASE=<provide name of database>
    HOST=<provide name of the host server>
    PORT=<provide port number>
    FRAMED=0
    Trace=Yes
    TraceFile=<full_path_to_log_folder>/impala.log
    Type=HS2NoSasl


  4. Add the newly created DSN name entry to the ODBC Data Sources section as shown below:
     
    
    [ODBC Data Sources]
    Impala-WH=Hive Driver 

     
  5. Edit the ODBC.sh file found in the location <MSTR_HOME_PATH>/env and add the following section to the end of the file. Replace the <FULL_PATH_TO_LOCATION_OF_DRIVER> as per the location in which the driver is installed.
    Note: Even though the section below mentions 'ODBC Driver for Hive', the following section needs to be added for connecting to Cloudera Impala 1.0 also.
     
    
    # 
    # ODBC Driver for Hive
    #
    HIVE_CONFIG='<FULL_PATH_TO_LOCATION_OF_DRIVER>/cloudera/20v2’
    if [ "${HIVE_CONFIG}" != '<HIVE_CONFIG>' ]; then
    export HIVE_CONFIG
    mstr_append_path LD_LIBRARY_PATH "${HIVE_CONFIG:?}"/lib
    export LD_LIBRARY_PATH
    fi


Users can also connect to secured CDH clusters using MIT Kerberos. Refer to the following Strategy Knowledge Base document for further information on how to configure connectivity on a Linux operating system:
 
KB43150 : How to configure a connectivity to a secured CDH cluster with Strategy 9.x with the Cloudera ODBC Driver for the Intelligence Server on a Linux operating system
 
 
Creation of Database Instance 
 
Follow the steps in the following technote to install the new Impala database object:
KB43537 : How to install DBMS objects provided by Strategy Technical Support
 
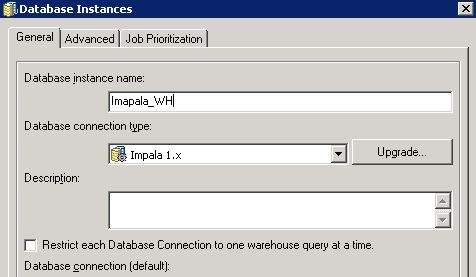
Create a new database instance by setting the database type to 'Impala 1.x' as shown below.
 

ka04W00000148TMQAY_0EM440000002JDm.jpeg

 
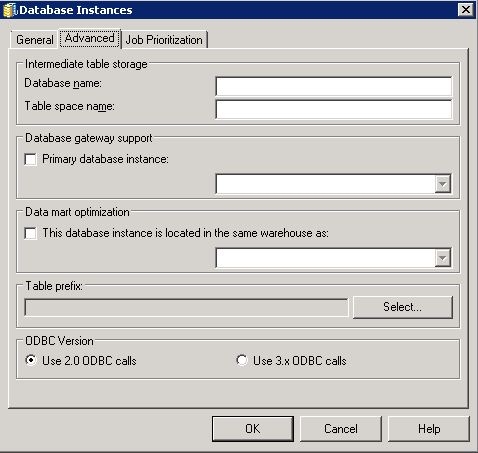
In the advanced tab of the database instance editor, make sure that the option 'Use 2.0 ODBC calls' is selected as shown below:

ka04W00000148TMQAY_0EM440000002JDl.jpeg

 
KB43595


Comment

0 comments

Details

Knowledge Article

Published:

June 2, 2017

Last Updated:

December 29, 2018