EducationSoftwareStrategy.com
StrategyCommunity

Knowledge Base

Product

Community

Knowledge Base

TopicsBrowse ArticlesDeveloper Zone

Product

Download SoftwareProduct DocumentationSecurity Hub

Education

Tutorial VideosSolution GalleryEducation courses

Community

GuidelinesGrandmastersEvents
x_social-icon_white.svglinkedin_social-icon_white.svg
Strategy logoCommunity

© Strategy Inc. All Rights Reserved.

LegalTerms of UsePrivacy Policy
  1. Home
  2. Topics

KB46929: In MicroStrategy Analytics Enterprise 9.4.1, how to establish connectivity to Hive using the Cloudera v2.5 ODBC driver


Community Admin

• Strategy


In MicroStrategy Analytics Enterprise 9.4.1, Cloudera v2.5 ODBC drivers are supported to establish connectivity to Cloudera CDH 4.x. Refer to the following Community Article for further information.

Introduction:
In Strategy Analytics Enterprise 9.4.1, Cloudera v2.5 ODBC drivers are supported to establish connectivity to Cloudera CDH 4.x. Refer to the following Community Article for further information:
 
KB46881: Certification of Cloudera v2.5 drivers to connect to Cloudera CDH 4.x in Strategy Analytics Enterprise 9.4.1
 
The section below provides steps to establish ODBC connectivity to Hive from Windows and Linux Operating Systems.
 
Windows 
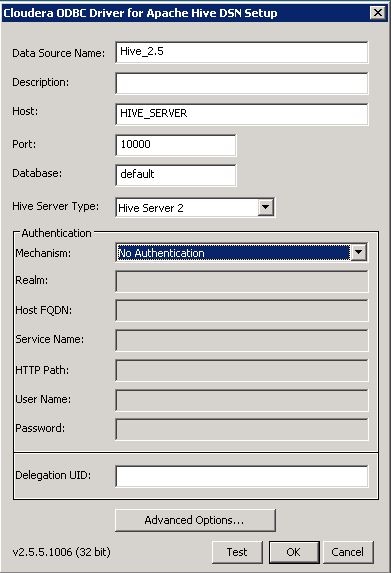
  • Install the certified ODBC driver (32-bit Cloudera ODBC Driver for Apache Hive, Version 2.5) to connect to Hive.
  • From Windows ODBC Administrator (32-bit), choose to create a new system DSN and choose 'Cloudera Driver for Apache Hive'.
  • On the DSN configuration editor, provide the required server parameters to connect to Hive, as shown below.
     
ka04W00000148B9QAI_0EM440000002JCI.jpeg
  •  
    For steps on configuring the DSN when using Kerberos authentication, refer to the following Strategy Knowledge Base document:
     
    KB46879 : How to configure connectivity to a secured CDH cluster with Strategy 9.4.x with the Cloudera v2.5 ODBC Driver for the Intelligence Server on a Windows operating system

 
Linux 

  1. Install the certified ODBC driver (32-bit Cloudera ODBC Driver for Apache Hive, Version 2.5) to connect to Hive.
  2. Locate the odbc.ini file found in the home directory of the Strategy installation.
  3. Edit the odbc.ini and add the following content at the end of the file to create a new DSN for Hive. Sections marked with <> (marked in bold) should be filled in by users based on their environment.   
     
    
    [Cloudera_Hive_2.5]
    Description=Cloudera ODBC Driver for Apache Hive
    Driver=<FULL_PATH_TO_DRIVER>/lib/32/libclouderahiveodbc32.so
    DriverUnicodeEncoding=2
    HOST=<HIVE_SERVER_IP_OR_NAME>
    PORT=<PORT_ON_WHICH_HIVE_SERVER_IS_RUNNING>
    Schema=wh2
    FastSQLPrepare=0
    UseNativeQuery=0
    HiveServerType=2
    AuthMech=0
    #KrbHostFQDN=
    #KrbRealm=
    #KrbServiceName=hive
    #KrbServiceName=
    #UID=hdfs 


    Note: For the 'AuthMech' parameter, the default parameter value is 0, which means no authentication. Refer to the Cloudera documentation found at: http://www.cloudera.com/content/support/en/documentation/cloudera-connectors-documentation/connector-documentation-latest.html  for information on options that can be set for the 'AuthMech' parameter.
    The parameters which have been commented out are required only when using Kerberos as the authentication mechanism or when using a standard user name.  
  4. In the odbc.ini file, add the following entry to the ODBC Data Sources header section as shown below
     
    
    [ODBC Data Sources] 
    Cloudera_Hive_2.5=Cloudera ODBC Driver for Apache Hive 


  5. Edit the odbcinst.ini found in the home folder of the Strategy installation and edit the entry for 'Cloudera ODBC Driver for Apache Hive'. The <FULL_PATH_TO_DRIVER> in the section below should be filled based on the on the install directory of the Cloudera driver.


    [Cloudera ODBC Driver for Apache Hive] 
    Driver=<FULL_PATH_TO_DRIVER>/lib/32/libclouderahiveodbc32.so
    Description=Cloudera ODBC Driver for Apache Hive
    Setup=<FULL_PATH_TO_DRIVER>/lib/32/libclouderahiveodbc32.so
    APILevel=2
    ConnectFunctions=YYY
    DriverODBCVer=1.0
    FileUsage=0
    SQLLevel=1


  6. In the odbc.sh file, edit the entry for 'ODBC Driver for Hive' and substitute the '<HIVE_CONFIG>' with full path. Additionally, we will need to create a new environment variable for the Cloudera Hive INI. An example entry is given below. Users would have to fill in the <FULL_PATH_TO_DRIVER> based on the install directory of the Cloudera driver.
     
    
    #
    # ODBC Driver for Hive
    #
    HIVE_CONFIG='<FULL_PATH_TO_DRIVER>/lib/32'
    CLOUDERAHIVEINI=<FULL_PATH_TO_DRIVER>/lib/32/cloudera.hiveodbc.ini
    if [ "${HIVE_CONFIG}" != '<HIVE_CONFIG>' ]; then
    export HIVE_CONFIG
    mstr_append_path LD_LIBRARY_PATH "${HIVE_CONFIG:?}"/
    export LD_LIBRARY_PATH
    fi
    
    if [ "${CLOUDERAHIVEINI}" != '<CLOUDERAHIVEINI>' ]; then
     export CLOUDERAHIVEINI
    
     if [ ! -f "${CLOUDERAHIVEINI:?}" ]; then
     echo "${0##*/}: WARNING: ${CLOUDERAHIVEINI:?} does not exist" >&2
     fi
    fi

  7. In the Cloudera.hiveodbc.ini file the DriverManagerEncoding will need to be switched from UTF-32 to UTF-8. The ODBCInstaLib will need to have it's default value changed from libiodbcinst.so to libodbcinst.so.


KB46929


Comment

0 comments

Details

Knowledge Article

Published:

June 2, 2017

Last Updated:

December 29, 2018