For Strategy 10.6 and later versions, please refer to KB263794.
Starting in Strategy Web 9.4.1 Hotfix 3, users can create Custom Shapes for ESRI maps in Visual Insight or Report Services Documents for cloud-based ESRI map.
Check 9.4.1 Hotfix 3 GIS Integration Help product manual below for more information:
http://www2.microstrategy.com/producthelp/9.4.1HF3/GISHelp/Lang_1033/GIS_Integration.htm#topics/ESRICloudIntegration/ESRI_CustomCloud_RenderCustomShapes.htm
The following steps assume ESRI is already configured in the user's environment. For steps on how to activate ESRI in Strategy Analytics Enterprise 9.4.1, refer to Technical Note KB45064 .
PREREQUISITES:
1. A KML file from a 3rd party tool such as Geocommons (http://geocommons.com/) or Google Earth (http://www.google.com/earth/)
1a. The file must contain a node that matches data in your metadata or a data import file exactly (typically, the <name> node)
1b. The file must contain polygon structures that have the coordinate data
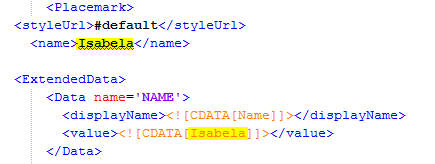
Note: Strategy does not support <ExtendedData> until Strategy Version 10. Users need to manually input the name information from the Extended Data portion into the node that matches the data in Strategy 9. For example:
Under the <value> node, the name of the Geo Attribute element needs to be placed in the <name> node to be read by Strategy.
2. An attribute that matches the data OR an imported file with the matching data, as mentioned above
3. Clear all Web related caches per Technical Note KB42534 .
STEPS:
1. Stop the Web Server
2. Place the .kml file into the following locations:
2a. Under the Web "plugins" folder (typically located underC:\Program Files (x86)\MicroStrategy\Web ASPx) , create a folder with the name "CustomShapes". Place a copy of the .kml file in this new folder.
2b. Place a second copy of the .kml file in the "swf" folder (typically located under C:\Program Files (x86)\MicroStrategy\Web ASPx)
Note: Make sure to set permissions for all to these files.
3. Locate the esriConfig.xml file under WEB INF/xml/config and click Edit
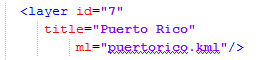
4. In the esriConfig.xml file, add the following entry under <layers>:
<layer id="7"
      title="Custom Shapes"
             ml="NAME_OF_THE_KML_FILE.kml"/>
5. In the esriConfig.xml file, add the following entry under <shapes>:
NOTE: the layerid matches with the "id" of the new custom layer created in step #4 above.
<shape id="7"
desc="Custom Shapes"
custom="true"
plugin="CustomShapes"
roleId="7"
type="Polygon"
descWeb="mstrweb.9229"
descFlash="mstr.1622"
descDesktop="26973"
qf="['NAME']"
ea="name"
layerId="7" />
Where plugin is the exact name of the folder created in step 2a. The roleId will always be 7 for custom shapes, it is independant of the layerId. The fields qf and ea correspond to the node in the KML file that has the descriptive information about each shape and that will be compared to Strategy data(This must be the same). Also note that the descriptive field is "name" and hence qf and ea are set as name (case sensitive).
6. If the Web Server is IIS, add the MIME type according to Technical Note KB47283 . This step is not necessary for other Web Servers.
7. Start the Web Server.
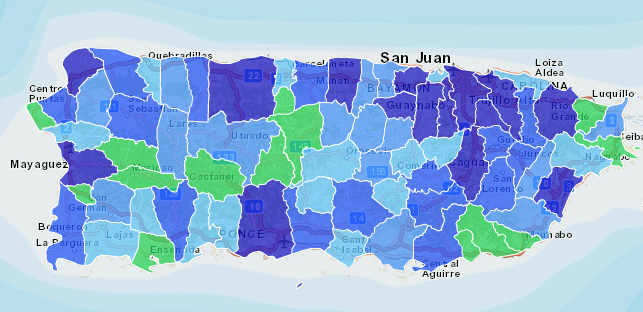
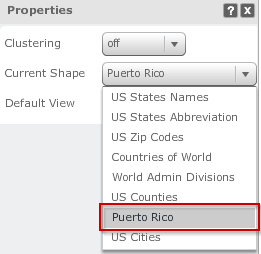
8. Create an ESRI map in Visual Insight or a document and check that the newly created shape file appears in the drop-down.
In Visual Insight, the drop-down displays under Show > Properties > Current Shape
In a Document, the drop-down displays under Widget Properties > Show Areas > Shape file
